CallteFoot's blog

Victory belongs to the most persevering


  • 首页

  • 归档

  • 分类

  • 标签

  • 关于

Flutter_install

发表于 2018-07-12 | 分类于 Flutter

文章目录:

  • 系统要求
  • 获取Flutter Sdk
    • 克隆仓库
    • 运行flutter doctor
    • 更新系统路径
  • 编译器设置
  • 平台设置
  • IOS设置
    • 安装Xcode
    • 设置IOS模拟器
    • 部署到IOS设备
  • Android设置
    • 安装Android Studio
    • 设置Android设备
    • 设置Android模拟器

系统要求

安装并运行 Flutter ,你的开发环境必须满足这些最低要求:

  • 操作系统:macOS (64-bit)。
  • 磁盘空间: 700 MB (不包括 Xcode 和 Android Studio 的磁盘空间)。
  • 工具:Flutter 依赖你环境中可用的这些命令行工具。
    • bash, mkdir,rm,git, curl,unzip,which

获取 Flutter SDK

获取 Flutter ,你可使用 git 去克隆 Flutter 的仓库然后添加 flutter 工具到你的路径,运行 flutter doctor 显示你可能要安装的依赖。

克隆仓库

如果你是第一次在你机器上安装 Flutter ,克隆 beta 分支的仓库然后添加 flutter 工具到你的路径:

1
2
$ git clone -b beta https://github.com/flutter/flutter.git
$ export PATH=`pwd`/flutter/bin:$PATH

上面的命令会在当前的终端窗口暂时设置 PATH 变量,要永久添加 Flutter 到你的路径,请参阅 更新你的路径。

要更新一个现有版本的 Flutter ,请参阅更新 Flutter 。

运行 flutter doctor

运行以下命令可以看到你是否需要安装任何依赖来完成安装:

1
$ flutter doctor

这个命令会检查你的环境并显示一份报告在终端窗口,Dart SDK 已和 Flutter 捆绑在一起,所以你不需要额外安装 Dart 。仔细检查输出信息是否需要安装其他软件或者执行其他任务(以 粗体 字显示)。

举个例子:

1
2
3
4
5
[-] Android toolchain - develop for Android devices
• Android SDK at /Users/obiwan/Library/Android/sdk
✗ Android SDK is missing command line tools; download from https://goo.gl/XxQghQ
• Try re-installing or updating your Android SDK,
visit https://flutter.io/setup/#android-setup for detailed instructions.

这是你第一次去运行 flutter 命令(比如 flutter doctor ),它会下载依赖库,并且自行编译。后续运行这条命令就会更加快了。

接下来的章节就是描述怎么执行这些任务和完成设置过程。你会看到 flutter doctor 输出了,假如你是用了 IDE ,就会显示 IntelliJ IDEA , Android Studio 和 VS Code 这些编译器的可用插件。请参阅编译器设置根据步骤去安装 Flutter 和 Dart 插件。

当你安装好了所有缺失的依赖库,运行 flutter doctor 命令去验证你的设置是否正确。

这个 flutter 工具使用了 Google Analytics 匿名分析 报告功能,使用情况信息和基本崩溃报告。这些数据用于帮助改进 Flutter 工具。并且这个分析报告是不会在第一次运行或者任何涉及到 flutter config 的设置运行时发送,因此你可以在任何分析之前退出分析。要禁用分析的话,输入 flutter config –no-analytics ,要显示当前配置的话输入 flutter config 。详情请参阅 Google 的隐私政策:www.google.com/intl/en/policies/privacy。

更新你的路径

你只能在命令行中更新你当前会话窗口的 PATH 变量,如克隆 Flutter 库所示。当永久更新这个变量,这样子你就可以在任意终端会话中运行 flutter 命令了。

对于计算机来说,永久给全部终端会话修改这个变量这些操作都是不同的。通常,你会打开新窗口时将命令输入。举个例子:

  1. 确定好放置 Flutter SDK 的目录,你会在步骤 3 用到它。
  2. 打开(或者创建) $HOME/.bash_profile 这个文件或者文件名可能不同于你计算机的。
  3. 添加下面命令行并将 [PATH_TO_FLUTTER_GIT_DIRECTORY] 改为你克隆 Flutter 仓库的路径:

    1
    $ export PATH=[PATH_TO_FLUTTER_GIT_DIRECTORY]/flutter/bin:$PATH
  4. 运行 source $HOME/.bash_profile 刷新当前窗口。

  5. 验证 flutter/bin 是否在你的路径上:
    1
    $ echo $PATH

更多的细节,可以参阅StackExchange 上的问题。

编译器设置

使用 flutter 命令行工具,你可以使用任何编辑器去开发 Flutter 应用。在命令提示符窗口输入 flutter help 可以显示可用的操作。

我推荐使用我们的插件来获取丰富的 IDE 体验 ,支持编辑,运行和调试 Flutter 应用。参阅编译器设置了解详细步骤。

平台设置

macOS 支持为 iOS 和 Android 开发 Flutter 应用程序。现在只要在两个系统平台中的一个完成设置,就可以构建运行你的第一个 Flutter 应用程序了。

iOS 设置

安装 Xcode

为 iOS 开发 Flutter 应用,你需要一台安装了 Xcode 7.2 或者更新版本的 Mac 。

  1. 安装 Xcode 7.2 或者更新版本(通过网页下载或者 App Store 安装)。
  2. 通过在在命令行运行 sudo xcode-select –switch /Applications/Xcode.app/Contents/Developer 来配置 Xcode 命令行工具来使用安装好的最新版本 Xcode 。

大多数情况下,这是安装最新版 Xcode 的正确的路径。如果你想使用不同的版本,请改为指定的路径。

3.确保 Xcode 许可协议是通过打开一次 Xcode 或者从命令行中运行 sudo xcodebuild -license 来签署的。
使用 Xcode ,你就可以在你的 iOS 设备或者在模拟器上运行 Flutter 应用。

设置 iOS 模拟器

准备在 iOS 模拟器上运行并测试你的 Flutter 应用,根据以下步骤:

在你的 Mac 上,可以通过 Spotlight 或者使用以下命令找到模拟器:

1
$ open -a Simulator

  1. 通过检查模拟器的 Hardware > Device 设置,确保你的模拟器运行 64 位的设备(iPhone 5s 或者更高版本)。
  2. 根据你开发设备的屏幕尺寸,模拟高屏幕密度的 iOS 设备可能会溢出你的屏幕,在模拟器的 Window > Scale 菜单设置设备的比例。
  3. 运行 flutter run 来启动你的应用

部署到 iOS 设备

部署你的 Flutter 应用程序到物理的 iOS 设备,你需要一些额外的工具和一个 Apple 账号。你还需要在 Xcode 中设置物理设备的部署。

  1. 安装 homebrew。
  2. 打开终端运行这些命令来安装部署 Flutter 应用程序到 iOS 设备的工具
    1
    2
    3
    4
    $ brew update
    $ brew install --HEAD libimobiledevice
    $ brew install ideviceinstaller ios-deploy cocoapods
    $ pod setup

如果这些命令中的任何一个命令失败出现错误,运行 brew doctor 并根据说明解决问题。

  1. 遵循 Xcode 的签名流程来配置你的项目:

    1. 打开默认的 Xcode 工作空间,找到你的 Flutter 项目目录并打开终端运行 open ios/Runner.xcworkspace 。
    2. 在 Xcode 左边的导航面板,选择 Runner 项目。
    3. 在 Runner 目标设置界面,确保在 General > Signing > Team 选择了你的开发团队,当你选择了开发团队,Xcode 创建和下载一个开发证书,向你的设备注册你的账户,并创建和下载配置文件(如果你需要的话)。

      • 要开始你的第一个 iOS 开发项目,你可能需要在 Xcode 上注册你的 Apple ID。
        Xcode account add
        任意的 Apple ID 都支持开发和测试。需要注册 Apple 开发者计划才能分发你的应用到 App Store 。请参阅 Apple 会员类型之间的差异。
      • 你第一次用物理设备开发 iOS 时,你需要同时信任该设备上的 Mac 和开发证书。 当你的 iOS 设备第一次连接到你的 Mac 时,在对话框提示中选择 Trust。
        Trust Mac
        然后,打开 iOS 设备上的设置,选择 常规 > 设备管理 然后信任你的证书。
        如果 Xcode 的自动签名失败,验证项目的 General > Identity > Bundle Identifier 是否唯一。
        Check the app’s Bundle ID
        运行flutter run 启动你的应用程序。

Android设置

安装 Android Studio

为 Android 开发 Flutter 应用,你可以使用 Mac ,Windows 或者是 Linux(64 位)机器。

Flutter 要求安装和配置 Android Studio:

  1. 下载并安装 Android Studio。

  2. 启动 Android Studio,并执行 Android Studio 安装向导。这将会安装 Flutter 为 Android 开发所需的最新的 Android SDK ,Android SDK 平台工具和 Android SDK 构建工具。

设置你的 Android 设备

为了在 Android 设备上运行和测试你的 Flutter 应用,你需要一台运行 Android 4.1( API 级别 16 )或者更高版本的 Android 设备。

  1. 在你的设备上启动 开发者选项 和 USB 调试,详情说明可在 Android 文档中找到。
  2. 使用 USB 线将设备插入电脑。如果在设备上出现提示,请授权你的电脑访问你的设备。
  3. 在终端运行 flutter devices 命令来验证 Flutter 识别到你连接的 Android 设备。
  4. 运行 flutter run 来启动的你的应用。
    通常情况下, Flutter 使用了 adb 工具所基于的 Android SDK 版本,如果你要安装使用不同的 Android SDK 版本,就必须设置 ANDROID_HOME 环境变量设置为安装目录。

设置 Android 模拟器

准备在 Android 模拟器上运行和测试你的 Flutter 应用,需要按照以下几个步骤来操作:

  1. 在你的电脑上启动 VM 加速。
    1. 启动 Android Studio > Tools > Android > AVD Manager 和选择 Create Virtual Device 。
    2. 选择一个设备的定义和选择 Next 。
    3. 为你的模拟器 Android 版本选择一个或者多个系统镜像,和选择 Next 。推荐使用 x86 or x86_64 镜像。
    4. 为了提高模拟器性能,选择 Hardware - GLES 2.0 来启动硬件加速。
    5. 验证 AVD 的配置是否正确,然后选择 Finish 。

有关上述步骤的详细信息,请查阅管理 AVDs 。

  1. 在 Android 虚拟设备管理器中,在工具栏点击 Run 。模拟器启动和显示所选操作系统版本和设备的默认界面。
  2. 通过 flutter run 来启动你的应用,连接设备的名称是 Android SDK built for ,这里的 platform 是指设备 soc 芯片系列,比如 x86 。
音视频点知识

发表于 2018-07-05 | 分类于 Android , Media

基础知识

基本概念

  • 视频是什么
        静止的画面叫图像(picture)。连续的图像变化每秒超过24帧(frame)画面以上时,根椐视觉暂留原理,人眼无法辨别每付单独的静态画面,看上去是平滑连续的视觉效果。这样的连续画面叫视频。当连续图像变化每秒低于24帧画面时,人眼有不连续的感觉叫动画(cartoon)。

  • 流媒体
        指采用流式传输的方式在Internet / Intranet播放的媒体格式.流媒体的数据流随时传送随 时播放,只是在开始时有些延迟边下载边播入的流式传输方式不仅使启动延时大幅度地缩短,而且对系统缓存容量的需求也大大降低,极大地减少用户用在等待的时间。

  • 分辨率
        分辨率是一个表示平面图像精细程度的概念,通常它是以横向和纵向点的数量来衡量的,表示成水平点数垂直点数的形式,在计算机显示领域我们也表示成“每英寸像素”(ppi).在一个固定的平面内,分辨率越高,意味着可使用的点数越多,图像越细致。

  • 码率
        数据传输时单位时间传送的数据位数,可以理解其为取样率,单位时间内取样率越大,精度就越高,处理出来的文件就越接近原始文件,但是文件体积与取样率是成正比的,如何用最低的码率达到最少的失真,一般我们用的单位是kbps即千位每秒。

  • 帧率
        帧/秒(frames per second)的缩写,也称为帧速率,测量用于保存、显示动态视频的信息数量。每一帧都是静止的图象,快速连续地显示帧便形成了运动的假象。每秒钟帧数 (fps) 愈多,所显示的动作就会愈流畅,可理解为1秒钟时间里刷新的图片的帧数,也可以理解为图形处理器每秒钟能够刷新几次,也就是指每秒钟能够播放(或者录制)多少格画面。

多媒体的格式分类

    封装格式(专业上讲叫容器,通俗的叫文件格式),视频编解码,音频编解码。

  • 常见的封装格式
    • MPEG : 编码采用的容器,具有流的特性。里面又分为 PS,TS 等,PS 主要用于 DVD 存储,TS 主要用于 HDTV.
    • MPEG Audio Layer 3 :大名鼎鼎的 MP3,已经成为网络音频的主流格式,能在 128kbps 的码率接近 CD 音质
    • MPEG-4(Mp4) : 编码采用的容器,基于 QuickTime MOV 开发,具有许多先进特性;实际上是对Apple公司开发的MOV格式(也称Quicktime格式)的一种改进.
    • MKV: 它能把 Windows Media Video,RealVideo,MPEG-4 等视频音频融为一个文件,而且支持多音轨,支持章节字幕等;开源的容器格式
    • 3GP : 3GPP视频采用的格式, 主要用于流媒体传送;3GP其实是MP4格式的一种简化版本,是手机视频格式的绝对主流.
    • MOV : QuickTime 的容器,恐怕也是现今最强大的容器,甚至支持虚拟现实技术,Java等,它的变种 MP4,3GP都没有这么厉害;广泛应用于Mac OS操作系统,在Windows操作系统上也可兼容,但是远比不上AVI格式流行
    • AVI : 最常见的音频视频容器,音频视频交错(Audio Video Interleaved)允许视频和音频交错在一起同步播放.
    • WAV : 一种音频容器,大家常说的 WAV 就是没有压缩的 PCM 编码,其实 WAV 里面还可以包括 MP3 等其他 ACM 压缩编码等等

流媒体协议(RTP RTCP RTSP RTMP HLS)

  • RTP RTCP RTSP
    • RTP :(Real-time Transport Protocol)是用于Internet上针对多媒体数据流的一种传输层协议.RTP协议和RTP控制协议RTCP一起使用,而且它是建立在UDP协议上的
    • RTCP:Real-time Transport Control Protocol或RTP Control Protocol或简写RTCP)实时传输控制协议,是实时传输协议(RTP)的一个姐妹协议,RTP协议和RTP控制协议RTCP一起使用,而且它是建立在UDP协议上的
    • RTSP:(Real Time Streaming Protocol)是用来控制声音或影像的多媒体串流协议,RTSP提供了一个可扩展框架,使实时数据,如音频与视频的受控、点播成为可能。数据源包括现场数据与存储在剪辑中的数据。该协议目的在于控制多个数据发送连接,为选择发送通道,如UDP、多播UDP与TCP提供途径,并为选择基于RTP上发送机制提供方法传输时所用的网络通讯协定并不在其定义的范围内,服务器端可以自行选择使用TCP或UDP来传送串流内容,比较能容忍网络延迟

RTP不像http和ftp可完整的下载整个影视文件,它是以固定的数据率在网络上发送数据,客户端也是按照这种速度观看影视文件,当影视画面播放过后,就不可以再重复播放,除非重新向服务器端要求数据。
RTSP与RTP最大的区别在于:RTSP是一种双向实时数据传输协议,它允许客户端向服务器端发送请求,如回放、快进、倒退等操作。当然,RTSP可基于RTP来传送数据,还可以选择TCP、UDP、组播UDP等通道来发送数据,具有很好的扩展性。它时一种类似与http协议的网络应用层协议

  • RTMP
    RTMP(Real Time Messaging Protocol)实时消息传送协议是Adobe Systems公司为Flash播放器和服务器之间音频、视频和数据传输 开发的开放协议。

  • HLS
    HTTP Live Streaming(HLS)是苹果公司(Apple Inc.)实现的基于HTTP的流媒体传输协议,可实现流媒体的直播和点播,主要应用在iOS系统,为iOS设备(如iPhone、iPad)提供音视频直播和点播方案。HLS点播,基本上就是常见的分段HTTP点播,不同在于,它的分段非常小。相对于常见的流媒体直播协议,例如RTMP协议、RTSP协议、MMS协议等,HLS直播最大的不同在于,直播客户端获取到的,并不是一个完整的数据流。HLS协议在服务器端将直播数据流存储为连续的、很短时长的媒体文件(MPEG-TS格式),而客户端则不断的下载并播放这些小文件,因为服务器端总是会将最新的直播数据生成新的小文件,这样客户端只要不停的按顺序播放从服务器获取到的文件,就实现了直播。由此可见,基本上可以认为,HLS是以点播的技术方式来实现直播。由于数据通过HTTP协议传输,所以完全不用考虑防火墙或者代理的问题,而且分段文件的时长很短,客户端可以很快的选择和切换码率,以适应不同带宽条件下的播放。不过HLS的这种技术特点,决定了它的延迟一般总是会高于普通的流媒体直播协议。

参考文献:
[1]. 基础知识 https://www.jianshu.com/p/8436c7353296
[2]. android视频播放实现 https://blog.csdn.net/u011403718/article/details/53813713
[3]. android种MediaCodeC编码 https://blog.csdn.net/mirkerson/article/details/38520175

MediaExtractor译文

发表于 2018-07-05 | 分类于 Android , Media

MediaExtractor

官网描述是:MediaExtractor facilitates extraction of demuxed, typically encoded, media data from a data source. added in API level 16。 public final class MediaExtractor
extends Object.
译文:MediaExtractor便于从数据源中提取复用的,典型编码的媒体数据。 在api 16时候加入到sdk的。
其一般的用法如下:

1
2
3
4
5
6
7
8
9
10
11
12
13
14
15
16
17
18
19
20
MediaExtractor extractor = new MediaExtractor();
extractor.setDataSource(...);
int numTracks = extractor.getTrackCount();
for (int i = 0; i < numTracks; ++i) {
MediaFormat format = extractor.getTrackFormat(i);
String mime = format.getString(MediaFormat.KEY_MIME);
if (weAreInterestedInThisTrack) {
extractor.selectTrack(i);
}
}
ByteBuffer inputBuffer = ByteBuffer.allocate(...)
while (extractor.readSampleData(inputBuffer, ...) >= 0) {
int trackIndex = extractor.getSampleTrackIndex();
long presentationTimeUs = extractor.getSampleTime();
...
extractor.advance();
}

extractor.release();
extractor = null;

在使用该类的时候可能需要使用到Manifest.permission.INTERNET权限,当数据源为网络数据时。

概要

  1. 嵌套子类
类名 描述
MediaExtractor.CasInfo Describes the conditional access system used to scramble a track. (描述用于对轨道进行加扰的条件访问系统。)
MediaExtractor.MetricsConstants 度量标准常量
  1. 常量
常量名 值类型 描述 值
SAMPLE_FLAG_ENCRYPTED int The sample is (at least partially) encrypted(采样加密), see also the documentation for MediaCodec.queueSecureInputBuffer(int, int, MediaCodec.CryptoInfo, long, int) 2 (0x00000002)
SAMPLE_FLAG_PARTIAL_FRAME int This indicates that the buffer only contains part of a frame, and the decoder should batch the data until a buffer without this flag appears before decoding the frame.(这表明缓冲区只包含帧的一部分,并且解码器应该对数据进行批处理,直到没有该标志的缓冲区在解码帧之前出现。) 4 (0x00000004)
SAMPLE_FLAG_SYNC int The sample is a sync sample (or in MediaCodec’s terminology it is a key frame.)(该示例是同步样本(或者在MediaCodec的术语中,它是一个关键帧)。) 1 (0x00000001)
SEEK_TO_CLOSEST_SYNC int If possible, seek to the sync sample closest to the specified time(如果可能的话,寻找最接近指定时间的同步采样) 2 (0x00000002)
SEEK_TO_NEXT_SYNC int If possible, seek to a sync sample at or after the specified time(如果可能的话,在指定的时间或之 后 寻找同步样本。) 1 (0x00000001)
SEEK_TO_PREVIOUS_SYNC int If possible, seek to a sync sample at or before the specified time(如果可能的话,在指定的时间或之 前 寻找同步样本。) 0 (0x00000000)
  1. 公共构造器
    MediaExtractor()

  2. 公共方法

方法名 返回类型 描述
advance() boolean Advance to the next sample.(前进到下一个采样)
getAudioPresentations(int trackIndex) List Get the list of available audio presentations for the track.(获取该曲目的可用音频演示列表。)
getCachedDuration() long Returns an estimate of how much data is presently cached in memory expressed in microseconds.(返回目前在内存中缓存的数据量,以微秒为单位表示。)
getCasInfo(int index) MediaExtractor.CasInfo Retrieves the information about the conditional access system used to scramble a track.(检索有关用于加密曲目的条件访问系统的信息。)
getDrmInitData() DrmInitData Extract DRM initialization data if it exists(提取DRM初始化数据(如果存在))
getMetrics() PersistableBundle Return Metrics data about the current media container.(返回有关当前媒体容器的度量标准数据。)
getPsshInfo() Map Get the PSSH info if present.(获取PSSH信息,如果存在。)
getSampleCryptoInfo(MediaCodec.CryptoInfo info) boolean If the sample flags indicate that the current sample is at least partially encrypted, this call returns relevant information about the structure of the sample data required for decryption.(如果样本标志指示当前样本至少部分加密,则此调用返回有关解密所需的样本数据结构的相关信息。)
getSampleFlags() int Returns the current sample’s flags.(返回当前采样的标志。)
getSampleSize() long Returns the current sample’s presentation size
getSampleTime() long Returns the current sample’s presentation time in microseconds.(以微秒为单位返回当前样本的呈现时间。)
getSampleTrackIndex() int Returns the track index the current sample originates from (or -1 if no more samples are available)(返回当前样本来源的轨道索引(如果没有更多样本可用,则返回-1))
getTrackCount() int Count the number of tracks found in the data source.(计算数据源中找到的曲目数量。)
getTrackFormat(int index) MediaFormat Get the track format at the specified index.(获取指定索引处的曲目格式。)
hasCacheReachedEndOfStream() boolean Returns true iff we are caching data and the cache has reached the end of the data stream (for now, a future seek may of course restart the fetching of data).(如果我们正在缓存数据并且缓存已到达数据流的末尾(现在,未来的查找当然可能会重新开始提取数据),则返回true。)
readSampleData(ByteBuffer byteBuf, int offset) int Retrieve the current encoded sample and store it in the byte buffer starting at the given offset.(检索当前编码样本并将其存储在从给定偏移量开始的字节缓冲区中。)
release() void Make sure you call this when you’re done to free up any resources instead of relying on the garbage collector to do this for you at some point in the future.(确保你在完成任务时释放任何资源,而不是依赖垃圾回收器在将来的某个时刻为你做这件事。)
seekTo(long timeUs, int mode) void All selected tracks seek near the requested time according to the specified mode.(根据指定的模式,所有选定的曲目都会在请求的时间附近寻找。)
selectTrack(int index) void Subsequent calls to readSampleData(ByteBuffer, int), getSampleTrackIndex() and getSampleTime() only retrieve information for the subset of tracks selected.(随后对readSampleData(ByteBuffer,int),getSampleTrackIndex()和getSampleTime()的调用仅检索所选轨道子集的信息。)
setDataSource(AssetFileDescriptor afd) void Sets the data source (AssetFileDescriptor) to use.(设置要使用的数据源(AssetFileDescriptor))
setDataSource(Context context, Uri uri, Map headers) void Sets the data source as a content Uri.(将数据源设置为内容Uri。)
setDataSource(FileDescriptor fd) void Sets the data source (FileDescriptor) to use.((设置要使用的数据源(FileDescriptor)))
setDataSource(MediaDataSource dataSource) void Sets the data source (MediaDataSource dataSource) to use.(设置要使用的数据源(MediaDataSource))
setDataSource(FileDescriptor fd, long offset, long length) void Sets the data source (FileDescriptor) to use.(设置要使用的数据源(MediaDataSource))
setDataSource(String path) void Sets the data source (file-path or http URL) to use.(设置要使用的数据源(文件路径或http URL))
setDataSource(String path, Map headers) void Sets the data source (file-path or http URL) to use.(设置要使用的数据源(文件路径或http URL))
setMediaCas(MediaCas mediaCas) void Sets the MediaCas instance to use.(设置要使用的MediaCas实例。)
unselectTrack(int index) void Subsequent calls to readSampleData(ByteBuffer, int), getSampleTrackIndex() and getSampleTime() only retrieve information for the subset of tracks selected.(随后对readSampleData(ByteBuffer,int),getSampleTrackIndex()和getSampleTime()的调用仅检索所选轨道子集的信息。)

MediaCodec译文

发表于 2018-07-05 | 分类于 Android , Media

MediaCodec

官方描述:MediaCodec class can be used to access low-level media codecs, i.e. encoder/decoder components. It is part of the Android low-level multimedia support infrastructure (normally used together with MediaExtractor, MediaSync, MediaMuxer, MediaCrypto, MediaDrm, Image, Surface, and AudioTrack.)
译文:MediaCodec类可用于访问底层媒体编解码器,例如,编码器/解码器组件。 它是Android低级多媒体支持基础架构的一部分(通常与MediaExtractor,MediaSync,MediaMuxer,MediaCrypto,MediaDrm,Image,Surface和AudioTrack一起使用。)

MediaCodeC中缓存的处理

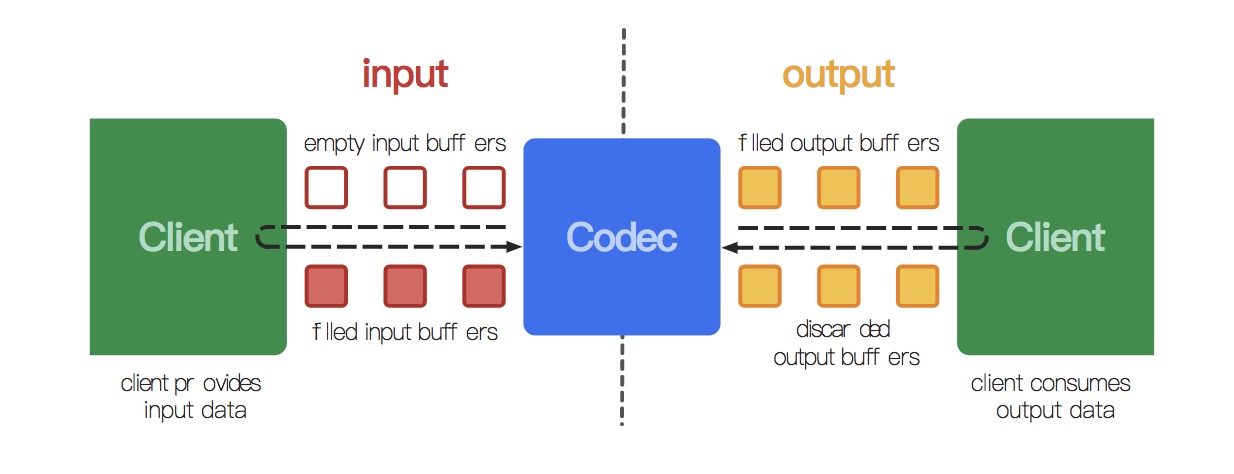
从广义上讲,编解码器就是处理输入数据来产生输出数据。MediaCode采用异步方式处理数据,并且使用了一组输入输出缓存(input and output buffers)。简单来讲,你请求或接收到一个空的输入缓存(input buffer),向其中填充满数据并将它传递给编解码器处理。编解码器处理完这些数据并将处理结果输出至一个空的输出缓存(output buffer)中。最终,你请求或接收到一个填充了结果数据的输出缓存(output buffer),使用完其中的数据,并将其释放给编解码器再次使用。

  1. 数据类型(Data Types)

  编解码器可以处理三种类型的数据:压缩数据(即为经过H254. H265. 等编码的视频数据或AAC等编码的音频数据)、原始音频数据、原始视频数据。三种类型的数据均可以利用ByteBuffers进行处理,但是对于原始视频数据应提供一个Surface以提高编解码器的性能。Surface直接使用本地视频数据缓存(native video buffers),而没有映射或复制数据到ByteBuffers,因此,这种方式会更加高效。在使用Surface的时候,通常不能直接访问原始视频数据,但是可以使用ImageReader类来访问非安全的解码(原始)视频帧。这仍然比使用ByteBuffers更加高效,因为一些本地缓存(native buffer)可以被映射到 direct ByteBuffers。当使用ByteBuffer模式,你可以利用Image类和getInput/OutputImage(int)方法来访问到原始视频数据帧。

  1. 压缩缓存(Compressed Buffers)

  输入缓存(对于解码器)和输出缓存(对编码器)中包含由多媒体格式类型决定的压缩数据。对于视频类型是单个压缩的视频帧。对于音频数据通常是单个可访问单元(一个编码的音频片段,通常包含几毫秒的遵循特定格式类型的音频数据),但这种要求也不是十分严格,一个缓存内可能包含多个可访问的音频单元。在这两种情况下,缓存不会在任意的字节边界上开始或结束,而是在帧或可访问单元的边界上开始或结束。

  1. 原始音频缓存(Raw Audio Buffers)

  原始的音频数据缓存包含完整的PCM(脉冲编码调制)音频数据帧,这是每一个通道按照通道顺序的一个样本。每一个样本是一个按照本机字节顺序的16位带符号整数(16-bit signed integer in native byte order)。

1
2
3
4
5
6
7
8
9
10
11
12
13
14
short[] getSamplesForChannel(MediaCodec codec, int bufferId, int channelIx) {
  ByteBuffer outputBuffer = codec.getOutputBuffer(bufferId);
  MediaFormat format = codec.getOutputFormat(bufferId);
  ShortBuffer samples = outputBuffer.order(ByteOrder.nativeOrder()).asShortBuffer();
  int numChannels = formet.getInteger(MediaFormat.KEY_CHANNEL_COUNT);
  if (channelIx < 0 || channelIx >= numChannels) {
    return null;
  }
  short[] res = new short[samples.remaining() / numChannels];
  for (int i = 0; i < res.length; ++i) {
    res[i] = samples.get(i * numChannels + channelIx);
  }
  return res;
}

  1. 原始视频缓存(Raw Video Buffers)

  在ByteBuffer模式下,视频缓存(video buffers)根据它们的颜色格式(color format)进行展现。你可以通过调用getCodecInfo().getCapabilitiesForType(…).colorFormats方法获得编解码器支持的颜色格式数组。视频编解码器可以支持三种类型的颜色格式:

  • 本地原始视频格式(native raw video format):这种格式通过COLOR_FormatSurface标记,并可以与输入或输出Surface一起使用。
  • 灵活的YUV缓存(flexible YUV buffers)(例如:COLOR_FormatYUV420Flexible):利用一个输入或输出Surface,或在在ByteBuffer模式下,可以通过调用getInput/OutputImage(int)方法使用这些格式。
  • 其他,特定的格式(other, specific formats):通常只在ByteBuffer模式下被支持。有些颜色格式是特定供应商指定的。其他的一些被定义在 MediaCodecInfo.CodecCapabilities中。这些颜色格式同 flexible format相似,你仍然可以使用 getInput/OutputImage(int)方法。
      从Android 5.1(LOLLIPOP_MR1)开始,所有的视频编解码器都支持灵活的YUV4:2:0缓存(flexible YUV 4:2:0 buffers)。
  1. 状态(States)

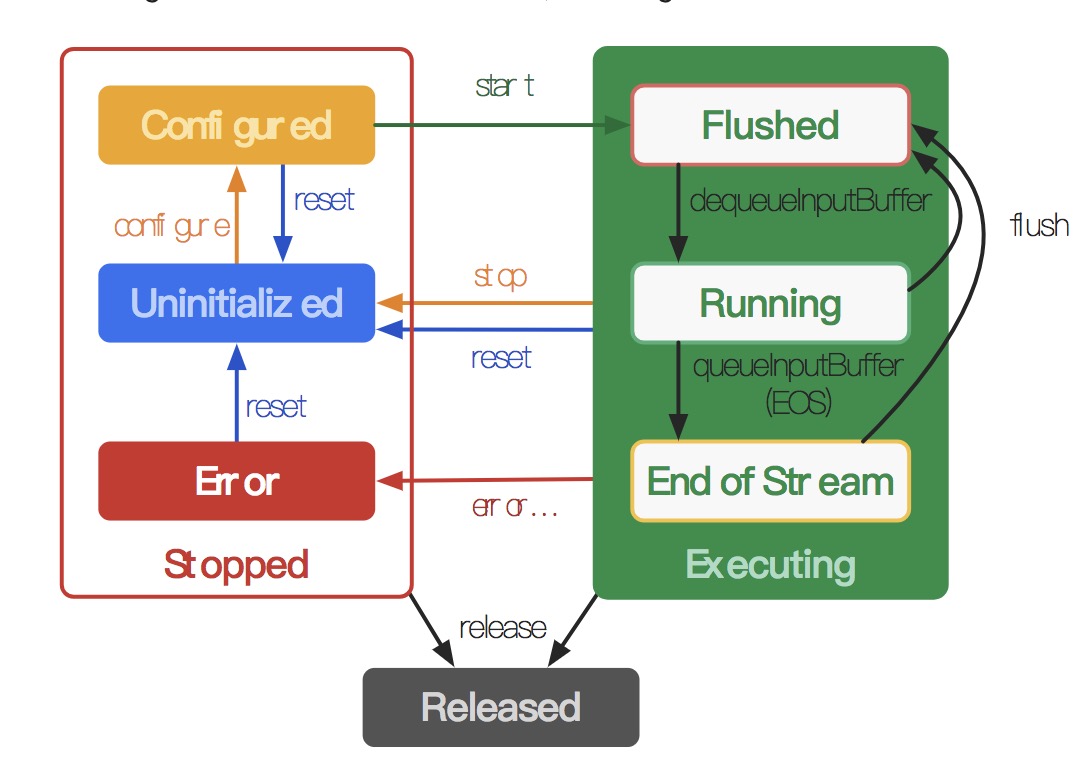
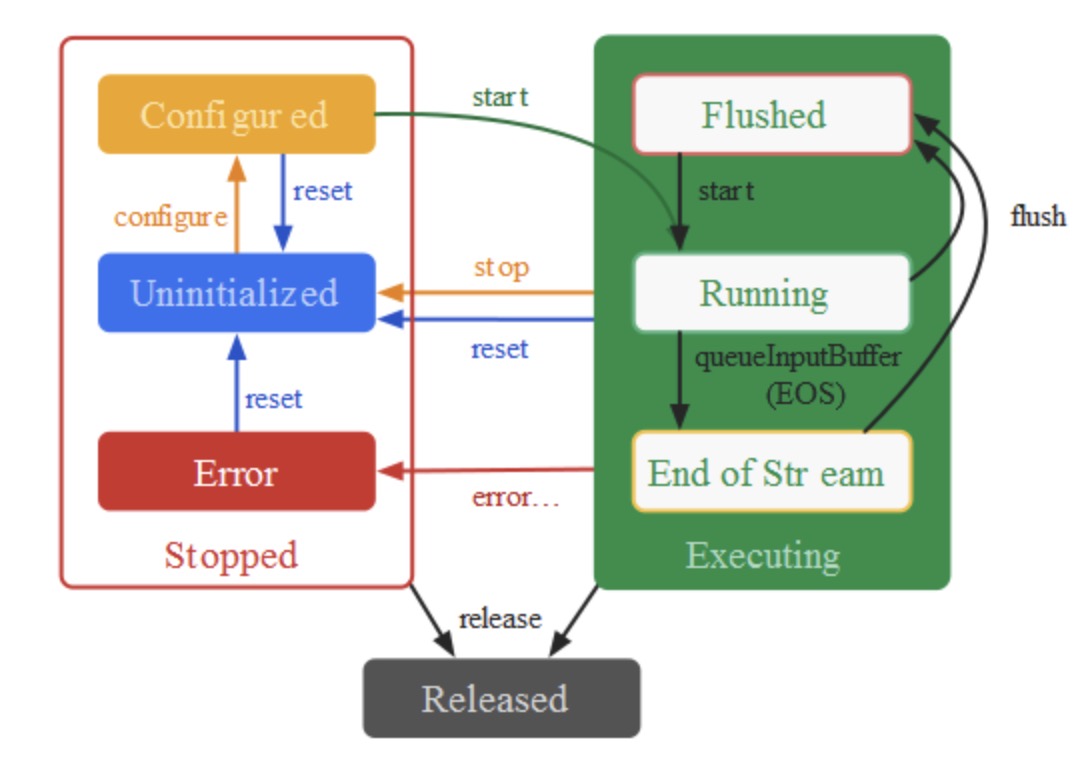
在编解码器的生命周期内有三种理论状态:停止态-Stopped、执行态-Executing、释放态-Released,停止状态(Stopped)包括了三种子状态:未初始化(Uninitialized)、配置(Configured)、错误(Error)。执行状态(Executing)在概念上会经历三种子状态:刷新(Flushed)、运行(Running)、流结束(End-of-Stream)。
编码器的三种理论状态

  • 当你使用任意一种工厂方法(factory methods)创建了一个编解码器,此时编解码器处于未初始化状态(Uninitialized)。首先,你需要使用configure(…)方法对编解码器进行配置,这将使编解码器转为配置状态(Configured)。然后调用start()方法使其转入执行状态(Executing)。在这种状态下你可以通过上述的缓存队列操作处理数据。
  • 执行状态(Executing)包含三个子状态: 刷新(Flushed)、运行( Running) 以及流结束(End-of-Stream)。在调用start()方法后编解码器立即进入刷新子状态(Flushed),此时编解码器会拥有所有的缓存。一旦第一个输入缓存(input buffer)被移出队列,编解码器就转入运行子状态(Running),编解码器的大部分生命周期会在此状态下度过。当你将一个带有end-of-stream 标记的输入缓存入队列时,编解码器将转入流结束子状态(End-of-Stream)。在这种状态下,编解码器不再接收新的输入缓存,但它仍然产生输出缓存(output buffers)直到end-of- stream标记到达输出端。你可以在执行状态(Executing)下的任何时候通过调用flush()方法使编解码器重新返回到刷新子状态(Flushed)。
  • 通过调用stop()方法使编解码器返回到未初始化状态(Uninitialized),此时这个编解码器可以再次重新配置 。当你使用完编解码器后,你必须调用release()方法释放其资源。
  • 在极少情况下编解码器会遇到错误并进入错误状态(Error)。这个错误可能是在队列操作时返回一个错误的值或者有时候产生了一个异常导致的。通过调用 reset()方法使编解码器再次可用。你可以在任何状态调用reset()方法使编解码器返回到未初始化状态(Uninitialized)。否则,调用 release()方法进入最终的Released状态。
  1. 创建(Creation)

  根据指定的MediaFormat使用MediaCodecList创建一个MediaCodec实例。在解码文件或数据流时,你可以通过调用MediaExtractor.getTrackFormat方法获得所期望的格式(media format)。并调用MediaFormat.setFeatureEnabled方法注入任何你想要添加的特定属性,然后调用MediaCodecList.findDecoderForFormat方法获得可以处理指定的媒体格式的编解码器的名字。最后,通过调用createByCodecName(String)方法创建一个编解码器。
  注意:在Android 5.0 (LOLLIPOP)上,传递给MediaCodecList.findDecoder/EncoderForFormat的格式不能包含帧率-frame rate。通过调用format.setString(MediaFormat.KEY_FRAME_RATE, null)方法清除任何存在于当前格式中的帧率。
  你也可以根据MIME类型利用createDecoder/EncoderByType(String)方法创建一个你期望的编解码器。然而,这种方式不能够给编解码器加入指定特性,而且创建的编解码器有可能不能处理你所期望的媒体格式。

  1. 创建安全的解码器(Creating secure decoders
    )

     在Android 4.4(KITKAT_WATCH)及之前版本,安全的编解码器(secure codecs)没有被列在MediaCodecList中,但是仍然可以在系统中使用。安全编解码器只能够通过名字进行实例化,其名字是在常规编解码器的名字后附加.secure标识(所有安全编解码器的名字都必须以.secure结尾),调用createByCodecName(String)方法创建安全编解码器时,如果系统中不存在指定名字的编解码器就会抛出IOException异常。
    从Android 5.0(LOLLIPOP)及之后版本,你可以在媒体格式中使用FEATURE_SecurePlayback属性来创建一个安全编解码器。

  1. 初始化(Initialization)

  在创建了编解码器后,如果你想异步地处理数据,可以通过调用setCallback方法设置一个回调方法。然后,使用指定的媒体格式配置编解码器。这时你可以为视频原始数据产生者(例如视频解码器)指定输出Surface。此时你也可以为secure 编解码器设置解密参数(详见MediaCrypto) 。最后,因为编解码器可以工作于多种模式,你必须指定是该编码器是作为一个解码器(decoder)还是编码器(encoder)运行。

  从API LOLLIPOP起,你可以在Configured 状态下查询输入和输出格式的结果。在开始编解码前你可以通过这个结果来验证配置的结果,例如,颜色格式。

    如果你想将原始视频数据(raw video data)送视频消费者处理(将原始视频数据作为输入的编解码器,例如视频编码器),你可以在配置好视频消费者编解码器(encoder)后调用createInputSurface方法创建一个目的surface来存放输入数据,如此,调用视频生产者(decoder)的setInputSurface(Surface)方法将前面创建的目的Surface配置给视频生产者作为输出缓存位置。

  1. Codec-specific数据

    有些格式,特别是ACC音频和MPEG4、H.264和H.265视频格式要求实际数据以若干个包含配置数据或编解码器指定数据的缓存为前缀。当处理这种压缩格式的数据时,这些数据必须在调用start()方法后且在处理任何帧数据之前提交给编解码器。这些数据必须在调用queueInputBuffer方法时使用BUFFER_FLAG_CODEC_CONFIG进行标记。

    Codec-specific数据也可以被包含在传递给configure方法的格式信息(MediaFormat)中,在ByteBuffer条目中以”csd-0”, “csd-1”等key标记。这些keys一直包含在通过MediaExtractor获得的Audio Track or Video Track的MediaFormat中。一旦调用start()方法,MediaFormat中的Codec-specific数据会自动提交给编解码器;你不能显示的提交这些数据。如果MediaFormat中不包含编解码器指定的数据,你可以根据格式要求,按照正确的顺序使用指定数目的缓存来提交codec-specific数据。在H264 AVC编码格式下,你也可以连接所有的codec-specific数据并作为一个单独的codec-config buffer提交。

Android 使用下列的codec-specific data buffers。对于适当的MediaMuxer轨道配置,这些也要在轨道格式中进行设置。每一个参数集以及被标记为(*)的codec-specific-data段必须以”\x00\x00\x00\x01”字符开头。

Format CSD buffer #0 CSD buffer #1 CSD buffer #2
AAC Decoder-specific information from ESDS* Not Used Not Used
VORBIS Identification header Setup header Not Used
OPUS Identification header Pre-skip in nanosecs(unsigned 64-bit native-order integer.) This overrides the pre-skip value in the identification header. Seek Pre-roll in nanosecs(unsigned 64-bit native-order integer.)
FLAC mandatory metadata block (called the STREAMINFO block),optionally followed by any number of other metadata blocks Not Used Not Used
MPEG-4 Decoder-specific information from ESDS* Not Used Not Used
H.264 AVC SPS (Sequence Parameter Sets*) PPS (Picture Parameter Sets*) Not Used
H.265 HEVC VPS (Video Parameter Sets) + SPS (Sequence Parameter Sets) + PPS (Picture Parameter Sets*) Not Used Not Used
VP9 VP9 CodecPrivate Data (optional) Not Used Not Used

注意:当编解码器被立即刷新或start之后不久刷新,并且在任何输出buffer或输出格式变化被返回前需要特别地小心,因为编解码器的codec specific data可能会在flush过程中丢失。为保证编解码器的正常运行,你必须在刷新后使用标记为BUFFER_FLAG_CODEC_CONFIGbuffers的buffers再次提交这些数据。

   编码器(或者产生压缩数据的编解码器)将会在有效的输出缓存之前产生和返回编解码器指定的数据,这些数据会以codec-config flag进行标记。包含codec-specific-data的Buffers没有有意义的时间戳。

数据处理(Data Processing)
  每一个编解码器都包含一组输入和输出缓存(input and output buffers),这些缓存在API调用中通过buffer-id进行引用。当成功调用start()方法后客户端将不会“拥有”输入或输出buffers。在同步模式下,通过调用dequeueInput/OutputBuffer(…) 方法从编解码器获得(取得所有权)一个输入或输出buffer。在异步模式下,你可以通过MediaCodec.Callback.onInput/OutputBufferAvailable(…)的回调方法自动地获得可用的buffers。

  在获得一个输入buffe后,向其中填充数据,并利用queueInputBuffer方法将其提交给编解码器,若使用解密,则利用queueSecureInputBuffer方法提交。不要提交多个具有相同时间戳的输入buffers(除非它是也被同样标记的codec-specific data)。

  在异步模式下通过onOutputBufferAvailable方法的回调或者在同步模式下响应dequeuOutputBuffer的调用,编解码器返回一个只读的output buffer。在这个output buffer被处理后,调用一个releaseOutputBuffer方法将这个buffer返回给编解码器。

  当你不需要立即向编解码器重新提交或释放buffers时,保持对输入或输出buffers的所有权可使编解码器停止工作,当然这些行为依赖于设备情况。特别地,编解码器可能延迟产生输出buffers直到输出的buffers被释放或重新提交。因此,尽可能短时间地持有可用的buffers。

根据API版本情况,你有三种处理相关数据的方式:

Processing Mode API version <= 20 Jelly Bean/KitKat API version >= 21 Lollipop and later
Synchronous API using buffer arrays Supported Deprecated
Synchronous API using buffers Not Available Supported
Asynchronous API using buffers Not Available Supported
  1. 使用缓存的异步处理方式(Asynchronous Processing using Buffers)

    从Android 5.0(LOLLIPOP)开始,首选的方法是调用configure之前通过设置回调异步地处理数据。异步模式稍微改变了状态转换方式,因为你必须在调用flush()方法后再调用start()方法才能使编解码器的状态转换为Running子状态并开始接收输入buffers。同样,初始调用start方法将编解码器的状态直接变化为Running 子状态并通过回调方法开始传递可用的输入buufers。
异步模式处理
 异步模式下,编解码器典型的使用方法如下:

1
2
3
4
5
6
7
8
9
10
11
12
13
14
15
16
17
18
19
20
21
22
23
24
25
26
27
28
29
30
31
32
33
34
35
36
37
38
39
40
41
42
43
44
45
46
47
48
49
50
51
52
53
54
55
MediaCodec codec = MediaCodec.createByCodecName(name);
MediaFormat mOutputFormat; // member variable
// 异步模式下需要在configure之前设置callback
codec.setCallback(new MediaCodec.Callback() {
/**
* 在onInputBufferAvailable回调方法中,MediaCodec会通知什么时候input
* buffer有效,根据buffer id,调用getInputBuffer(id)可以获得这个buffer,
* 此时就可以向这个buffer中写入数据,最后调用queueInputBuffer(id, …)提交
* 给MediaCodec处理。
*/
@Override
void onInputBufferAvailable(MediaCodec mc, int inputBufferId) {
ByteBuffer inputBuffer = codec.getInputBuffer(inputBufferId);
// fill inputBuffer with valid data
…
codec.queueInputBuffer(inputBufferId, …);
}
/**
* 在onOutputBufferAvailable回调方法中,MediaCodec会通知什么时候output
* buffer有效,根据buffer id,调用getOutputBuffer(id)可以获得这个buffer,
* 此时就可以读取这个buffer中的数据,最后调用releaseOutputBuffer(id, …)释放
* 给MediaCodec再次使用。
*/
@Override
void onOutputBufferAvailable(MediaCodec mc, int outputBufferId, …) {
ByteBuffer outputBuffer = codec.getOutputBuffer(outputBufferId);
MediaFormat bufferFormat = codec.getOutputFormat(outputBufferId); // option A
// bufferFormat is equivalent to mOutputFormat
// outputBuffer is ready to be processed or rendered.
…
codec.releaseOutputBuffer(outputBufferId, …);
}
/**
* 当MediaCodec的output format发生变化是会回调该方法,一般在start之后都会首先回调该方法
*/
@Override
void onOutputFormatChanged(MediaCodec mc, MediaFormat format) {
// Subsequent data will conform to new format.
// Can ignore if using getOutputFormat(outputBufferId)
mOutputFormat = format; // option B
}
/**
* MediaCodec运行发生错误时会回调该方法
*/
@Override
void onError(…) {
…
}
});
codec.configure(format, …);
mOutputFormat = codec.getOutputFormat(); // option B
codec.start();
// wait for processing to complete
codec.stop();
codec.release();

  1. 使用缓存的同步处理方式(Synchronous Processing using Buffers) .
      从Android5.0(LOLLIPOP)开始,即使在同步模式下使用编解码器你应该通过getInput/OutputBuffer(int) 和/或 getInput/OutputImage(int) 方法检索输入和输出buffers。这允许通过框架进行某些优化,例如,在处理动态内容过程中。如果你调用getInput/OutputBuffers()方法这种优化是不可用的。

  注意,不要同时混淆使用缓存和缓存数组的方法。特别地,仅仅在调用start()方法后或取出一个值为INFO_OUTPUT_FORMAT_CHANGED的输出buffer ID后你才可以直接调用getInput/OutputBuffers方法。

  同步模式下MediaCodec的典型应用如下:

1
2
3
4
5
6
7
8
9
10
11
12
13
14
15
16
17
18
19
20
21
22
23
24
25
26
27
28
29
30
31
MediaCodec codec = MediaCodec.createByCodecName(name);
codec.configure(format, …);
MediaFormat outputFormat = codec.getOutputFormat(); // option B
codec.start();
/**
* 在一个无限循环中不断地请求Codec是否有可用的input buffer 或 output buffer
*/
for (;;) {
int inputBufferId = codec.dequeueInputBuffer(timeoutUs); // 请求是否有可用的input buffer
if (inputBufferId >= 0) {
ByteBuffer inputBuffer = codec.getInputBuffer(…);
// fill inputBuffer with valid data
…
codec.queueInputBuffer(inputBufferId, …); // 提交数据给Codec
}
int outputBufferId = codec.dequeueOutputBuffer(…);
if (outputBufferId >= 0) {
ByteBuffer outputBuffer = codec.getOutputBuffer(outputBufferId);
MediaFormat bufferFormat = codec.getOutputFormat(outputBufferId); // option A
// bufferFormat is identical to outputFormat
// outputBuffer is ready to be processed or rendered.
…
codec.releaseOutputBuffer(outputBufferId, …); // 释放output buffer供Codec再次使用
} else if (outputBufferId == MediaCodec.INFO_OUTPUT_FORMAT_CHANGED) {
// Subsequent data will conform to new format.
// Can ignore if using getOutputFormat(outputBufferId)
outputFormat = codec.getOutputFormat(); // option B
}
}
codec.stop();
codec.release();

  1. 使用缓存数组的同步处理方式(Synchronous Processing using Buffer Arrays)– (deprecated)
      在Android 4.4(KITKAT_WATCH)及之前版本,一组输入或输出buffers使用ByteBuffer[]数组表示。在成功调用了start()方法后,通过调用getInput/OutputBuffers()方法检索buffer数组。在这些数组中使用buffer的ID-s(非负数)作为索引,如下面的演示示例中,注意数组大小和系统使用的输入和输出buffers的数量之间并没有固定的关系,尽管这个数组提供了上限边界。

    1
    2
    3
    4
    5
    6
    7
    8
    9
    10
    11
    12
    13
    14
    15
    16
    17
    18
    19
    20
    21
    22
    23
    24
    25
    26
    MediaCodec codec = MediaCodec.createByCodecName(name);
    codec.configure(format, …);
    codec.start();
    ByteBuffer[] inputBuffers = codec.getInputBuffers();
    ByteBuffer[] outputBuffers = codec.getOutputBuffers();
    for (;;) {
    int inputBufferId = codec.dequeueInputBuffer(…);
    if (inputBufferId >= 0) {
    // fill inputBuffers[inputBufferId] with valid data
    …
    codec.queueInputBuffer(inputBufferId, …);
    }
    int outputBufferId = codec.dequeueOutputBuffer(…);
    if (outputBufferId >= 0) {
    // outputBuffers[outputBufferId] is ready to be processed or rendered.
    …
    codec.releaseOutputBuffer(outputBufferId, …);
    } else if (outputBufferId == MediaCodec.INFO_OUTPUT_BUFFERS_CHANGED) {
    outputBuffers = codec.getOutputBuffers();
    } else if (outputBufferId == MediaCodec.INFO_OUTPUT_FORMAT_CHANGED) {
    // Subsequent data will conform to new format.
    MediaFormat format = codec.getOutputFormat();
    }
    }
    codec.stop();
    codec.release();
  2. 流结束处理(End-of-stream Handling)
      当到达输入数据结尾时,你必须在调用queueInputBuffer方法中通过指定BUFFER_FLAG_END_OF_STREAM标记来通知编解码器。你可以在最后一个有效的输入buffer上做这些操作,或者提交一个额外的以end-of-stream标记的空的输入buffer。如果使用一个空的buffer,它的时间戳将被忽略。

  编解码器将会继续返回输出buffers,直到它发出输出流结束的信号,这是通过指定dequeueOutputBuffer方法中MediaCodec.BufferInfo的end-of-stream标记来实现的,或者是通过回调方法onOutputBufferAvailable来返回end-of-stream标记。可以在最后一个有效的输出buffer中设置或者在最后一个有效的输出buffer后添加一个空的buffer来设置,这种空的buffer的时间戳应该被忽略。

  当通知输入流结束后不要再提交额外的输入buffers,除非编解码器被刷新或停止或重启。

  1. 使用一个输出表面(Using an Output Surface)
      使用一个输出Surface进行数据处理的方法与ByteBuffer模式几乎是相同的,然而,输出buffers不再可访问,而且被表示为null值。E.g.方法getOutputBuffer/Image(int)将返回null,方法getOutputBuffers()将返回仅包含null值的数组。

  当使用一个输出Surface时,你能够选择是否渲染surface上的每一个输出buffer,你有三种选择:

  • 不要渲染这个buffer(Do not render the buffer):通过调用releaseOutputBuffer(bufferId, false)。
  • 使用默认的时间戳渲染这个buffer(Render the buffer with the default timestamp):调用releaseOutputBuffer(bufferId, true)。
  • 使用指定的时间戳渲染这个buffer(Render the buffer with a specific timestamp):调用 releaseOutputBuffer(bufferId, timestamp)。
      从Android6.0(M)开始,默认的时间戳是buffer的presentation timestamp(转换为纳秒)。在此前的版本中这是没有被定义的。

  而且,从Android6.0(M)开始,你可以通过使用setOutputSurface方法动态地改变输出Surface。

  1. 使用一个输入表面(Using an Input Surface)
      当使用输入Surface时,将没有可访问的输入buffers,因为这些buffers将会从输入surface自动地向编解码器传输。调用dequeueInputBuffer时将抛出一个IllegalStateException异常,调用getInputBuffers()将要返回一个不能写入的伪ByteBuffer[]数组。

  调用signalEndOfInputStream()方法发送end-of-stream信号。调用这个方法后,输入surface将会立即停止向编解码器提交数据。

查询&自适应播放支持(Seeking & Adaptive Playback Support)
  视频解码器(通常指处理压缩视频数据的编解码器)关于搜索-seek和格式转换(不管它们是否支持)表现不同,且被配置为adaptive playback。你可以通过调用CodecCapabilities.isFeatureSupported(String)方法来检查解码器是否支持adaptive playback 。支持Adaptive playback的解码器只有在编解码器被配置在Surface上解码时才被激活。

  流域界与关键帧(Stream Boundary and Key Frames)

  在调用start()或flush()方法后,输入数据在合适的流边界开始是非常重要的:其第一帧必须是关键帧(key-frame)。一个关键帧能够独立地完全解码(对于大多数编解码器它意味着I-frame),关键帧之后显示的帧不会引用关键帧之前的帧。

  下面的表格针对不同的视频格式总结了合适的关键帧。

Format Suitable key frame
VP9/VP8 a suitable intraframe where no subsequent frames refer to frames prior to this frame. (There is no specific name for such key frame.)
H.265 HEVC IDR or CRA
H.264 AVC IDR
MPEG-4 H.263 MPEG-2 a suitable I-frame where no subsequent frames refer to frames prior to this frame.(There is no specific name for such key frame.)

对于不支持adaptive playback的解码器(包括解码到Surface上解码器)

  为了开始解码与先前提交的数据(也就是seek后)不相邻的数据你必须刷新解码器。由于所有输出buffers会在flush的一刻立即撤销,你可能希望在调用flush方法前等待这些buffers首先被标记为end-of-stream。在调用flush方法后输入数据在一个合适的流边界或关键帧开始是非常重要的。

  注意:flush后提交的数据的格式不能改变;flush()方法不支持格式的不连续性;为此,一个完整的stop()-configure(…)-start()的过程是必要的。

  同时注意:如果你调用start()方法后过快地刷新编解码器,通常,在收到第一个输出buffer或输出format变化前,你需要向这个编解码器再次提交codec-specific-data。具体查看codec-specific-data部分以获得更多信息。

  对于支持及被配置为adaptive playback的几码器

  为了开始解码与先前提交的数据(也就是seek后)不相邻的数据,你没有必要刷新解码器;然而,在间断后传入的数据必须开始于一个合适的流边界或关键帧。

  针对一些视频格式-也就是H.264、H.265、VP8和VP9,也可以修改图片大小或者配置mid-stream。为了做到这些你必须将整个新codec-specific配置数据与关键帧一起打包到一个单独的buffer中(包括所有的开始数据),并将它作为一个常规的输入数据提交。

  在picture-size被改变后以及任意具有新大小的帧返回之前,你可以从dequeueOutputBuffer方法或onOutputFormatChanged回调中得到 INFO_OUTPUT_FORMAT_CHANGED的返回值。

  注意:就像使用codec-specific data时的情况,在你修改图片大小后立即调用fush()方法时需要非常小心。如果你没有接收到图片大小改变的确认信息,你需要重试修改图片大小的请求。

  1. 错误处理(Error handling)

  工厂方法createByCodecName以及createDecoder/EncoderByType会在创建codec失败时抛出一个IOException,你必须捕获异常或声明向上传递异常。在编解码器不允许使用该方法的状态下调用时,MediaCodec方法将会抛出IllegalStateException异常;这种情况一般是由于API接口的不正确调用引起的。涉及secure buffers的方法可能会抛出一个MediaCodec.CryptoException异常,可以调用getErrorCode()方法获得更多的异常信息。

  内部的编解码器错误将导致MediaCodec.CodecException,这可能是由于media内容错误、硬件错误、资源枯竭等原因所致,即使你已经正确的使用了API。当接收到一个CodecException时,可以调用isRecoverable()和isTransient()两个方法来决定建议的行为。

可恢复错误(recoverable errors):如果isRecoverable() 方法返回true,然后就可以调用stop(),configure(…),以及start()方法进行修复。
短暂错误(transient errors):如果isTransient()方法返回true,资源短时间内不可用,这个方法可能会在一段时间之后重试。
致命错误(fatal errors):如果isRecoverable()和isTransient()方法均返回fase,CodecException错误是致命的,此时就必须reset这个编解码器或调用released方法释放资源。
  isRecoverable()和isTransient()方法不可能同时都返回true。

  1. 嵌套类(Nested classes)
类名 类型 描述
MediaCodec.BufferInfo class 每一个缓存区的元数据都包含有一个偏移量offset和大小size用于指示相关编解码器(输出)缓存中有效数据的范围。
MediaCodec.Callback class MediaCodec回调接口
MediaCodec.CodecException class 当发生内部的编解码器错误是抛出。
MediaCodec.CryptoException class 在入队列一个安全的输入缓存过程中发生加密错误时抛出。
MediaCodec.CryptoInfo class 描述(至少部分地)加密的输入样本的结构的元数据。
MediaCodec.OnFrameRenderedListener interface 当一个输出帧在输出surface上呈现时,监听器被调用。
  1. 常量
名称 类型 值 描述
BUFFER_FLAG_CODEC_CONFIG int 2(0x00000002) 这表示带有此标记的缓存包含编解码器初始化或编解码器特定的数据而不是多媒体数据media data。
BUFFER_FLAG_END_OF_STREAM int 4(0x00000004 它表示流结束,该标志之后不会再有可用的buffer,除非接下来对Codec执行flush()方法。
BUFFER_FLAG_KEY_FRAME int 1(0x00000001) 这表示带有此标记的(编码的)缓存包含关键帧数据。
BUFFER_FLAG_PARTIAL_FRAME int 8 (0x00000008) 这表明缓冲区只包含帧的一部分,并且解码器应该对数据进行批处理,直到没有该标志的缓冲区在解码帧之前出现。
BUFFER_FLAG_SYNC_FRAME int 1(0x00000001) 这个常量在API level 21中弃用,使用BUFFER_FLAG_KEY_FRAME代替。这表示带有此标记的(编码的)缓存包含关键帧数据。
CONFIGURE_FLAG_ENCODE int 1(0x00000001) 如果编解码器被用作编码器,传递这个标志。
CRYPTO_MODE_AES_CBC int 2(0x00000002)
CRYPTO_MODE_AES_CTR int 1(0x00000001)
CRYPTO_MODE_UNENCRYPTED int 0(0x00000000)
INFO_OUTPUT_BUFFERS_CHANGED int -3 (0xfffffffd) 此常数在API级别21中已弃用。由于getOutputBuffers()已被弃用,此返回值可以被忽略。 每次出队时,客户端都应该使用get-buffer或get-image方法的on命令来请求当前缓冲区。输出缓冲区已更改,客户端必须从此处引用由getOutputBuffers()返回的新输出缓冲区集合。此外,此事件表示视频缩放模式可能已重置为默认值。
INFO_OUTPUT_FORMAT_CHANGED int -2 (0xfffffffe) 输出格式已更改,后续数据将采用新格式。 getOutputFormat()返回新的格式。 请注意,您也可以使用新的getOutputFormat(int)方法来获取特定输出缓冲区的格式。 这使您无需跟踪输出格式更改。
INFO_TRY_AGAIN_LATER int -1 (0xffffffff) 如果在调用dequeueOutputBuffer(MediaCodec.BufferInfo,long)时指定了非负超时,则表示该呼叫超时。
PARAMETER_KEY_REQUEST_SYNC_FRAME String “request-sync” 请求编码器“很快”产生一个同步帧。 提供值为0的整数。
PARAMETER_KEY_SUSPEND String “drop-input-frames” 暂时暂停/恢复输入数据的编码。虽然暂停输入数据被有效丢弃,而不是被馈送到编码器中。在“表面输入”模式下,这个参数只与编码器一起使用才是有意义的,因为在这种情况下,客户端代码对编码器的输入端没有控制。该值是一个整数对象,包含要挂起的值1或要恢复的值0。
PARAMETER_KEY_VIDEO_BITRATE String “video-bitrate” 立即改变视频编码器的目标比特率。该值是包含BPS中的新比特率的整数对象。
VIDEO_SCALING_MODE_SCALE_TO_FIT int 1 (0x00000001) 内容按比例缩放到表面尺寸。
VIDEO_SCALING_MODE_SCALE_TO_FIT_WITH_CROPPING int 2 (0x00000002) 内容是缩放,保持其纵横比,使用整个表面积,可以裁剪内容。这种模式只适用于1:1像素长宽比的内容,因为你不能为一个表面配置像素的长宽比。对于Build.VERSION_CODES.N版本,如果视频旋转90度或270度,则此模式可能无法工作。
  1. 公有方法

configure

public void configure (MediaFormat format,Surface surface,MediaCrypto crypto,int flags):Configures a component.(配置组件。)

  • 参数
    format -》 MediaFormat: The format of the input data (decoder) or the desired format of the output data (encoder). Passing null as format is equivalent to passing an an empty mediaformat. (输入数据(解码器)的格式或输出数据(编码器)的所需格式。 以格式传递null相当于传递一个空的媒体格式。)
    surface -》 Surface: Specify a surface on which to render the output of this decoder. Pass null as surface if the codec does not generate raw video output (e.g. not a video decoder) and/or if you want to configure the codec for ByteBuffer output.(指定要渲染此解码器输出的表面。 如果编解码器不生成原始视频输出(例如,不是视频解码器),并且/或者如果要为ByteBuffer输出配置编解码器,则将null传递为曲面。)
    crypto -》 MediaCrypto: Specify a crypto object to facilitate secure decryption of the media data. Pass null as crypto for non-secure codecs. (指定一个加密对象以促进媒体数据的安全解密。 传递null作为非安全编解码器的加密。)
    flags -》 int: Specify CONFIGURE_FLAG_ENCODE to configure the component as an encoder.(指定CONFIGURE_FLAG_ENCODE将组件配置为编码器。)

  • 异常
    IllegalArgumentException -》 if the surface has been released (or is invalid), or the format is unacceptable (e.g. missing a mandatory key), or the flags are not set properly (e.g. missing CONFIGURE_FLAG_ENCODE for an encoder). (如果表面已被释放(或无效),或格式不可接受(例如,缺少必需的密钥),或者标记未正确设置(例如,编码器缺少CONFIGURE_FLAG_ENCODE)。)
    IllegalStateException -》 if not in the Uninitialized state.(如果不是未初始化状态。)
    MediaCodec.CryptoException -》 upon DRM error.(在DRM错误。)
    MediaCodec.CodecException -》 upon codec error.(编解码器错误。)

configure

public void configure (MediaFormat format,Surface surface,int flags,MediaDescrambler descrambler):Configure a component to be used with a descrambler.(配置要与解扰器一起使用的组件。)

  • 参数
    format -》 MediaFormat: The format of the input data (decoder) or the desired format of the output data (encoder). Passing null as format is equivalent to passing an an empty mediaformat. (输入数据(解码器)的格式或输出数据(编码器)的所需格式。 以格式传递null相当于传递一个空的媒体格式。)
    surface -》 Surface: Specify a surface on which to render the output of this decoder. Pass null as surface if the codec does not generate raw video output (e.g. not a video decoder) and/or if you want to configure the codec for ByteBuffer output.(指定要渲染此解码器输出的表面。 如果编解码器不生成原始视频输出(例如,不是视频解码器),并且/或者如果要为ByteBuffer输出配置编解码器,则将null传递为曲面。)
    flags -》 int: Specify CONFIGURE_FLAG_ENCODE to configure the component as an encoder.(指定CONFIGURE_FLAG_ENCODE将组件配置为编码器。)
    descrambler -》 MediaDescrambler: Specify a descrambler object to facilitate secure descrambling of the media data, or null for non-secure codecs.(指定解扰器对象以促进媒体数据的安全解扰,或者指定非安全编解码器为null。)

  • 异常
    IllegalArgumentException -》 if the surface has been released (or is invalid), or the format is unacceptable (e.g. missing a mandatory key), or the flags are not set properly (e.g. missing CONFIGURE_FLAG_ENCODE for an encoder). (如果表面已被释放(或无效),或格式不可接受(例如,缺少必需的密钥),或者标记未正确设置(例如,编码器缺少CONFIGURE_FLAG_ENCODE)。)
    IllegalStateException -》 if not in the Uninitialized state.(如果不是未初始化状态。)
    MediaCodec.CryptoException -》 upon DRM error.(在DRM错误。)
    MediaCodec.CodecException -》 upon codec error.(编解码器错误。)

createByCodecName

public static MediaCodec createByCodecName (String name):If you know the exact name of the component you want to instantiate use this method to instantiate it. Use with caution. Likely to be used with information obtained from MediaCodecList(如果您知道要实例化的组件的确切名称,请使用此方法将其实例化。 谨慎使用。 可能与从MediaCodecList获取的信息一起使用)

  • 参数
    name -》String: The name of the codec to be instantiated.This value must never be null.(要实例化的编解码器的名称。此值绝不能为null。)

  • 返回值
    MediaCodec -》 This value will never be null.(此值绝不能为null。)

  • 异常
    IOException -》 if the codec cannot be created. (如果无法创建编解码器)
    IllegalArgumentException -》 if name is not valid.(如果名称无效)
    NullPointerException -》 if name is null.(如果名称为空)

createDecoderByType

public static MediaCodec createDecoderByType (String type):Instantiate the preferred decoder supporting input data of the given mime type. The following is a partial list of defined mime types and their semantics:(实例化支持给定MIME类型的输入数据的首选解码器。 以下是定义的MIME类型及其语义的部分列表:)

  • “video/x-vnd.on2.vp8” - VP8 video (i.e. video in .webm)
  • “video/x-vnd.on2.vp9” - VP9 video (i.e. video in .webm)
  • “video/avc” - H.264/AVC video
  • “video/hevc” - H.265/HEVC video
  • “video/mp4v-es” - MPEG4 video
  • “video/3gpp” - H.263 video
  • “audio/3gpp” - AMR narrowband audio
  • “audio/amr-wb” - AMR wideband audio
  • “audio/mpeg” - MPEG1/2 audio layer III
  • “audio/mp4a-latm” - AAC audio (note, this is raw AAC packets, not packaged in LATM!)
  • “audio/vorbis” - vorbis audio
  • “audio/g711-alaw” - G.711 alaw audio
  • “audio/g711-mlaw” - G.711 ulaw audio
    Note: It is preferred to use MediaCodecList.findDecoderForFormat(MediaFormat) and createByCodecName(String) to ensure that the resulting codec can handle a given format.(注意:最好使用MediaCodecList.findDecoderForFormat(MediaFormat)和createByCodecName(String)来确保生成的编解码器可以处理给定的格式。)
  • 参数
    type -》 String: The mime type of the input data.This value must never be null.(输入数据的mime类型。此值绝不能为null。)

  • 异常
    IOException -》if the codec cannot be created.(如果无法创建编解码器)
    IllegalArgumentException -》 if type is not a valid mime type.(如果type不是有效的mime类型)
    NullPointerException -》 if type is null.(如果type为空)

createEncoderByType

public static MediaCodec createEncoderByType (String type):Instantiate the preferred encoder supporting output data of the given mime type. Note: It is preferred to use MediaCodecList.findEncoderForFormat(MediaFormat) and createByCodecName(String) to ensure that the resulting codec can handle a given format.
(实例化支持给定MIME类型的输出数据的首选编码器。 注意:最好使用MediaCodecList.findEncoderForFormat(MediaFormat)和createByCodecName(String)来确保生成的编解码器可以处理给定的格式。)

  • 参数
    type -》String: The desired mime type of the output data.This value must never be null.(所需的MIME类型的输出数据。该值不能为空。)

  • 返回值
    MediaCodec -》This value will never be null.(这个值永远不为空)。

  • 异常
    IOException -》 if the codec cannot be created. (如果编解码器不能被创建。)
    IllegalArgumentException -》 if type is not a valid mime type. (如果type不是有效的MIME类型。)
    NullPointerException -》 if type is null. (如果type为null。)

createInputSurface

public Surface createInputSurface ():Requests a Surface to use as the input to an encoder, in place of input buffers. This may only be called after configure(MediaFormat, Surface, MediaCrypto, int) and before start().The application is responsible for calling release() on the Surface when done.The Surface must be rendered with a hardware-accelerated API, such as OpenGL ES. Surface.lockCanvas(android.graphics.Rect) may fail or produce unexpected results.(请求Surface用作编码器的输入,以代替输入缓冲区。 这只能在configure(MediaFormat,Surface,MediaCrypto,int)和start()之前调用。应用程序负责在完成时调用Surface上的release()。Surface必须使用硬件加速API(如OpenGL ES)进行渲染。 Surface.lockCanvas(android.graphics.Rect)可能会失败或产生意想不到的结果。)

  • 返回值
    Surface -》 This value will never be null.(这个值永远不为空)
  • 异常
    IllegalStateException -》 if not in the Configured state.(如果不在配置状态)

createPersistentInputSurface

public static Surface createPersistentInputSurface ():Create a persistent input surface that can be used with codecs that normally have an input surface, such as video encoders. A persistent input can be reused by subsequent MediaCodec or MediaRecorder instances, but can only be used by at most one codec or recorder instance concurrently.The application is responsible for calling release() on the Surface when done.(创建可与通常具有输入表面的编解码器一起使用的持久输入表面,例如视频编码器。 持久性输入可以被后续MediaCodec或MediaRecorder实例重用,但最多只能同时使用一个编解码器或录制器实例。应用程序负责在完成时调用Surface上的release()。)

  • 返回值
    Surface -》 an input surface that can be used with setInputSurface(Surface).This value will never be null.(一个可以与setInputSurface(Surface)一起使用的输入表面。该值永远不会为空)

dequeueInputBuffer

public int dequeueInputBuffer (long timeoutUs):Returns the index of an input buffer to be filled with valid data or -1 if no such buffer is currently available. This method will return immediately if timeoutUs == 0, wait indefinitely for the availability of an input buffer if timeoutUs < 0 or wait up to “timeoutUs” microseconds if timeoutUs > 0.(返回要用有效数据填充的输入缓冲区的索引,如果当前没有可用的缓冲区,则返回-1。 如果timeoutU == 0,此方法将立即返回,如果timeoutU <0,则无限期等待输入缓冲区的可用性;如果timeoutus> 0,则等待“timeoutUs”微秒。)

  • 参数
    timeoutUs -》 long: The timeout in microseconds, a negative timeout indicates “infinite”.(超时(微秒),负超时表示“无限”。
    )
  • 返回值
    int -》 缓冲区索引id
  • 异常
    IllegalStateException -》 if not in the Executing state, or codec is configured in asynchronous mode.(如果不处于执行状态,或编解码器配置为异步模式。)
    MediaCodec.CodecException -》 upon codec error.(编解码器错误。)

dequeueOutputBuffer

public int dequeueOutputBuffer (MediaCodec.BufferInfo info, long timeoutUs):Dequeue an output buffer, block at most “timeoutUs” microseconds. Returns the index of an output buffer that has been successfully decoded or one of the INFO* constants.(出队输出缓冲区,最多阻止“timeoutUs”微秒。 返回已成功解码的输出缓冲区的索引或其中一个INFO *常量。)

  • 参数
    info -》 MediaCodec.BufferInfo: Will be filled with buffer meta data.This value must never be null.(将填充缓冲区元数据。该值不能为空)
    timeoutUs -》 long: The timeout in microseconds, a negative timeout indicates “infinite”.(超时(微秒),负超时表示“无限”。
    )
  • 返回值
    int -》 缓冲区索引id
  • 异常
    IllegalStateException -》 if not in the Executing state, or codec is configured in asynchronous mode.(如果不处于执行状态,或编解码器配置为异步模式。)
    MediaCodec.CodecException -》 upon codec error.(编解码器错误。)

flush

public void flush ():Flush both input and output ports of the component.Upon return, all indices previously returned in calls to dequeueInputBuffer and dequeueOutputBuffer — or obtained via onInputBufferAvailable or onOutputBufferAvailable callbacks — become invalid, and all buffers are owned by the codec.If the codec is configured in asynchronous mode, call start() after flush has returned to resume codec operations. The codec will not request input buffers until this has happened. Note, however, that there may still be outstanding onOutputBufferAvailable callbacks that were not handled prior to calling flush. The indices returned via these callbacks also become invalid upon calling flush and should be discarded.If the codec is configured in synchronous mode, codec will resume automatically if it is configured with an input surface. Otherwise, it will resume when dequeueInputBuffer is called.(刷新组件的输入和输出端口。返回时,以前通过调用dequeueInputBuffer和dequeueOutputBuffer返回的所有索引 - 或通过onInputBufferAvailable或onOutputBufferAvailable回调获得 - 都变为无效,并且所有缓冲区都由编解码器拥有。如果编解码器配置为 异步模式,在刷新后调用start()返回以恢复编解码器操作。 在这种情况发生之前,编解码器不会请求输入缓冲器。 但请注意,在调用刷新之前,可能仍有未完成的onOutputBufferAvailable回调。 通过这些回调返回的索引在调用flush时也会失效,应该丢弃。如果编解码器配置为同步模式,如果配置了输入表面,编解码器将自动恢复。 否则,它将在调用dequeueInputBuffer时继续。)

  • 异常
    IllegalStateException -》 if not in the Executing state.(如果不处于执行状态)
    MediaCodec.CodecException -》 upon codec error.(编解码器错误。)

getCodecInfo

public MediaCodecInfo getCodecInfo ()
Get the codec info. If the codec was created by createDecoderByType or createEncoderByType, what component is chosen is not known beforehand, and thus the caller does not have the MediaCodecInfo.(获取编解码器信息。 如果编解码器是由createDecoderByType或createEncoderByType创建的,则选择哪个组件并不是事先知道的,因此调用者没有MediaCodecInfo。)

  • 返回参数
    MediaCodecInfo -》 This value will never be null.( 该值永远不会为空)
  • 异常
    IllegalStateException -》 if in the Released state.(如果处于Released状态。)

getInputBuffer

public ByteBuffer getInputBuffer (int index):Returns a cleared, writable ByteBuffer object for a dequeued input buffer index to contain the input data. After calling this method any ByteBuffer or Image object previously returned for the same input index MUST no longer be used.(返回已清除的可写ByteBuffer对象,用于包含输入数据的出列输入缓冲区索引。 在调用这个方法之后,必须不再使用先前为相同输入索引返回的任何ByteBuffer或Image对象。)

  • 参数
    index -》 int: The index of a client-owned input buffer previously returned from a call to dequeueInputBuffer(long), or received via an onInputBufferAvailable callback.(先前从调用dequeueInputBuffer(long)返回的客户机拥有的输入缓冲区的索引,或通过onInputBufferAvailable回调接收的索引。)
  • 返回值
    ByteBuffer -》 the input buffer, or null if the index is not a dequeued input buffer, or if the codec is configured for surface input.(输入缓冲区;如果索引不是出列输入缓冲区,或者编解码器配置为表面输入,则为null。)
  • 异常
    IllegalStateException -》 if not in the Executing state.(如果不处于执行状态)
    MediaCodec.CodecException -》 upon codec error.(编解码器错误。)

getOutputFormat

public MediaFormat getOutputFormat (int index):Returns the output format for a specific output buffer.(返回特定输出缓冲区的输出格式)

  • 参数
    index -》 int: The index of a client-owned input buffer previously returned from a call to dequeueInputBuffer(long).(先前从调用dequeueInputBuffer(long)返回的客户机拥有的输入缓冲区的索引。)
  • 返回值
    MediaFormat -》 the format for the output buffer, or null if the index is not a dequeued output buffer.(输出缓冲区的格式;如果索引不是出队输出缓冲区,则返回null。)

getOutputFormat

public MediaFormat getOutputFormat ():Call this after dequeueOutputBuffer signals a format change by returning INFO_OUTPUT_FORMAT_CHANGED. You can also call this after configure(MediaFormat, Surface, MediaCrypto, int) returns successfully to get the output format initially configured for the codec. Do this to determine what optional configuration parameters were supported by the codec.(通过返回INFO_OUTPUT_FORMAT_CHANGED,dequeueOutputBuffer发出格式更改后调用此函数。 您也可以在configure(MediaFormat,Surface,MediaCrypto,int)成功返回后获取为编解码器初始配置的输出格式。 这样做可以确定编解码器支持哪些可选的配置参数。)

  • 返回值
    MediaFormat -》 This value will never be null.(该值永远不会为空)
  • 异常
    IllegalStateException -》 if not in the Executing state.(如果不处于执行状态)
    MediaCodec.CodecException -》 upon codec error.(编解码器错误。)

getOutputImage

public Image getOutputImage (int index):Returns a read-only Image object for a dequeued output buffer index that contains the raw video frame. After calling this method, any ByteBuffer or Image object previously returned for the same output index MUST no longer be used.(返回包含原始视频帧的出列输出缓冲区索引的只读Image对象。 在调用这个方法之后,必须不再使用先前为相同输出索引返回的任何ByteBuffer或Image对象。)

  • 返回值
    index -》 int: The index of a client-owned output buffer previously returned from a call to dequeueOutputBuffer(MediaCodec.BufferInfo, long), or received via an onOutputBufferAvailable callback.(先前从调用dequeueOutputBuffer(MediaCodec.BufferInfo,long)或通过onOutputBufferAvailable回调接收的客户端拥有的输出缓冲区的索引。)
  • 返回值
    Image -》 the output image, or null if the index is not a dequeued output buffer, not a raw video frame, or if the codec was configured with an output surface. (输出图像;如果索引不是出列输出缓冲区,不是原始视频帧,或者编解码器配置了输出表面,则为null。)
  • 异常
    IllegalStateException -》 if not in the Executing state.(如果不处于执行状态)
    MediaCodec.CodecException -》 upon codec error.(编解码器错误。)

queueInputBuffer

public void queueInputBuffer (int index,int offset, int size,long presentationTimeUs,int flags):After filling a range of the input buffer at the specified index submit it to the component. Once an input buffer is queued to the codec, it MUST NOT be used until it is later retrieved by getInputBuffer(int) in response to a dequeueInputBuffer(long) return value or a MediaCodec.Callback.onInputBufferAvailable(MediaCodec, int) callback.Many decoders require the actual compressed data stream to be preceded by “codec specific data”, i.e. setup data used to initialize the codec such as PPS/SPS in the case of AVC video or code tables in the case of vorbis audio. The class MediaExtractor provides codec specific data as part of the returned track format in entries named “csd-0”, “csd-1” … These buffers can be submitted directly after start() or flush() by specifying the flag BUFFER_FLAG_CODEC_CONFIG. However, if you configure the codec with a MediaFormat containing these keys, they will be automatically submitted by MediaCodec directly after start. Therefore, the use of BUFFER_FLAG_CODEC_CONFIG flag is discouraged and is recommended only for advanced users. To indicate that this is the final piece of input data (or rather that no more input data follows unless the decoder is subsequently flushed) specify the flag BUFFER_FLAG_END_OF_STREAM.(在指定索引处填充输入缓冲区的范围后,将其提交给组件。一旦输入缓冲区排队等待编解码器,它就不能被使用,直到它稍后被getInputBuffer(int)检索以响应dequeueInputBuffer(long)返回值或MediaCodec.Callback.onInputBufferAvailable(MediaCodec,int)回调。许多解码器要求实际压缩数据流在“编解码器特定数据”之前,即用于初始化编解码器的设置数据,例如在AVC视频情况下为PPS / SPS或在​​vorbis音频情况下为代码表。 MediaExtractor类在名为“csd-0”,“csd-1”的条目中提供特定于编解码器的数据作为返回轨道格式的一部分…可以通过指定标志BUFFER_FLAG_CODEC_CONFIG在start()或flush()后直接提交这些缓冲区。但是,如果使用包含这些密钥的MediaFormat配置编解码器,它们将在启动后直接由MediaCodec自动提交。因此,不鼓励使用BUFFER_FLAG_CODEC_CONFIG标志,并且建议仅限高级用户使用。为了表明这是最后一块输入数据(或者除非解码器随后被刷新,否则不会有更多的输入数据出现)指定标志BUFFER_FLAG_END_OF_STREAM。)
注意:在Build.VERSION_CODES.M之前,presentationTimeUs没有传播到(呈现的)表面输出缓冲区的帧时间戳,并且结果帧时间戳未定义。 使用releaseOutputBuffer(int,long)来确保设置了特定的帧时间戳。 同样,由于帧时间戳可以被目标表面用于渲染同步,因此必须注意使presentationTimeUs正常化,以便不会误认为系统时间。 (请参阅SurfaceView细节)。

  • 参数
    index -》 int: The index of a client-owned input buffer previously returned in a call to dequeueInputBuffer(long).(先前在调用dequeueInputBuffer(long)时返回的客户机拥有的输入缓冲区的索引)
    offset -》 int: The byte offset into the input buffer at which the data starts.(输入缓冲区中数据开始的字节偏移量)
    size -》 int: The number of bytes of valid input data.(有效输入数据的字节数)
    presentationTimeUs -》 long: The presentation timestamp in microseconds for this buffer. This is normally the media time at which this buffer should be presented (rendered). When using an output surface, this will be propagated as the timestamp for the frame (after conversion to nanoseconds).(此缓冲区的呈现时间戳(以微秒为单位)。 这通常是介质缓冲区应呈现(呈现)的介质时间。 使用输出表面时,这将作为帧的时间戳(转换为纳秒后)传播。)
    flags -》 int: A bitmask of flags BUFFER_FLAG_CODEC_CONFIG and BUFFER_FLAG_END_OF_STREAM. While not prohibited, most codecs do not use the BUFFER_FLAG_KEY_FRAME flag for input buffers.(标志BUFFER_FLAG_CODEC_CONFIG和BUFFER_FLAG_END_OF_STREAM的位掩码。 虽然不禁止,但大多数编解码器不会将BUFFER_FLAG_KEY_FRAME标志用于输入缓冲区。)
  • 异常
    IllegalStateException -》 if not in the Executing state.(如果不处于执行状态)
    MediaCodec.CodecException -》 upon codec error.(编解码器错误。)
    MediaCodec.CryptoException -》 if a crypto object has been specified in configure(MediaFormat, Surface, MediaCrypto, int)(如果在配置中指定了加密对象(MediaFormat,Surface,MediaCrypto,int)

queueSecureInputBuffer

public void queueSecureInputBuffer (int index, int offset, 、MediaCodec.CryptoInfo info,long presentationTimeUs,int flags):Similar to queueInputBuffer but submits a buffer that is potentially encrypted. Check out further notes at queueInputBuffer.(与queueInputBuffer类似,但提交可能加密的缓冲区。 在queueInputBuffer中查看进一步的注释。)

  • 参数
    index -》 int: The index of a client-owned input buffer previously returned in a call to dequeueInputBuffer(long).(先前在调用dequeueInputBuffer(long)时返回的客户机拥有的输入缓冲区的索引。)
    offset -》 int: The byte offset into the input buffer at which the data starts.输入缓冲区中数据开始的字节偏移量)
    info -》 MediaCodec.CryptoInfo: Metadata required to facilitate decryption, the object can be reused immediately after this call returns.This value must never be null.(为便于解密而需要的元数据,该对象可在此调用返回后立即重用。此值绝不能为空。)
    presentationTimeUs -》 long: The presentation timestamp in microseconds for this buffer. This is normally the media time at which this buffer should be presented (rendered).(此缓冲区的呈现时间戳(以微秒为单位)。 这通常是介质缓冲区应呈现(呈现)的介质时间。)
    flags -》 int: A bitmask of flags BUFFER_FLAG_CODEC_CONFIG and BUFFER_FLAG_END_OF_STREAM. While not prohibited, most codecs do not use the BUFFER_FLAG_KEY_FRAME flag for input buffers.(标志BUFFER_FLAG_CODEC_CONFIG和BUFFER_FLAG_END_OF_STREAM的位掩码。 虽然不禁止,但大多数编解码器不会将BUFFER_FLAG_KEY_FRAME标志用于输入缓冲区。)
    • 异常
      IllegalStateException -》 if not in the Executing state.(如果不处于执行状态)
      MediaCodec.CodecException -》 upon codec error.(编解码器错误。)
      MediaCodec.CryptoException -》 if a crypto object has been specified in configure(MediaFormat, Surface, MediaCrypto, int)(如果在配置中指定了加密对象(MediaFormat,Surface,MediaCrypto,int)

release

public void release ();Free up resources used by the codec instance. Make sure you call this when you’re done to free up any opened component instance instead of relying on the garbage collector to do this for you at some point in the future.(释放编解码器实例使用的资源。 确保在你完成释放任何打开的组件实例时调用它,而不是依赖垃圾回收器在将来的某个时刻为你做这件事。)

releaseOutputBuffer

public void releaseOutputBuffer (int index, boolean render):If you are done with a buffer, use this call to return the buffer to the codec or to render it on the output surface. If you configured the codec with an output surface, setting render to true will first send the buffer to that output surface. The surface will release the buffer back to the codec once it is no longer used/displayed. Once an output buffer is released to the codec, it MUST NOT be used until it is later retrieved by getOutputBuffer(int) in response to a dequeueOutputBuffer(MediaCodec.BufferInfo, long) return value or a MediaCodec.Callback.onOutputBufferAvailable(MediaCodec, int, MediaCodec.BufferInfo) callback.(如果完成了缓冲区,则使用此调用将缓冲区返回给编解码器或将其呈现在输出表面上。 如果您使用输出表面配置编解码器,将渲染设置为true将首先将缓冲区发送到该输出表面。 一旦不再使用/显示,表面就会将缓冲区释放回编解码器。 一旦输出缓冲区被释放到编解码器,它就不能被使用,直到之后被getOutputBuffer(int)检索以响应dequeueOutputBuffer(MediaCodec.BufferInfo,long)返回值或MediaCodec.Callback.onOutputBufferAvailable(MediaCodec,int ,MediaCodec.BufferInfo)回调。)

  • 参数
    index -》 int: The index of a client-owned output buffer previously returned from a call to dequeueOutputBuffer(MediaCodec.BufferInfo, long).(先前从调用dequeueOutputBuffer(MediaCodec.BufferInfo,long)返回的客户端拥有的输出缓冲区的索引。)
    render -》 boolean: If a valid surface was specified when configuring the codec, passing true renders this output buffer to the surface.(如果在配置编解码器时指定了有效曲面,则传递true会将此输出缓冲区渲染到曲面。)
  • 异常
    IllegalStateException -》 if not in the Executing state.(如果不处于执行状态)
    MediaCodec.CodecException -》 upon codec error.(编解码器错误。)

releaseOutputBuffer

public void releaseOutputBuffer (int index, long renderTimestampNs):If you are done with a buffer, use this call to update its surface timestamp and return it to the codec to render it on the output surface. If you have not specified an output surface when configuring this video codec, this call will simply return the buffer to the codec.(如果已完成缓冲区,则使用此调用更新其表面时间戳并将其返回给编解码器以在输出表面上呈现它。 如果您在配置此视频编解码器时尚未指定输出界面,则此调用将简单地将缓冲区返回给编解码器。)
The timestamp may have special meaning depending on the destination surface.(时间戳根据目的地表面可能有特殊含义。)
SurfaceView specifics
If you render your buffer on a SurfaceView, you can use the timestamp to render the buffer at a specific time (at the VSYNC at or after the buffer timestamp). For this to work, the timestamp needs to be reasonably close to the current System.nanoTime(). Currently, this is set as within one (1) second. A few notes:(如果在SurfaceView上渲染缓冲区,则可以使用时间戳在特定时间渲染缓冲区(在缓冲区时间戳之后或之后的VSYNC处)。 为此,时间戳需要相当接近当前的System.nanoTime()。 目前,这是在一(1)秒内设定的。 一些注意事项:)

  • the buffer will not be returned to the codec until the timestamp has passed and the buffer is no longer used by the Surface.(该缓冲区将不会返回到编解码器,直到时间戳已经过去并且该缓冲区不再被Surface使用。)
  • buffers are processed sequentially, so you may block subsequent buffers to be displayed on the Surface. This is important if you want to react to user action, e.g. stop the video or seek.(缓冲区会按顺序处理,因此您可能会阻止后续缓冲区显示在Surface上。 如果您想对用户操作做出反应,这很重要。 停止视频或寻求。)
  • if multiple buffers are sent to the Surface to be rendered at the same VSYNC, the last one will be shown, and the other ones will be dropped.(如果将多个缓冲区发送到要在同一个VSYNC上渲染的Surface,则会显示最后一个缓冲区,其他则会被放弃。)
  • if the timestamp is not “reasonably close” to the current system time, the Surface will ignore the timestamp, and display the buffer at the earliest feasible time. In this mode it will not drop frames.(如果时间戳不与当前系统时间“合理接近”,Surface将忽略时间戳,并在最早的可行时间显示缓冲区。 在这种模式下,它不会丢帧。)
  • for best performance and quality, call this method when you are about two VSYNCs’ time before the desired render time. For 60Hz displays, this is about 33 msec.(为获得最佳性能和质量,当您在所需渲染时间之前约两个VSYNC的时间时调用此方法。 对于60Hz的显示器,这是大约33毫秒。)

Once an output buffer is released to the codec, it MUST NOT be used until it is later retrieved by getOutputBuffer(int) in response to a dequeueOutputBuffer(MediaCodec.BufferInfo, long) return value or a MediaCodec.Callback.onOutputBufferAvailable(MediaCodec, int, MediaCodec.BufferInfo) callback.(一旦输出缓冲区被释放到编解码器,它就不能被使用,直到之后被getOutputBuffer(int)检索以响应dequeueOutputBuffer(MediaCodec.BufferInfo,long)返回值或MediaCodec.Callback.onOutputBufferAvailable(MediaCodec,int ,MediaCodec.BufferInfo)回调。)

  • 参数
    index -》 int: The index of a client-owned output buffer previously returned from a call to dequeueOutputBuffer(MediaCodec.BufferInfo, long).(他先前从调用dequeueOutputBuffer(MediaCodec.BufferInfo,long)返回的客户端拥有的输出缓冲区的索引,)
    renderTimestampNs -》 long: The timestamp to associate with this buffer when it is sent to the Surface.(发送到Surface时与此缓冲区关联的时间戳。)
  • 异常
    IllegalStateException -》 if not in the Executing state.(如果不处于执行状态)
    MediaCodec.CodecException -》 upon codec error.(编解码器错误。)

reset

public void reset ():Returns the codec to its initial (Uninitialized) state. Call this if an unrecoverable error has occured to reset the codec to its initial state after creation.(将编解码器返回到其初始(未初始化)状态。 如果在创建后发生不可恢复的错误以将编解码器重置为其初始状态,请调用此函数。)

  • 异常
    IllegalStateException -》 if not in the Executing state.(如果不处于执行状态)
    MediaCodec.CodecException -》 upon codec error.(编解码器错误。)

setCallback

public void setCallback (MediaCodec.Callback cb,Handler handler):Sets an asynchronous callback for actionable MediaCodec events. If the client intends to use the component in asynchronous mode, a valid callback should be provided before configure(MediaFormat, Surface, MediaCrypto, int) is called. When asynchronous callback is enabled, the client should not call getInputBuffers(), getOutputBuffers(), dequeueInputBuffer(long) or dequeueOutputBuffer(BufferInfo, long).
Also, flush() behaves differently in asynchronous mode. After calling flush, you must call start() to “resume” receiving input buffers, even if an input surface was created.(为可操作的MediaCodec事件设置异步回调。 如果客户端打算以异步模式使用组件,则应在调用configure(MediaFormat,Surface,MediaCrypto,int)之前提供有效的回调。 启用异步回调时,客户端不应调用getInputBuffers(),getOutputBuffers(),dequeueInputBuffer(long)或dequeueOutputBuffer(BufferInfo,long)。
另外,flush()在异步模式下表现不同。 在调用flush之后,即使创建了输入曲面,也必须调用start()来“继续”接收输入缓冲区。)

  • 参数
    cb -》 MediaCodec.Callback: The callback that will run. Use null to clear a previously set callback (before configure is called and run in synchronous mode).(将运行的回调。 使用null清除先前设置的回调(在调用configure并在同步模式下运行之前)。)
    handler -》 Handler: Callbacks will happen on the handler’s thread. If null, callbacks are done on the default thread (the caller’s thread or the main thread.)(回调将在处理程序的线程上发生。 如果为null,则在默认线程(调用者线程或主线程)上完成回调。)

setCallback

public void setCallback (MediaCodec.Callback cb):Sets an asynchronous callback for actionable MediaCodec events on the default looper.Same as setCallback(Callback, Handler) with handler set to null.

setInputSurface

public void setInputSurface (Surface surface):Configures the codec (e.g. encoder) to use a persistent input surface in place of input buffers. This may only be called after configure(MediaFormat, Surface, MediaCrypto, int) and before start(), in lieu of createInputSurface().(配置编解码器(例如编码器)以使用持久输入表面代替输入缓冲器。 这只能在configure(MediaFormat,Surface,MediaCrypto,int)和start()之前调用,而不是createInputSurface()。)

  • 参数
    surface -》 Surface: a persistent input surface created by createPersistentInputSurface(),This value must never be null.(由createPersistentInputSurface()创建的持久性输入表面,该值不能为空。)
  • 异常
    IllegalStateException -》 if not in the Configured state or does not require an input surface.(如果不处于配置状态或不需要输入表面。)
    IllegalArgumentException -》 if the surface was not created by createPersistentInputSurface(). (如果表面不是由createPersistentInputSurface()创建的。)

setOnFrameRenderedListener

public void setOnFrameRenderedListener (MediaCodec.OnFrameRenderedListener listener, Handler handler):Registers a callback to be invoked when an output frame is rendered on the output surface.This method can be called in any codec state, but will only have an effect in the Executing state for codecs that render buffers to the output surface.
Note: This callback is for informational purposes only: to get precise render timing samples, and can be significantly delayed and batched. Some frames may have been rendered even if there was no callback generated.(注册在输出表面上呈现输出帧时调用的回调函数。可以在任何编解码器状态中调用此方法,但仅对于将缓冲区呈现到输出表面的编解码器在执行状态中起作用。
注意:此回调仅用于提供信息:获取精确的渲染时间采样,并且可以显着延迟和批处理。 即使没有生成回调,某些帧可能已经被渲染。)

  • 参数
    listener -》 MediaCodec.OnFrameRenderedListener: the callback that will be run,This value may be null.
    handler -》 Handler: the callback will be run on the handler’s thread. If null, the callback will be run on the default thread, which is the looper from which the codec was created, or a new thread if there was none.

setOutputSurface

public void setOutputSurface (Surface surface):Dynamically sets the output surface of a codec.This can only be used if the codec was configured with an output surface. The new output surface should have a compatible usage type to the original output surface. E.g. codecs may not support switching from a SurfaceTexture (GPU readable) output to ImageReader (software readable) output.(动态设置编解码器的输出表面。仅当编解码器配置有输出表面时才能使用此选项。 新的输出表面应与原始输出表面具有兼容的使用类型。 例如。 编解码器可能不支持从SurfaceTexture(GPU可读)输出切换到ImageReader(软件可读)输出。)

  • 参数
    surface -》 Surface: the output surface to use. It must not be null.
  • 异常
    IllegalStateException -》 if the codec does not support setting the output surface in the current state.
    IllegalArgumentException -》 if the new surface is not of a suitable type for the codec.

setParameters

public void setParameters (Bundle params):Communicate additional parameter changes to the component instance. Note: Some of these parameter changes may silently fail to apply.

  • 参数
    params -》Bundle: The bundle of parameters to set.This value may be null.
  • 异常
    IllegalStateException if in the Released state.

setVideoScalingMode

public void setVideoScalingMode (int mode):If a surface has been specified in a previous call to configure(MediaFormat, Surface, MediaCrypto, int) specifies the scaling mode to use. The default is “scale to fit”.

⚠️ The scaling mode may be reset to the default each time an INFO_OUTPUT_BUFFERS_CHANGED event is received from the codec; therefore, the client must call this method after every buffer change event (and before the first output buffer is released for rendering) to ensure consistent scaling mode.
⚠️ Since the INFO_OUTPUT_BUFFERS_CHANGED event is deprecated, this can also be done after each INFO_OUTPUT_FORMAT_CHANGED event.

  • 参数
    mode -》 int
  • 异常
    IllegalArgumentException -》 if mode is not recognized.
    IllegalStateException -》 if in the Released state.

signalEndOfInputStream

public void signalEndOfInputStream ():Signals end-of-stream on input. Equivalent to submitting an empty buffer with BUFFER_FLAG_END_OF_STREAM set. This may only be used with encoders receiving input from a Surface created by createInputSurface().

  • 异常
    IllegalStateException -》 if not in the Executing state.
    MediaCodec.CodecException -》 upon codec error.

start

public void start ():After successfully configuring the component, call start.Call start also if the codec is configured in asynchronous mode, and it has just been flushed, to resume requesting input buffers.

  • 异常
    IllegalStateException -》 if not in the Configured state or just after flush() for a codec that is configured in asynchronous mode.
    MediaCodec.CodecException -》 upon codec error. Note that some codec errors for start may be attributed to future method calls.

stop

public void stop ():Finish the decode/encode session, note that the codec instance remains active and ready to be start()ed again. To ensure that it is available to other client call release() and don’t just rely on garbage collection to eventually do this for you.

  • 异常
    IllegalStateException -》 if in the Released state.

未命名

发表于 2018-07-02

音视频处理涉及到的类api

MediaFormat

官方描述:Encapsulates the information describing the format of media data, be it audio or video. The format of the media data is specified as string/value pairs。added in API level 16。 public final class MediaFormat extends Object。
译文:封装描述媒体数据格式的信息,无论是音频还是视频。 媒体数据的格式被指定为字符串/值对。

MediaMuxer

官方描述:MediaMuxer facilitates muxing elementary streams. Currently MediaMuxer supports MP4, Webm and 3GP file as the output. It also supports muxing B-frames in MP4 since Android Nougat. added in API level 18。public final class MediaMuxer extends Object。
译文:MediaMuxer有助于混合基本流。 目前MediaMuxer支持MP4,Webm和3GP文件作为输出。 自从Android Nougat以来,它还支持MP4中的M帧B帧。
其一般的用法如下:

1
2
3
4
5
6
7
8
9
10
11
12
13
14
15
16
17
18
19
20
21
22
23
24
25
MediaMuxer muxer = new MediaMuxer("temp.mp4", OutputFormat.MUXER_OUTPUT_MPEG_4);
// More often, the MediaFormat will be retrieved from MediaCodec.getOutputFormat()
// or MediaExtractor.getTrackFormat().
MediaFormat audioFormat = new MediaFormat(...);
MediaFormat videoFormat = new MediaFormat(...);
int audioTrackIndex = muxer.addTrack(audioFormat);
int videoTrackIndex = muxer.addTrack(videoFormat);
ByteBuffer inputBuffer = ByteBuffer.allocate(bufferSize);
boolean finished = false;
BufferInfo bufferInfo = new BufferInfo();

muxer.start();
while(!finished) {
// getInputBuffer() will fill the inputBuffer with one frame of encoded
// sample from either MediaCodec or MediaExtractor, set isAudioSample to
// true when the sample is audio data, set up all the fields of bufferInfo,
// and return true if there are no more samples.
finished = getInputBuffer(inputBuffer, isAudioSample, bufferInfo);
if (!finished) {
int currentTrackIndex = isAudioSample ? audioTrackIndex : videoTrackIndex;
muxer.writeSampleData(currentTrackIndex, inputBuffer, bufferInfo);
}
};
muxer.stop();
muxer.release();

Surface

public class Surface extends Object implements Parcelable:Handle onto a raw buffer that is being managed by the screen compositor.A Surface is generally created by or from a consumer of image buffers (such as a SurfaceTexture, MediaRecorder, or Allocation), and is handed to some kind of producer (such as OpenGL, MediaPlayer, or CameraDevice) to draw into.

Note: A Surface acts like a weak reference to the consumer it is associated with. By itself it will not keep its parent consumer from being reclaimed.
(处理由屏幕合成器管理的原始缓冲区。surface通常由图像缓冲区(例如SurfaceTexture,MediaRecorder或Allocation)的使用者创建或从图像缓冲区的消费者创建,并被传递给某种生产者(例如OpenGL,MediaPlayer或CameraDevice)以进行绘制。
注意:Surface表示对与其关联的使用者的弱引用。 它本身不会让其父母消费者不被收回。)

Android音视频处理之MediaExtractor

发表于 2018-06-28 | 分类于 Android , Media

Android提供了一个MediaExtractor类,可以用来分离容器中的视频track和音频track,下面的例子展示了使用MediaExtractor和MediaMuxer来实现视频的换音:

1
2
3
4
5
6
7
8
9
10
11
12
13
14
15
16
17
18
19
20
21
22
23
24
25
26
27
28
29
30
31
32
33
34
35
36
37
38
39
40
41
42
43
44
45
46
47
48
49
50
51
52
53
54
55
56
57
58
59
60
61
62
63
64
65
66
67
68
69
70
71
72
73
74
75
76
77
78
private void muxingAudioAndVideo(String videoPath, String audioPath, String outputPath) throws IOException {
MediaMuxer mediaMuxer = new MediaMuxer(outputPath, MediaMuxer.OutputFormat.MUXER_OUTPUT_MPEG_4);

//视频的MediaExtractor
MediaExtractor videoExtractor = new MediaExtractor();
videoExtractor.setDataSource(videoPath);
int videoTrackIndex = -1;
for (int i = 0; i < videoExtractor.getTrackCount(); i++) {
MediaFormat format = videoExtractor.getTrackFormat(i);
if (format.getString(MediaFormat.KEY_MIME).startsWith("video")) {
videoExtractor.selectTrack(i);
videoTrackIndex = mediaMuxer.addTrack(format);
break;
}
}

//音频的MediaExtractor
MediaExtractor audioExtractor = new MediaExtractor();
audioExtractor.setDataSource(audioPath);
int audioTrackIndex = -1;
for (int i = 0; i < audioExtractor.getTrackCount(); i++) {
MediaFormat format = audioExtractor.getTrackFormat(i);
if (format.getString(MediaFormat.KEY_MIME).startsWith("audio")) {
audioExtractor.selectTrack(i);
audioTrackIndex = mediaMuxer.addTrack(format);
}
}
// 添加完所有轨道后start
mediaMuxer.start();

// 封装视频track
if (-1 != videoTrackIndex) {
MediaCodec.BufferInfo info = new MediaCodec.BufferInfo();
info.presentationTimeUs = 0;
ByteBuffer buffer = ByteBuffer.allocate(1024 * 1024);
while (true) {
int sampleSize = videoExtractor.readSampleData(buffer, 0);
if (sampleSize < 0) {
break;
}
info.offset = 0;
info.size = sampleSize;
info.flags = MediaCodec.BUFFER_FLAG_SYNC_FRAME;
info.presentationTimeUs = videoExtractor.getSampleTime();
mediaMuxer.writeSampleData(videoTrackIndex, buffer, info);

videoExtractor.advance();
}
}

// 封装音频track
if (-1 != audioTrackIndex) {
MediaCodec.BufferInfo info = new MediaCodec.BufferInfo();
info.presentationTimeUs = 0;
ByteBuffer buffer = ByteBuffer.allocate(100 * 1024);
while (true) {
int sampleSize = audioExtractor.readSampleData(buffer, 0);
if (sampleSize < 0) {
break;
}
info.offset = 0;
info.size = sampleSize;
info.flags = MediaCodec.BUFFER_FLAG_SYNC_FRAME;
info.presentationTimeUs = audioExtractor.getSampleTime();
mediaMuxer.writeSampleData(audioTrackIndex, buffer, info);

audioExtractor.advance();
}
}

// 释放MediaExtractor
videoExtractor.release();
audioExtractor.release();

// 释放MediaMuxer
mediaMuxer.stop();
mediaMuxer.release();
}

MediaExtractor的接口比较简单,首先通过 setDataSource()设置数据源,数据源可以是本地文件地址,也可以是网络地址:

1
2
MediaExtractor mVideoExtractor = new MediaExtractor();
mVideoExtractor.setDataSource(mVideoPath);

然后可以通过getTrackFormat(int index)来获取各个track的 MediaFormat,通过MediaFormat来获取track的详细信息,如:MimeType、分辨率、采样频率、帧率 等等,其内部就是一个map对象,通过key获取对应的信息:

1
2
3
for (int i = 0; i < mVideoExtractor.getTrackCount(); i++) {
MediaFormat format = mVideoExtractor.getTrackFormat(i);
}

获取到track的详细信息后,通过selectTrack(int index)选择指定的通道:

1
2
3
4
if (format.getString(MediaFormat.KEY_MIME).startsWith("video/")) {
mVideoExtractor.selectTrack(i);
break;
}

指定通道之后就可以从MediaExtractor中读取数据了:

1
2
3
4
5
6
7
8
while (true) {
int sampleSize = mVideoExtractor.readSampleData(buffer, 0);
if (sampleSize < 0) {
break;
}
// do something
mVideoExtractor.advance(); // 移动到下一帧
}

在读取结束之后,记得释放资源:

1
mVideoExtractor.release();

问题:

  1. Android MediaExtractor readSampleData IllegalArgumentException
    视频采样的时候报的错误,主要视频的采用buffer设置的可能小了,开始设置的是100K,后来提到1M就没有问题;
    参考地址:https://stackoverflow.com/questions/33148629/android-mediaextractor-readsampledata-illegalargumentexception
  2. MPEG4Writer: Unsupported mime ‘audio/mpeg’
    一开始使用的是mp3音频,显示不支持,后来换成m4a就没有问题,后期在看下MPEG4Writer支持什么音频格式!!!
    参考地址: http://www.cnblogs.com/rockylearnstodevelop/p/5353717.html

拓展:

  1. 关于Android读取assert下的资源文件
    Android 中资源分为两种,一种是res下可编译的资源文件, 这种资源文件系统会在R.java里面自动生成该资源文件的ID,访问也很简单,只需要调用R.XXX.id即可;第二种就是放在assets文件夹下面的原生资源文件,assets文件夹里面的文件都是保持原始的文件格式,放在这个文件夹下面的文件不会被R文件编译,所以不能像第一种那样直接使用.Android提供了一个工具类,方便我们操作获取assets文件下的文件:AssetManager,需要用AssetManager以字节流的形式读取文件。其主要步骤是:

    • 获取Context然后调用getAssets()来获取AssetManager引用。
    • 再用AssetManager的open(String fileName,int accessMode)方法并指定要读取的文件名称以及访
      问模式来获取输入流InputStream。
    • 用InputStream读取文件,读取完后需要InputStream.close();
    • 最后调用AssetManager的close()方法关闭AssetManager。
  2. AssetManager提供了如下方法用于处理assets:

    1
    2
    3
    4
    5
    6
    7
    8
    9
    10
    String[] list(String path);//列出该目录下的下级文件和文件夹名称

    InputStream open(String fileName);//以顺序读取模式打开文件,默认模式为ACCESS_STREAMING

    InputStream open(String fileName, int accessMode);//以指定模式打开文件。读取模式有以下几种:
    //ACCESS_UNKNOWN : 未指定具体的读取模式
    //ACCESS_RANDOM : 随机读取
    //ACCESS_STREAMING : 顺序读取
    //ACCESS_BUFFER : 缓存读取
    void close()//关闭AssetManager实例
  3. 使用
    assets目录下主要存放四种文件:文本文件、图像文件、网页文件(包括html中引用的js/ccs/jpg等资源)、音频视频文件,下面通过具体的案例分别来说下怎么获取

    • 加载assets目录下的网页
      1
      webView.loadUrl("file:///android_asset/html/index.htmll");

说明:这种方式可以加载assets目录下的网页,并且与网页有关的css,js,图片等文件也会的加载。

  • 加载assets目录下的图片资源

    1
    2
    3
    InputStream is = getAssets().open(fileName);  
    bitmap = BitmapFactory.decodeStream(is);
    ivImg.setImageBitmap(bitmap);
  • 加载assets目录下文本文件

    1
    2
    3
    4
    5
    InputStream is = getAssets().open(fileName);  
    int lenght = is.available();
    byte[] buffer = new byte[lenght];
    is.read(buffer);
    String result = = new String(buffer, "utf8");
  • 加载assets目录下音乐

    1
    2
    3
    4
    5
    6
    7
    8
    9
    10
    // 打开指定音乐文件,获取assets目录下指定文件的AssetFileDescriptor对象  
    AssetFileDescriptor afd = am.openFd(music);
    mPlayer.reset();
    // 使用MediaPlayer加载指定的声音文件。
    mPlayer.setDataSource(afd.getFileDescriptor(),
    afd.getStartOffset(), afd.getLength());
    // 准备声音
    mPlayer.prepare();
    // 播放
    mPlayer.start();

补充下:Android中还有另外一个文件夹raw,和assets差不多,也不会被R文件编译,但是raw下不能在建文件夹,assets文件下是可以在建文件夹的,下面是获取raw文件夹下资源的方法:

1
InputStream is = getResources().openRawResource(R.id.filename);

将assets下的文件复制到SD卡中

1
2
3
4
5
6
7
8
9
10
11
12
13
14
15
16
17
18
19
20
21
22
23
24
25
26
27
28
29
30
31
32
33
34
/**  
* 从assets目录中复制整个文件夹内容
* @param context Context 使用CopyFiles类的Activity
* @param oldPath String 原文件路径 如:/aa
* @param newPath String 复制后路径 如:xx:/bb/cc
*/
public void copyFilesFassets(Context context,String oldPath,String newPath) {
try {
String fileNames[] = context.getAssets().list(oldPath);//获取assets目录下的所有文件及目录名
if (fileNames.length > 0) {//如果是目录
File file = new File(newPath);
file.mkdirs();//如果文件夹不存在,则递归
for (String fileName : fileNames) {
copyFilesFassets(context,oldPath + "/" + fileName,newPath+"/"+fileName);
}
} else {//如果是文件
InputStream is = context.getAssets().open(oldPath);
FileOutputStream fos = new FileOutputStream(new File(newPath));
byte[] buffer = new byte[1024];
int byteCount=0;
while((byteCount=is.read(buffer))!=-1) {//循环从输入流读取 buffer字节
fos.write(buffer, 0, byteCount);//将读取的输入流写入到输出流
}
fos.flush();//刷新缓冲区
is.close();
fos.close();
}
} catch (Exception e) {
// TODO Auto-generated catch block
e.printStackTrace();
//如果捕捉到错误则通知UI线程
MainActivity.handler.sendEmptyMessage(COPY_FALSE);
}
}

补充:Android获取assets或者raw目录的视频文件路径播放视频

1
2
3
4
String mp4FilePath = "file:///android_asset/Kotlin与ava共存.mp4";
mVideoView = (VideoView) findViewById(R.id.mVideoView);
mVideoView.setVideoPath(mp4FilePath);
mVideoView.start();

会提示播放失败。因为通过assets目录构造URI,不能用来播放视频,也不能播放音频。在raw目录下的文件构造URI可以播放音频,也能播放视频。 .
正确的是:

1
2
3
4
5
6
String uri = "android.resource://" + getPackageName() + "/" + R.raw.video;
mVideoView = (VideoView) findViewById(R.id.mVideoView);
mVideoView.setVideoPath(uri);
//mVideoView.setVideoPath(uri);
mVideoView.setVideoURI(Uri.parse(uri));
mVideoView.start();

参考:
[1] Android中读取assets目录下的文件详细介绍 https://blog.csdn.net/greathfs/article/details/52123984
[2] assets文件读取 https://www.cnblogs.com/wgscd/p/6738818.html
[3] asset视频播放 https://blog.csdn.net/e_inch_photo/article/details/78306785?utm_source=debugrun&utm_medium=referral

Android o 中Notification使用

发表于 2018-06-27 | 分类于 Android

介绍

    随着Android 8.0的发布,google更新了Notification内容,新增了通知渠道这个概念,用来对通知进行分类管理,以提高用户体验。关于Android 8.0中NotificationChannel的管理在《设置》-》《应用管理》-》《具体应用》-》《通知》或者 《设置》-》《通知》(具体应手机不同可能略有差异)就可以看到应用已经设置的通知渠道,这里可以对不同渠道通知管理。

创建NotificationChannl

    通过NotificationManager的createNotificationChannel方法来创建NotificationChannel:

1
2
3
4
5
6
7
8
9
10
11
12
13
14
15
16
public void createNotificationChannel(String id, String name, int importance, String desc) {
if (mNotificationManager.getNotificationChannel(id) != null) return;

NotificationChannel notificationChannel = new NotificationChannel(id, name, importance);
notificationChannel.enableLights(true);
notificationChannel.enableVibration(true);

notificationChannel.setLightColor(Color.RED);
notificationChannel.setLockscreenVisibility(Notification.VISIBILITY_PRIVATE);
notificationChannel.setShowBadge(true);
notificationChannel.setBypassDnd(true);
notificationChannel.setVibrationPattern(new long[]{100, 200, 300, 400});
notificationChannel.setDescription(desc);

mNotificationManager.createNotificationChannel(notificationChannel);
}

NotificationChannel 的方法列表:

  • getId() — 获取 ChannleId
  • enableLights() — 开启指示灯,如果设备有的话。
  • setLightColor() — 设置指示灯颜色
  • enableVibration() — 开启震动
  • setVibrationPattern() — 设置震动频率
  • setImportance() — 设置频道重要性
  • getImportance() — 获取频道重要性
  • setSound() — 设置声音
  • getSound() — 获取声音
  • setGroup() — 设置 ChannleGroup
  • getGroup() — 得到 ChannleGroup
  • setBypassDnd() — 设置绕过免打扰模式
  • canBypassDnd() — 检测是否绕过免打扰模式
  • getName() — 获取名称
  • setLockScreenVisibility() — 设置是否应在锁定屏幕上显示此频道的通知
  • getLockscreenVisibility() — 检测是否应在锁定屏幕上显示此频道的通知
  • setShowBadge() 设置是否显示角标
  • canShowBadge() — 检测是否显示角标

以上属性表示了隶属这个渠道的通知显示效果。

setImportance 重要程度

越高,提示权限就越高,最高的支持发出声音&悬浮通知。

1
2
3
4
5
6
7
public static final int IMPORTANCE_DEFAULT = 3;
public static final int IMPORTANCE_HIGH = 4;
public static final int IMPORTANCE_LOW = 2;
public static final int IMPORTANCE_MAX = 5;
public static final int IMPORTANCE_MIN = 1;
public static final int IMPORTANCE_NONE = 0;
public static final int IMPORTANCE_UNSPECIFIED = -1000;

删除 NotificationChannel

通过 NotificationManager 的 deleteNotificationChannel 方法来删除 NotificationChannel。

1
mNotificationManager.deleteNotificationChannel(chatChannelId);

发出通知

只需要设置一个 ChannelId 即可发布到对应的 Channel 上,需要注意的是 NotificationChannel 一定要先创建才行。

1
2
3
4
5
6
7
8
9
10
11
12
13
14
Notification.Builder builder = new Notification.Builder(this, chatChannelId);
builder.setSmallIcon(R.mipmap.ic_launcher)
.setContentTitle("Gavin")
.setContentText("Today released Android 8.0 version of its name is Oreo")
.setAutoCancel(true);

Intent resultIntent = new Intent(this, MainActivity.class);
TaskStackBuilder stackBuilder = TaskStackBuilder.create(this);
stackBuilder.addParentStack(MainActivity.class);
stackBuilder.addNextIntent(resultIntent);
PendingIntent resultPendingIntent = stackBuilder.getPendingIntent(0, PendingIntent.FLAG_UPDATE_CURRENT);
builder.setContentIntent(resultPendingIntent);

mNotificationManager.notify((int) System.currentTimeMillis(), builder.build());

角标管理

首先要开启允许使用通知圆点,这个是用户可以取消的,如果要显示一定要代码中保证是开启状态。

  1. NotificationChannel 开启角标

    1
    notificationChannel.setShowBadge(true);
  2. Notification 设置角标样式

    1
    new Notification.Builder(this, chatChannelId).setBadgeIconType(BADGE_ICON_SMALL)
  3. Notification 设置角标计数

    1
    new Notification.Builder(this, chatChannelId).setNumber(1)

跳转设置

1
2
3
4
Intent intent = new Intent(Settings.ACTION_CHANNEL_NOTIFICATION_SETTINGS);
intent.putExtra(Settings.EXTRA_CHANNEL_ID, chatChannelId);
intent.putExtra(Settings.EXTRA_APP_PACKAGE, getPackageName());
startActivity(intent);

使用 NotificationChannleGroup

如果你的通知渠道比较多,那么久可以考虑使用 NotificationChannleGroup 来管理一下 。

创建 NotificationChannleGroup

和创建 NotificationChannle 类似

1
mNotificationManager.createNotificationChannelGroup(new NotificationChannelGroup(groupId, groupName));

NotificationChannle 绑定 groupId

1
notificationChannel.setGroup(groupId);

删除 NotificationChannleGroup

可以批量删除该 Group 下的所有 Channel

1
mNotificationManager.deleteNotificationChannelGroup(groupId2);

参考地址:
[1]. NotificationChannl运用 http://gavinliu.cn/2017/08/22/Android-%E5%90%83%E5%A5%A5%E5%88%A9%E5%A5%A5%E7%B3%BB%E5%88%97-1-Notification/

androidCamera2使用

发表于 2018-06-22 | 分类于 Android

Camera2 介绍

    从android5.0开始对相机的API进行了全新的设计,这些API都在android.hardware.camera2包下,也是为了区分之前的API,新API不仅大幅提高了Android系统拍照等功能,还支持RAW照片输出,甚至允许程序调整相机的对焦模式、曝光模式、快门等。官网给出的说明如下:
Camera2 API

  • Supports 30fps full resolution with burst mode
    支持30fps的全高清连拍
  • Supports change on manual camera settings between frame capture
    支持帧之间的手动设置
  • Supports RAW image capture
    支持RAW格式的图片拍摄
  • Supports Zero Shutter Lag & Movie Snapshot
    支持快门0延迟以及电影速拍
  • Supports setting other manual camera device controls including level of Noise Cancelling
    支持相机其他方面的手动控制包括噪音消除的级别
  1. Camera2工作流程示意图:
    camera2流程示意图
        Google采用了pipeline(管道)的概念,将Camera Device相机设备和Android Device安卓设备连接起来, Android Device通过管道发送CaptureRequest拍照请求给Camera Device,Camera Device通过管道返回CameraMetadata数据给Android Device,这一切建立在一个叫作CameraCaptureSession的会话中。

  2. Camera2类图:
    camera2类图
        其中CameraManager是所有相机设备(CameraDevice)的管理者,而每个CameraDevice自己会负责建立CameraCaptureSession以及建立CaptureRequest。CameraCharacteristics是CameraDevice的属性描述类,在CameraCharacteristics中可以进行相机设备功能的详细设定(当然了,首先你得确定你的相机设备支持这些功能才行)类图中有着三个重要的callback,其中CameraCaptureSession.CaptureCallback将处理预览和拍照图片的工作,需要重点对待。

以上的类是如何相互配合的?下面是拍照的流程图:
camera2类图

  1. 调用openCamera方法后会回调CameraDevice.StateCallback方法,该方法重写onPened函数;
  2. 在onOpened方法中调用createCaptureSession方法,该方法又回调CameraCaptureSession.StateCallback方法。
  3. 在CameraCaptureSession.StateCallback中重写onConfigured方法,设置setRepeatingRequest方法(也即开启预览);
  4. 在setRepeatingRequest又会回调CameraCaptureSession.CaptureCallback方法;
  5. 重写CameraCaptureSession.CaptureCallback中的onCaptureCompleted方法,result就是未经过处理的元数据;

其中onCaptureProgressed方法很明显是在Capture过程中的,也就是在onCaptureCompleted之前,所以,在这之前相对图像干什么就看你的了,像美颜等操作就可以在这个方法中实现了。

由此也可以看出Camera2相机使用还是简单的,其实就是3个Callback函数的回调,先说一下:setRepeatingRequest和capture方法其实都是向相机设备发送获取图像的请求,但是capture就获取那么一次,而setRepeatingRequest就是不停的获取图像数据,所以呢,使用capture就想拍照一样,图像就停在那里了,但是setRepeatingRequest一直在发送和获取,所以需要连拍的时候就调用它,然后在onCaptureCompleted中保存图像就行了。(注意了,图像的预览也是用的setRepeatingRequest,只要不处理数据就行了),从上面我们也了解到Camera2运用主要用到这些类:CameraManager、CameraDevice、CameraCharacteristics、CameraRequest与CameraRequest.Builder、CameraCaptureSession以及CaptureResult。

  1. CameraManager:位于android.hardware.camera2.CameraManager下,也是Android 21(5.0)添加的,和其他系统服务一样通过 Context.getSystemService(CameraManager.class ) 或者Context.getSystemService(Context.CAMERA_SERVICE) 来完成初始化,主要用于管理系统摄像头:

    • 通过getCameraIdList()方法获取Android设备的摄像头列表,如今手机基本都有前后摄像头,有的手机则更多;
    • 通过getCameraIdList()方法获取Android设备的摄像头列表;
    • openCamera(String cameraId, CameraDevice.StateCallback callback, Handler handler)打开指定Id的摄像头;
  2. CameraDevice:CameraDevice是Camera2中抽象出来的一个对象,直接与系统硬件摄像头相联系。因为不可能所有的摄像头都会支持高级功能(即摄像头功能可被分为limit 和full 两个级别),当摄像头处于limited 级别时候,此时Camera2和早期的Camera功能差不多,除此之外在Camera2架构中,CameraDevice还承担其他两项重要任务:

    • 通过CameraDevice.StateCallback监听摄像头的状态(主要包括onOpened、onClosed、onDisconnected、onErro四种状态);
    • 管理CameraCaptureSession,通过方法createCaptureSession(List outputs, CameraCaptureSession.StateCallback callback, Handler handler)方法和createReprocessableCaptureSession(InputConfiguration inputConfig, List outputs, CameraCaptureSession.StateCallback callback, Handler handler)方法创建会话 (其中第三个参数: The handler on which the callback should be invoked, or null to use the current thread’s looper.),通常会在CameraDevice.StateCallback中调用对应方法创建预览会话。
    • 管理CaptureRequest,主要包括通过createCaptureRequest(int templateType)创建捕获请求,在需要预览、拍照、再次预览的时候都需要通过创建请求来完成;
  3. CameraCaptureSession:系统向摄像头发送 Capture 请求,而摄像头会返回 CameraMetadata,这一切都是在由对应的 CameraDevice创建的CameraCaptureSession 会话 完成,当程序需要预览、拍照、再次预览时,都需要先通过会话。(A configured capture session for a CameraDevice, used for capturing images from the camera or reprocessing images captured from the camera in the same session previously.A CameraCaptureSession is created by providing a set of target output surfaces to createCaptureSession, or by providing an InputConfiguration and a set of target output surfaces to createReprocessableCaptureSession for a reprocessable capture session. Once created, the session is active until a new session is created by the camera device, or the camera device is closed.)CameraCaptureSession一旦被创建,直到对应的CameraDevice关闭才会死掉。虽然CameraCaptureSession会话用于从摄像头中捕获图像,但是 只有同一个会话才能再次从同一摄像头中捕获图像。另外,创建会话是一项耗时的异步操作,可能需要几百毫秒,因为它需要配置相机设备的内部管道并分配内存缓冲区以将图像发送到所需的目标,因而createCaptureSession和createReprocessableCaptureSession会将随时可用的CameraCaptureSession发送到提供的监听器的onConfigured回调中。如果无法完成配置,则触发onConfigureFailed回调,并且会话将不会变为活动状态。最后需要注意的是,如果摄像头设备创建了一个新的会话,那么上一个会话是被关闭的,并且会回调与其关联的onClosed,如果不处理好,当会话关闭之后再次调用会话的对应方法那么所有方法将会跑出IllegalStateException异常。关闭的会话清除任何重复的请求(和调用了stopRepeating()方法类似),但是在新创建的会话接管并重新配置摄像机设备之前,关闭的会话仍然会正常完成所有正在进行的捕获请求。简而言之,在Camera2中CameraCaptureSession承担很重要的角色:

    • 管理CameraCaptureSession.StateCallback状态回调,用于接收有关CameraCaptureSession状态的更新的回调对象,主要回调方法有两个当CameraDevice 完成配置,对应的会话开始处理捕获请求时触发onConfigured(CameraCaptureSession session)方法,反之配置失败时候触发onConfigureFailed(CameraCaptureSession session)方法;
    • 管理CameraCaptureSession.CaptureCallback捕获回调,用于接收捕获请求状态的回调,当请求触发捕获已启动时;捕获完成时;在捕获图像时发生错误的情况下;都会触发该回调对应的方法;
    • 通过调用方法capture(CaptureRequest request, CameraCaptureSession.CaptureCallback listener, Handler handler)提交捕获图像请求(Submit a request for an image to be captured by the camera device.)即拍照,其中该请求定义了捕获单个图像的所有参数,包括传感器,镜头,闪光灯和后处理参数,每一次请求的结果将产生一个CaptureResult,可以为一个或多个Surface生成新的帧,然后 通过CaptureRequest.Builder的addTarget(Surface)方法附着到对应的Surface上显示,而且这个参数Surface必须是会话创建时候的一个子集,会话一次可以处理多个常规和重新处理请求。但如果只有常规请求或重新处理请求在进行,则以先进先出的顺序处理它们;如果两者都在进行中则分别以各自的先进先出顺序处理他们;然而,处理常规请求和重新处理请求的顺序并不是特定的,换言之,一个常规请求在下一个常规请求提交前被处理,同理重新处理请求也一样,但是一个常规请求不一定是在下一个重新处理请求提交之前被处理。通过capture方法提交的请求处理优先级比通过其他方式( setRepeatingRequest(CaptureRequest, CameraCaptureSession.CaptureCallback, Handler) 或者setRepeatingBurst(List, CameraCaptureSession.CaptureCallback, Handler))提交的请求的处理优先级高,一旦当前的repeat / repeatBurst处理完成,就会被处理。最后一点,所有CaptureSession可用于从相机捕获图像,但只有由createReprocessableCaptureSession创建的会话才可以提交重新处理捕获请求,
      将重新处理请求提交到常规捕获会话将导致IllegalArgumentException;
    • 通过调用方法setRepeatingRequest(CaptureRequest request, CameraCaptureSession.CaptureCallback listener, Handler handler)请求不断重复捕获图像,即实现预览;
    • 通过方法调用stopRepeating()实现停止捕获图像,即停止预览;
    1. CameraCharacteristics:描述Cameradevice属性的对象,可以使用CameraManager通过getCameraCharacteristics(String cameraId)进行查询;

    2. CameraRequest和CameraRequest.Builder:CameraRequest代表了一次捕获请求,而 CameraRequest.Builder用于描述捕获图片的各种参数设置,包含捕获硬件(传感器,镜头,闪存),对焦模式、曝光模式,处理流水线,控制算法和输出缓冲区的配置。,然后传递到对应的会话中进行设置,CameraRequest.Builder则负责生成CameraRequest对象。当程序调用setRepeatingRequest()方法进行预览时,或调用capture()方法进行拍照时,都需要传入CameraRequest参数。CameraRequest可以通过CameraRequest.Builder来进行初始化,通过调用createCaptureRequest来获得;

    3. CaptureResult:CaptureRequest描述是从图像传感器捕获单个图像的结果的子集的对象。(CaptureResults are produced by a CameraDevice after processing a CaptureRequest)当CaptureRequest被处理之后由CameraDevice生成;

    4. Camera2 主要角色之间的联系:CameraManager处于顶层管理位置负责检测获取所有摄像头及其特性和传入指定的CameraDevice.StateCallback回调打开指定摄像头,CameraDevice 是负责管理抽象对象,包括 监听Camera 的状态回调CameraDevice.StateCallback、创建CameraCaptureSession和CameraRequest,CameraCaptureSession 用于描述一次图像捕获操作,主要负责 监听自己会话的状态回调CameraCaptureSession.StateCallback和CameraCaptureSession.CaptureCallback捕获回调,还有发送处理 CameraRequest;CameraRequest 则可以看成是一个”JavaBean”的作用用于描述希望什么样的配置来处理这次请求;最后三个回调用于监听对应的状态。

Camera2 使用

  1. 权限配置:
    1
    2
    3
    4
    5
    6
    //相机权限
    <uses-permission android:name="android.permission.CAMERA" />
    //保存照片需要的权限
    <uses-permission android:name="android.permission.WRITE_EXTERNAL_STORAGE" />
    //录制视频需要的权限
    <uses-permission android:name="android.permission.RECORD_AUDIO" />

在6.0之后还需要在使用相机时动态判断是否具备权限:

1
2
3
4
5
6
private String[] permission = new String[]{
Manifest.permission.CAMERA};
if (ContextCompat.checkSelfPermission(getApplicationContext(), Manifest.permission.CAMERA) != PackageManager.PERMISSION_GRANTED) {
requestPermissions(permission, 101);
return;
}

  1. 打开相机并实时预览:

    1
    2
    3
    4
    5
    6
    7
    8
    9
    10
    11
    12
    13
    14
    15
    16
    17
    18
    19
    20
    21
    22
    23
    24
    25
    26
    27
    28
    29
    30
    31
    32
    33
    34
    35
    36
    37
    38
    39
    40
    41
    42
    43
    44
    45
    46
    47
    48
    49
    50
    51
    52
    53
    54
    55
    56
    57
    58
    59
    60
    61
    62
    63
    64
    65
    66
    67
    68
    69
    70
    71
    72
    73
    74
    75
    76
    77
    78
    79
    80
    81
    HandlerThread handlerThread=new HandlerThread("Camera2");
    handlerThread.start();
    Handler childHandler=new Handler(handlerThread.getLooper());
    handler mainHandler=new Handler(getMainLooper());

    private void initCamera() {

    CameraManager cameraManager = (CameraManager) getSystemService(Context.CAMERA_SERVICE);
    try {
    if (ActivityCompat.checkSelfPermission(this, Manifest.permission.CAMERA) != PackageManager.PERMISSION_GRANTED) {
    return;
    }
    //打开摄像头
    cameraManager.openCamera(CameraCharacteristics.LENS_FACING_BACK + "", stateCallback, mainHandler);
    } catch (CameraAccessException e) {
    e.printStackTrace();
    }
    }

    //相机状态监听回调
    private CameraDevice.StateCallback stateCallback = new CameraDevice.StateCallback() {
    @Override
    public void onOpened(CameraDevice camera) {//打开摄像头
    mCameraDevice = camera;
    //开启预览
    takePreview();
    }

    @Override
    public void onDisconnected(CameraDevice camera) {//关闭摄像头
    if (null != mCameraDevice) {
    mCameraDevice.close();
    MainActivity.this.mCameraDevice = null;
    }
    }

    @Override
    public void onError(CameraDevice camera, int error) {//发生错误
    Toast.makeText(MainActivity.this, "摄像头开启失败", Toast.LENGTH_SHORT).show();
    }
    };

    /**
    * 开始预览
    */
    private void takePreview() {
    try {
    // 创建预览需要的CaptureRequest.Builder
    final CaptureRequest.Builder previewRequestBuilder = mCameraDevice.createCaptureRequest(CameraDevice.TEMPLATE_PREVIEW);
    // 将SurfaceView的surface作为CaptureRequest.Builder的目标
    previewRequestBuilder.addTarget(surfaceHolder.getSurface());
    // 创建CameraCaptureSession,该对象负责管理处理预览请求和拍照请求
    mCameraDevice.createCaptureSession(Arrays.asList(surfaceHolder.getSurface(), mImageReader.getSurface()), new CameraCaptureSession.StateCallback() // ③
    {
    @Override
    public void onConfigured(CameraCaptureSession cameraCaptureSession) {
    if (null == mCameraDevice) return;
    // 当摄像头已经准备好时,开始显示预览
    mCameraCaptureSession = cameraCaptureSession;
    try {
    // 自动对焦
    previewRequestBuilder.set(CaptureRequest.CONTROL_AF_MODE, CaptureRequest.CONTROL_AF_MODE_CONTINUOUS_PICTURE);
    // 打开闪光灯
    previewRequestBuilder.set(CaptureRequest.CONTROL_AE_MODE, CaptureRequest.CONTROL_AE_MODE_ON_AUTO_FLASH);
    // 显示预览
    CaptureRequest previewRequest = previewRequestBuilder.build();
    mCameraCaptureSession.setRepeatingRequest(previewRequest, null, childHandler);
    } catch (CameraAccessException e) {
    e.printStackTrace();
    }
    }

    @Override
    public void onConfigureFailed(CameraCaptureSession cameraCaptureSession) {
    Toast.makeText(MainActivity.this, "配置失败", Toast.LENGTH_SHORT).show();
    }
    }, childHandler);
    } catch (CameraAccessException e) {
    e.printStackTrace();
    }
    }
  2. 使用相机拍照

    1
    2
    3
    4
    5
    6
    7
    8
    9
    10
    11
    12
    13
    14
    15
    16
    17
    18
    19
    20
    21
    22
    23
    24
    25
    26
    27
    28
    29
    30
    31
    32
    33
    34
    35
    36
    37
    38
    39
    40
    41
    42
    43
    44
    45
    46
    47
    48
    49
    50
    51
    52
    53
    54
    55
    56
    57
    58
    59
    60
    61
    62
    63
    64
    65
    66
    67
    68
    69
    70
    71
    72
    73
    74
    75
    76
    77
    78
    79
    80
    81
    82
    83
    //设置Surface旋转角
    private static final SparseIntArray ORIENTATIONS = new SparseIntArray();
    static {
    ORIENTATIONS.append(Surface.ROTATION_0,90);
    ORIENTATIONS.append(Surface.ROTATION_90,0);
    ORIENTATIONS.append(Surface.ROTATION_180,270);
    ORIENTATIONS.append(Surface.ROTATION_270,180);
    }


    //imageReader初始化,!!!这个在初始化摄像头时赋值。
    mImageReader = ImageReader.newInstance(mPreviewSize.getWidth(),
    mPreviewSize.getHeight(),
    ImageFormat.JPEG,
    2 );
    mImageReader.setOnImageAvailableListener(onImageAvailableListener , mBackgroundHandler);


    public void takePicture(){
    try {
    CaptureRequest.Builder captureRequestBuilder = mCameraDevice.createCaptureRequest(CameraDevice.TEMPLATE_STILL_CAPTURE);
    // 将imageReader的surface作为CaptureRequest.Builder的目标
    captureRequestBuilder.addTarget(imageReader.getSurface());
    // 自动对焦
    captureRequestBuilder.set(CaptureRequest.CONTROL_AF_MODE, CaptureRequest.CONTROL_AF_MODE_CONTINUOUS_PICTURE);
    // 获取手机方向
    int rotation = getWindowManager().getDefaultDisplay().getRotation();
    // 根据设备方向计算设置照片的方向
    captureRequestBuilder.set(CaptureRequest.JPEG_ORIENTATION, ORIENTATIONS.get(rotation));
    //拍照
    CaptureRequest mCaptureRequest = captureRequestBuilder.build();
    mSession.stopRepeating();
    mSession.capture(mCaptureRequest, null, mHandler);
    } catch (CameraAccessException e) {
    e.printStackTrace();
    }
    }

    /**监听拍照的图片*/
    private ImageReader.OnImageAvailableListener imageAvailableListener= new ImageReader.OnImageAvailableListener()
    {
    // 当照片数据可用时激发该方法
    @Override
    public void onImageAvailable(ImageReader reader) {

    //先验证手机是否有sdcard
    String status = Environment.getExternalStorageState();
    if (!status.equals(Environment.MEDIA_MOUNTED)) {
    Toast.makeText(getApplicationContext(), "你的sd卡不可用。", Toast.LENGTH_SHORT).show();
    return;
    }
    // 获取捕获的照片数据
    Image image = reader.acquireNextImage();
    ByteBuffer buffer = image.getPlanes()[0].getBuffer();
    byte[] data = new byte[buffer.remaining()];
    buffer.get(data);

    //手机拍照都是存到这个路径
    String filePath = Environment.getExternalStorageDirectory().getPath() + "/DCIM/Camera/";
    String picturePath = System.currentTimeMillis() + ".jpg";
    File file = new File(filePath, picturePath);
    try {
    //存到本地相册
    FileOutputStream fileOutputStream = new FileOutputStream(file);
    fileOutputStream.write(data);
    fileOutputStream.close();

    //显示图片
    BitmapFactory.Options options = new BitmapFactory.Options();
    options.inSampleSize = 2;
    Bitmap bitmap = BitmapFactory.decodeByteArray(data, 0, data.length, options);
    iv.setImageBitmap(bitmap);
    } catch (FileNotFoundException e) {
    e.printStackTrace();
    } catch (IOException e) {
    e.printStackTrace();
    } finally {
    image.close();
    }
    }


    };
  3. 使用相机录像

    1
    2
    3
    4
    5
    6
    7
    8
    9
    10
    11
    12
    13
    14
    15
    16
    17
    18
    19
    20
    21
    22
    23
    24
    25
    26
    27
    28
    29
    30
    31
    32
    33
    34
    35
    36
    37
    38
    39
    40
    41
    42
    43
    44
    45
    46
    47
    48
    49
    50
    51
    52
    53
    54
    55
    56
    57
    58
    59
    60
    61
    62
    63
    64
    65
    66
    67
    68
    69
    70
    71
    72
    73
    74
    75
    76
    77
    78
    79
    80
    81
    82
    83
    84
    85
    86
    //设置MediaRecoder属性
    private void setUpMediaRecorder() throws IOException {
    //设置音频源
    mMediaRecorder.setAudioSource(MediaRecorder.AudioSource.MIC);
    //设置视频源
    mMediaRecorder.setVideoSource(MediaRecorder.VideoSource.SURFACE);
    mMediaRecorder.setOutputFormat(MediaRecorder.OutputFormat.MPEG_4);
    //存储路径
    if (mNextVideoAbsolutePath == null || mNextVideoAbsolutePath.isEmpty()) {
    mNextVideoAbsolutePath = getVideoFilePath(getApplicationContext());
    }
    mMediaRecorder.setOutputFile(mNextVideoAbsolutePath);
    mMediaRecorder.setVideoEncodingBitRate(10000000);
    mMediaRecorder.setVideoFrameRate(30);
    //视屏宽高
    mMediaRecorder.setVideoSize(mVideoSize.getWidth(), mVideoSize.getHeight());
    //视屏编码格式
    mMediaRecorder.setVideoEncoder(MediaRecorder.VideoEncoder.H264);
    //音频编码格式
    mMediaRecorder.setAudioEncoder(MediaRecorder.AudioEncoder.AAC);
    int rotation = getWindowManager().getDefaultDisplay().getRotation();
    switch (mSensorOrientation) {
    case SENSOR_ORIENTATION_DEFAULT_DEGREES:
    mMediaRecorder.setOrientationHint(DEFAULT_ORIENTATIONS.get(rotation));
    break;
    case SENSOR_ORIENTATION_INVERSE_DEGREES:
    mMediaRecorder.setOrientationHint(INVERSE_ORIENTATIONS.get(rotation));
    break;
    }
    mMediaRecorder.prepare();
    }
    //视频录制
    private void startRecordingVideo() {
    if (null == mCameraDevice || !textureView.isAvailable() || null == mPreviewSize) {
    return;
    }
    try {
    closePreviewSession();
    setUpMediaRecorder();
    SurfaceTexture texture = textureView.getSurfaceTexture();
    assert texture != null;
    texture.setDefaultBufferSize(mPreviewSize.getWidth(), mPreviewSize.getHeight());
    mPreviewBuilder = mCameraDevice.createCaptureRequest(CameraDevice.TEMPLATE_RECORD);
    List<Surface> surfaces = new ArrayList<>();

    // Set up Surface for the camera preview
    Surface previewSurface = new Surface(texture);
    surfaces.add(previewSurface);
    mPreviewBuilder.addTarget(previewSurface);

    // Set up Surface for the MediaRecorder
    Surface recorderSurface = mMediaRecorder.getSurface();
    surfaces.add(recorderSurface);
    mPreviewBuilder.addTarget(recorderSurface);

    // Start a capture session
    // Once the session starts, we can update the UI and start recording
    mCameraDevice.createCaptureSession(surfaces, new CameraCaptureSession.StateCallback() {

    @Override
    public void onConfigured(@NonNull CameraCaptureSession cameraCaptureSession) {
    mPreviewSession = cameraCaptureSession;
    updatePreview();
    runOnUiThread(new Runnable() {
    @Override
    public void run() {
    // UI
    button.setText("stop");
    mIsRecordingVideo = true;

    // Start recording
    mMediaRecorder.start();
    }
    });
    }

    @Override
    public void onConfigureFailed(@NonNull CameraCaptureSession cameraCaptureSession) {
    Toast.makeText(getApplicationContext(), "Failed", Toast.LENGTH_SHORT).show();
    }
    }, mBackgroundHandler);
    } catch (CameraAccessException | IOException e) {
    e.printStackTrace();
    }

    }

录像主要时通过TextureView实现实时预览,同时使用MediaRecorder录制视屏。

参考:
[1]. Camera2完全解析 https://www.jianshu.com/p/d83161e77e90
[2]. Camera2介绍 https://blog.csdn.net/vinicolor/article/details/50992692

android启动模式

发表于 2018-06-22 | 分类于 Android
  1. 任务
    任务是指执行特定作业时与用户交互的一系列Activity,这些Activity按照各自的打开顺序排列在堆栈
    (即“返回栈”)中。google为了记录用户开启了那些Activity,引入了 任务栈(task stack) 的概念,
    用于记录activity开启的先后顺序,帮助维护好的用户体验。栈的特性是:先进后出。
  2. 如何查看当前系统的任务栈
    • 手机中,长按 home或者多任务键 会进入到概览屏幕的一个界面;
    • 命令行中,adb shell dumpsys activity;
  3. Activity启动模式
    Activity启动模式在AndroidMainifest.xml文件里面的activity标签设置,属性名为android:launchMode,示例如下:

    1
    2
    3
    4
    5
    6
    7
    8
    9
    <activity
    android:name=".FirstActivity"
    android:launchMode="singleTop"
    android:label="This is FirstActivity" >
    <intent-filter>
    <action android:name="android.intent.action.MAIN" />
    <category android:name="android.intent.category.LAUNCHER" />
    </intent-filter>
    </activity>
    • standard:标准模式,也是系统默认的,每次都会创建新的Activity覆盖在原Activity上。
      标准模式示意图
    • singleTop:栈顶复用模式,首先判断栈顶Activity是否是要启动的Activity,如果是则不创建新的
      Activity而直接引用这个Activity;如果不是则创建新的Activity。
      栈顶复用模式示意图
    • singleTask:栈内复用模式,检测整个Activity栈中是否存在当前需要启动的Activity,如果存在
      则将该Activity置于栈顶,并销毁其上所有Activity,如果不存在则创建新的Activity置于栈顶。
      栈内复用模式示意图
    • singleInstance:单实例模式,创建新的任务栈,且该任务栈仅有一个Activity。
      单实例模式示意图
  4. 其他

    • 为Activity设置新的任务栈
      taskAffinity,任务相关性。xml中的一个属性,标识了一个Activity所需要的任务栈的名字。默认是包名。如果设置了其他的名字如com.test.task1,那启动它的时候就会新建一个名为com.test.task1的任务栈。
      1
      2
      3
      4
      5
      6
      7
      8
      9
      10
      11
      12
      13
      14
      15
      16
      17
      18
      19
      20
      21
       <activity
      android:name="com.test.task0.MainActivity"
      android:label="@string/app_name"
      android:launchMode="standard">
      <intent-filter>
      <action android:name="android.intent.action.MAIN" />
      <category andorid:name="android.intent.category.LAUNCHER" />
      </intent-filter>
      </activity>
      <activity
      andorid:name="com.test.SecondActivity"
      android:taskAffinity="com.test.task1"
      android:label="@string/app_name"
      android:launchMode="singleTask"/>
      <activity
      andorid:name="com.test.ThirdActivity"
      android:taskAffinity="com.test.task1"
      android:label="@string/app_name"
      android:launchMode="singleTask"/>
      ```
      如果从MainActivity启动SecondActivity,然后再启动ThirdActivity,那么任务栈如下:

    Blockquotes com.test.task0 MainActivity
    Blockquotes com.test.task1 SecondActivity ThirdActivity
    若再从ThirdActivity启动MainActivity,那么任务栈如下:
    com.test.task0 MainActivity
    com.test.task1 SecondActivity ThirdActivity MainActivit
    总结:通过设置 TaskAffinity 属性更改任务栈属性。

    1
    2
    - 回退栈和通知  
    通过通知进入Activity存在的问题,默认情况下,从通知启动一个Activity,按返回键会回到主屏幕。但某些时候有按返回键仍然留在当前应用的需求。从通知打开的某个深层次Activity。在此Acitivity中点回退,若不做处理,将会直接返回到AndroidLaunch界面。这是因为在Notification中的PendingIntent会默认开启新的任务栈。当回退的时候此任务栈没有其他新的Activity,默认在PendingIntent 的Activity是任务栈中唯一的 Activity.

    举例: HomeActiy=>Step1Activity=>Step2Acitity
    某个通知 默认在PendingIntent 指定了Step2Acitity。通过通知栏进入到Step2Acitity。点回退。正常的顺序为:
    Step2Activity=>Step1Acitivity=>HomeActivity但是如果通过通知栏这样进入Step2Activity 点回退 会直接退回到Android 桌面。就是因为 PendingIntent会默认开启新的任务栈

    1
    解决方法:通过TaskStackBuilder设置具体的回退路径,在 AndroidManifest.xml定义Acitivity从属关系。

Android 4.0.3 及更早版本


Android 4.1 及更高版本


1
2
3
4
5
6
7
8
9
在代码中做如下处理:
```java
Intent intent = new Intent(MainActivity.this, ResultActivity.class);
TaskStackBuilder taskStackBuilder = TaskStackBuilder.create(this);
taskStackBuilder.addParentStack(ResultActivity.class);
taskStackBuilder.addNextIntent(intent);
PendingIntent pendingIntent = taskStackBuilder.getPendingIntent(1, PendingIntent.FLAG_UPDATE_CURRENT);
NotificationCompat.Builder notificationBuilder = new NotificationCompat.Builder(this);
notificationBuilder.setContentIntent(pendingIntent);

这样从Notification进入到指定的ResultActivity中。回退到正常的MainActivity中。
TaskStackBuilder 扩展应用
也可以单独使用TaskStackBuilder,让某个二级Acitivity启动的时候启动它的一级Acitity.
在 AndroidManifest.xml定义Acitivity从属关系。

1
2
3
4
5
6
7
8
<activity
android:name="com.example.app.ChildActivity
android:parentActivityName="com.example.app.ParentActivity">
<!-- 下面这段用来兼容API 16之前的版本 -->
<meta-data
android:name="android.support.PARENT_ACTIVITY"
android:value="com.example.app.MainActivity"/>
</activity>

在代码中申明:

1
2
3
4
Intent intent = new Intent(this, ChildActivity.class);
TaskStackBuilder.create(this)
.addNextIntentWithParentStack(intent)
.startActivities();

通过启动一个无任何层级关系的Acitity 激活应用(目前Lianlian3.0应用采用此方法)

1
2
3
4
5
6
7
8
9
public class SimpleLaunchAppActivity extends Activity {
@Override
protected void onCreate(Bundle savedInstanceState) {
super.onCreate(savedInstanceState);
// Now finish, which will drop the user in to the activity that was at the top
// of the task stack
finish();
}
}

原理:若通过Notification打开Acitivity后此Acitivy会位于要启动的App的栈顶。自动finish()后,app恢复到切换到后台之前的状态。SimpleLaunchAppActivity不得设置android:taskAffinity。taskAffinity和默认App的包名一致就不会新建任务栈。若设置了taskAffinity为新的任务栈,点回退后 将会回到android launch页面。
联连wifi的解决方案:

1
2
过启动一个无任何层级关系的TransparentSwitchActivity 激活应用**
目前存在的问题是TransparentSwitchActivity里面会根据参数判断 通过通知进入后还有部分逻辑不太人性化和完善。需要提高用户体验。

  • 关于系统默认的清空返回栈
    如何用户将任务切换到后台之后过了很长一段时间,系统会将这个任务中除了最底层的那个Activity之外的其它所有Activity全部清除掉。当用户重新回到这个任务的时候,最底层的那个Activity将得到恢复。这个是系统默认的行为,因为既然过了这么长的一段时间,用户很有可能早就忘记了当时正在做什么,那么重新回到这个任务的时候,基本上应该是要去做点新的事情了。当然,既然说是默认的行为,那就说明我们肯定是有办法来改变的,在Manifest中 元素中设置以下几种属性就可以改变系统这一默认行为:
    1
    2
    3
    4
    5
    6
    alwaysRetainTaskState   
    如果将最底层的那个Activity的这个属性设置为true,那么上面所描述的默认行为就将不会发生,任务中所有的Activity即使过了很长一段时间之后仍然会被继续保留。
    clearTaskOnLaunch
    如果将最底层的那个Activity的这个属性设置为true,那么只要用户离开了当前任务,再次返回的时候就会将最底层Activity之上的所有其它Activity全部清除掉。简单来讲,就是一种和alwaysRetainTaskState完全相反的工作模式,它保证每次返回任务的时候都会是一种初始化状态,即使用户仅仅离开了很短的一段时间。
    finishOnTaskLaunch
    这个属性和clearTaskOnLaunch是比较类似的,不过它不是作用于整个任务上的,而是作用于单个Activity上。如果某个Activity将这个属性设置成true,那么用户一旦离开了当前任务,再次返回时这个Activity就会被清除掉。

参考:
[1]. Activity启动模式 https://blog.csdn.net/lixiaodaoaaa/article/details/51700981

webpack4安装使用

发表于 2018-06-15 | 分类于 node

    官网手册为https://webpack.js.org/guides/getting-started/,但是在最后一步会出现npx webpack可能会出现错误,官网说是npx是在node 8.2或更高版本才行,但我的已经是v8.11.3。

其中dist为最终文件输出目录,src为需要编译打包的源文件;

  1. webpack安装:
    webpack安装分两种模式:

    • 全局安装
      1
      2
      npm install --global webpack
      npm install --global webpack-cli

    上面主要安装了webpakc基础库和webpack控制台(主要作用是命令行处理),通过上面那安装后在终端
    运行webpack -v会显示webpack版本号,如果没有安装webpack-cli,此时会有提示让安装webpack-cli或者webpack-command两个中的一个,如果两个都安装了此时会提示:

    1
    You have installed webpack-cli and webpack-command together. To work with the "webpack" command you need only one CLI package, please remove one of them or use them directly via their binary.

此时需要移除其中一个即可,执行npm remove webpack-cli 或者 npm remove webpack-command移除当前项目的, 全局的话使用npm remove –global webpack-cli。

  • 安装到你的项目目录:
    1
    npm install webpack --save-dev

!!! 全局安装了webpack后在npm脚本配置时,需要在当前目录安装npm install –save-dev webpack-command,否则会报错误显示找不到webpack的module。

  1. 项目包结构:
    包结构
    其中dist为webpack 默认 的打包后最终输出的文件所在目录,src为webpack 默认 的编写的js所在目录,main.js为webpack将src下的js打包集成的 默认 文件。
    此时package.json中的依赖应该是:

    1
    2
    3
    4
    5
    6
    7
    8
    9
    10
    11
    12
    13
    14
    15
    16
    17
    18
    19
    20
    {
    "name": "webpack",
    "version": "1.0.0",
    "description": "",
    "private": true,
    "scripts": {
    "test": "echo \"Error: no test specified\" && exit 1"
    },
    "keywords": [],
    "author": "",
    "license": "ISC",
    "dependencies": {
    "lodash": "^4.17.10"
    },
    "devDependencies": {
    "webpack": "^4.12.0",
    "webpack-command": "^0.2.1",
    "webpack-dev-server": "^2.9.7"
    }
    }
  2. webpack配置:
    webpack配置的文件名称 默认 为:webpack.config.js

    1
    2
    3
    4
    5
    6
    7
    module.exports = {
    entry: "./src/index.js", //入口文件,使用相对路径
    output: {
    path: __dirname + "/dist", //打包后的文件存放的地方,使用绝对路径
    filename: "bundle.js" //打包后输出文件的文件名
    }
    }

此时打包命令为:webpack –config webpack.config.js,也可以不加config参数。

  1. npm脚本化:
    通过npm实现打包编译则需要对package.json文件处理:主要是在scripts下添加build属性:
1
2
3
4
5
6
7
8
9
10
11
12
13
14
15
16
17
18
{
"name": "webpack-demo",
"version": "1.0.0",
"description": "",
"main": "index.js",
"scripts": {
"test": "echo \"Error: no test specified\" && exit 1",
"build": "webpack" //脚本化的命令和执行者
},
"keywords": [],
"author": "",
"license": "ISC",
"devDependencies": {
"webpack": "^4.0.1",
"webpack-cli": "^2.0.9",
"lodash": "^4.17.5"
}
}

最后打包命令则为 npm run build。

参考地址:
[1]. 官网 https://webpack.js.org/guides/getting-started/
[2]. webpack入门 https://segmentfault.com/a/1190000006178770

1234…6

CallteFoot

The blog from a Android coder

56 日志
23 分类
71 标签
© 2020 CallteFoot
由 Hexo 强力驱动
|
主题 — NexT.Gemini v5.1.4