从Android 2.3(Api level 9)开始Android用系统服务的方式提供了Download Manager来优化处理长时间的下载操作。Download Manager处理HTTP/HTTPS连接并监控连接中的状态变化以及重启来确保每一个下载任务顺利完成。
在大多数涉及到下载的情况中使用Download Manager都是不错的选择,特别是当用户切换不同的应用以后下载需要在后台继续进行,以及当下载任务顺利完成非常重要的情况(DownloadManager对于断点续传功能支持很好)。
要想使用Download Manager,使用getSystemService方法请求系统的DOWNLOAD_SERVICE服务,代码片段如下:1
2
3String serviceString = Context.DOWNLOAD_SERVICE;
DownloadManager downloadManager;
downloadManager = (DownloadManager) getSystemService(serviceString);
下载文件
需要一个请求下载操作,创建一个DownloadManager.Request对象,将要请求下载的文件的Uri传递给Download Manager的enqueue方法,代码片段如下所示:1
2
3Uri uri = Uri.parse("http://developer.android.com/shareables/icon_templates-v4.0.zip");
DownloadManager.Request request = new Request(uri);
long reference = downloadManager.enqueue(request);
在这里返回的reference变量是系统为当前的下载请求分配的一个唯一的ID,我们可以通过这个ID重新获得这个下载任务,进行一些自己想要进行的操作或者查询下载的状态以及取消下载等等。
我们可以通过addRequestHeader方法为DownloadManager.Request对象request添加HTTP头,也可以通过setMimeType方法重写从服务器返回的mime type。
我们还可以指定在什么连接状态下执行下载操作。setAllowedNetworkTypes方法可以用来限定在WiFi还是手机网络下进行下载,setAllowedOverRoaming方法可以用来阻止手机在漫游状态下下载。
下面的代码片段用于指定一个较大的文件只能在WiFi下进行下载:1
request.setAllowedNetworkTypes(Request.NETWORK_WIFI);
Android API level 11 介绍了getRecommendedMaxBytesOverMobile类方法(静态方法),返回一个当前手机网络连接下的最大建议字节数,可以来判断下载是否应该限定在WiFi条件下。
调用enqueue方法之后,只要数据连接可用并且Download Manager可用,下载就会开始。
要在下载完成的时候获得一个系统通知(notification),注册一个广播接受者来接收ACTION_DOWNLOAD_COMPLETE广播,这个广播会包含一个
EXTRA_DOWNLOAD_ID信息在intent中包含了已经完成的这个下载的ID,代码片段如下所示:1
2
3
4
5
6
7
8
9
10
11IntentFilter filter = new IntentFilter(DownloadManager.ACTION_DOWNLOAD_COMPLETE);
BroadcastReceiver receiver = new BroadcastReceiver() {
public void onReceive(Context context, Intent intent) {
long reference = intent.getLongExtra(DownloadManager.EXTRA_DOWNLOAD_ID, -1);
if (myDownloadReference == reference) {
//do something
}
}
};
registerReceiver(receiver, filter);
使用Download Manager的openDownloadedFile方法可以打开一个已经下载完成的文件,返回一个ParcelFileDescriptor对象。我们可以通过Download Manager来查询下载文件的保存地址,如果在下载时制定了路径和文件名,我们也可以直接操作文件。
我们可以为ACTION_NOTIFICATION_CLICKED action注册一个广播接受者,当用户从通知栏点击了一个下载项目或者从Downloads app点击可一个下载的项目的时候,系统就会发出一个点击下载项的广播。
代码片段如下:1
2
3
4
5
6
7
8
9
10
11
12
13IntentFilter filter = new IntentFilter(DownloadManager.ACTION_NOTIFICATION_CLICKED);
BroadcastReceiver receiver = new BroadcastReceiver() {
public void onReceive(Context context, Intent intent) {
String extraID = DownloadManager.EXTRA_NOTIFICATION_CLICK_DOWNLOAD_IDS;
long[] references = intent.getLongArrayExtra(extraID);
for (long reference : references)
if (reference == myDownloadReference) {
// Do something with downloading file.
}
}
};
registerReceiver(receiver, filter);
定制Download Manager Notifications的样式
默认情况下,通知栏中会显示被Download Manager管理的每一个download每一个Notification会显示当前的下载进度和文件的名字。通过Download Manager可以为每一个download request定制Notification的样式,包括完全隐藏Notification。下面的代码片段显示了通过setTitle和setDescription方法来定制显示在文件下载Notification中显示的文字(下载的通知icon不可更改?)。1
2request.setTitle(“Earthquakes”);
request.setDescription(“Earthquake XML”);
request.setNotificationVisibility方法可以用来控制什么时候显示Notification,甚至隐藏该request的Notification。有以下几个参数:
- Request.VISIBILITY_VISIBLE:在下载进行的过程中,通知栏中会一直显示该下载的Notification,当下载完成时,该Notification会被移除,这是默认的参数值;
- Request.VISIBILITY_VISIBLE_NOTIFY_COMPLETED:在下载过程中通知栏会一直显示该下载的Notification,在下载完成后该Notification会继续显示,直到用户点击该Notification或者消除该Notification;
- Request.VISIBILITY_VISIBLE_NOTIFY_ONLY_COMPLETION:只有在下载完成后该Notification才会被显示;
- Request.VISIBILITY_HIDDEN:不显示该下载请求的Notification。如果要使用这个参数,需要在应用的清单文件中加上DOWNLOAD_WITHOUT_NOTIFICATION权限。
指定下载保存地址
默认情况下,所有通过Download Manager下载的文件都保存在一个共享下载缓存中,使用系统生成的文件名每一个Request对象都可以制定一个下载保存的地址,通常情况下,所有的下载文件都应该保存在外部存储中,所以我们需要在应用清单文件中加上WRITE_EXTERNAL_STORAGE权限:1
<uses-permission android:name=”android.permission.WRITE_EXTERNAL_STORAGE”/>
下面的代码片段是在外部存储中指定一个任意的保存位置的方法:1
request.setDestinationUri(Uri.fromFile(f)); // f是一个File对象
如果下载的这个文件是你的应用所专用的,你可能会希望把这个文件放在你的应用在外部存储中的一个专有文件夹中。注意这个文件夹不提供访问控制,所以其他的应用也可以访问这个文件夹。在这种情况下,如果你的应用卸载了,那么在这个文件夹也会被删除。
下面的代码片段是指定存储文件的路径是应用在外部存储中的专用文件夹的方法:1
2request.setDestinationInExternalFilesDir(this,
Environment.DIRECTORY_DOWNLOADS, “Bugdroid.png”);
如果下载的文件希望被其他的应用共享,特别是那些你下载下来希望被Media Scanner扫描到的文件(比如音乐文件),那么你可以指定你的下载路径在外部存储的公共文件夹之下,下面的代码片段是将文件存放到外部存储中的公共音乐文件夹的方法:1
2request.setDestinationInExternalPublicDir(Environment.DIRECTORY_MUSIC,
"Android_Rock.mp3");
在默认的情况下,通过Download Manager下载的文件是不能被Media Scanner扫描到的,进而这些下载的文件(音乐、视频等)就不会在Gallery和Music Player这样的应用中看到。为了让下载的音乐文件可以被其他应用扫描到,我们需要调用Request对象的allowScaningByMediaScanner方法。如果我们希望下载的文件可以被系统的Downloads应用扫描到并管理,我们需要调用Request对象的setVisibleInDownloadsUi方法,传递参数true。
取消或删除下载
Download Manager的remove方法可以用来取消一个准备进行的下载,中止一个正在进行的下载,或者删除一个已经完成的下载。remove方法接受若干个download 的ID作为参数,你可以设置一个或者几个你想要取消的下载的ID,如下代码段所示:1
downloadManager.remove(REFERENCE_1, REFERENCE_2, REFERENCE_3);
该方法返回成功取消的下载的个数,如果一个下载被取消了,所有相关联的文件,部分下载的文件和完全下载的文件都会被删除。
查询Download Manager
你可以通过查询Download Manager来获得下载任务的状态,进度,以及各种细节,通过query方法返回一个包含了下载任务细节的Cursor。query方法传递一个DownloadManager.Query对象作为参数,通过DownloadManager.Query对象的setFilterById方法可以筛选我们希望查询的下载任务的ID。也可以使用setFilterByStatus方法筛选我们希望查询的某一种状态的下载任务,传递的参数是DownloadManager.STATUS常量,可以指定正在*进行、暂停、失败、完成四种状态。Download Manager包含了一系列COLUMN静态String常量,可以用来查询Cursor中的结果列索引。我们可以查询到下载任务的各种细节,包括*状态,文件大小,已经下载的字节数,标题,描述,URI,本地文件名和URI,媒体类型以及Media Provider download URI。
下面的代码段是通过注册监听下载完成事件的广播接受者来查询下载完成文件的本地文件名和URI的实现方法:1
2
3
4
5
6
7
8
9
10
11
12
13
14
15
16
17
18
19
20
21
22
23
24
25
26
27
28
29
30
31
32
33
34
35
36
37
38
39
40
41
42
43
public void onReceive(Context context, Intent intent) {
long reference = intent.getLongExtra(DownloadManager.EXTRA_DOWNLOAD_ID, -1);
if (myDownloadReference == reference) {
Query myDownloadQuery = new Query();
myDownloadQuery.setFilterById(reference);
Cursor myDownload = downloadManager.query(myDownloadQuery);
if (myDownload.moveToFirst()) {
//文件名称索引
int fileNameIdx =
myDownload.getColumnIndex(DownloadManager.COLUMN_LOCAL_FILENAME);
//下载文件存放地址uri索引
int fileUriIdx =
myDownload.getColumnIndex(DownloadManager.COLUMN_LOCAL_URI);
//下载状态
int status = cursor.getInt(cursor.getColumnIndex(DownloadManager.COLUMN_STATUS));
switch (status) {
case DownloadManager.STATUS_PAUSED:
statusMsg = "STATUS_PAUSED";
case DownloadManager.STATUS_PENDING:
statusMsg = "STATUS_PENDING";
case DownloadManager.STATUS_RUNNING:
statusMsg = "STATUS_RUNNING";
break;
case DownloadManager.STATUS_SUCCESSFUL:
statusMsg = "STATUS_SUCCESSFUL";
break;
case DownloadManager.STATUS_FAILED:
statusMsg = "STATUS_FAILED";
break;
default:
statusMsg = "未知状态";
break;
}
String fileName = myDownload.getString(fileNameIdx);
String fileUri = myDownload.getString(fileUriIdx);
// TODO Do something with the file.
Log.d(TAG, fileName + " : " + fileUri);
}
myDownload.close();
}
}
对于暂停和失败的下载,我们可以通过查询COLUMN_REASON列查询出原因的整数码。
- 对于STATUSPAUSED状态的下载,可以通过DownloadManager.PAUSED* 静态常量来翻译出原因的整数码,进而判断出下载是由于等待网络连接还是等待WiFi连接还是准备重新下载三种原因而暂停。
- 对于STATUSFAILED状态的下载,我们可以通过DownloadManager.ERROR*来判断失败的原因,可能是错误码(失败原因)包括没有存储设备,存储空间不足,重复的文件名,或者HTTP errors。
下面的代码是如何查询出当前所有的暂停的下载任务,提取出暂停的原因以及文件名称,下载标题以及当前进度的实现方法:1
2
3
4
5
6
7
8
9
10
11
12
13
14
15
16
17
18
19
20
21
22
23
24
25
26
27
28
29
30
31
32
33
34
35
36
37
38
39
40
41
42
43
44// Obtain the Download Manager Service.
String serviceString = Context.DOWNLOAD_SERVICE;
DownloadManager downloadManager;
downloadManager = (DownloadManager)getSystemService(serviceString);
// Create a query for paused downloads.
Query pausedDownloadQuery = new Query();
pausedDownloadQuery.setFilterByStatus(DownloadManager.STATUS_PAUSED);
// Query the Download Manager for paused downloads.
Cursor pausedDownloads = downloadManager.query(pausedDownloadQuery);
// Find the column indexes for the data we require.
int reasonIdx = pausedDownloads.getColumnIndex(DownloadManager.COLUMN_REASON);
int titleIdx = pausedDownloads.getColumnIndex(DownloadManager.COLUMN_TITLE);
int fileSizeIdx =
pausedDownloads.getColumnIndex(DownloadManager.COLUMN_TOTAL_SIZE_BYTES);
int bytesDLIdx =
pausedDownloads.getColumnIndex(DownloadManager.COLUMN_BYTES_DOWNLOADED_SO_FAR);
// Iterate over the result Cursor.
while (pausedDownloads.moveToNext()) {
// Extract the data we require from the Cursor.
String title = pausedDownloads.getString(titleIdx);
int fileSize = pausedDownloads.getInt(fileSizeIdx);
int bytesDL = pausedDownloads.getInt(bytesDLIdx);
// Translate the pause reason to friendly text.
int reason = pausedDownloads.getInt(reasonIdx);
String reasonString = "Unknown";
switch (reason) {
case DownloadManager.PAUSED_QUEUED_FOR_WIFI :
reasonString = "Waiting for WiFi"; break;
case DownloadManager.PAUSED_WAITING_FOR_NETWORK :
reasonString = "Waiting for connectivity"; break;
case DownloadManager.PAUSED_WAITING_TO_RETRY :
reasonString = "Waiting to retry"; break;
default : break;
}
// Construct a status summary
StringBuilder sb = new StringBuilder();
sb.append(title).append("\n");
sb.append(reasonString).append("\n");
sb.append("Downloaded ").append(bytesDL).append(" / " ).append(fileSize);
// Display the status
Log.d("DOWNLOAD", sb.toString());
}
// Close the result Cursor.
pausedDownloads.close();
DownloadManager原理
通过介绍我们已经可以灵活的使用DownloadManaged为我们服务了,为了更好的使用这个工具,得先了解它的工作原理、工作流程。下面就是整个工作流程的时序图: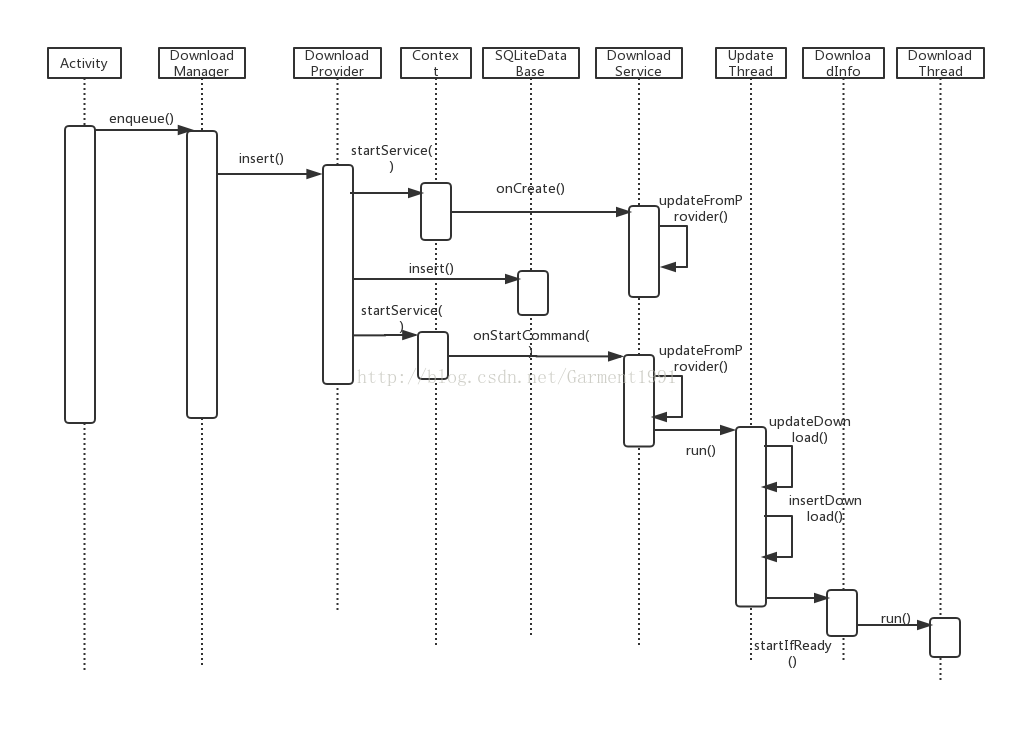
从上面的时序图我们可以大致了解整个流程。从添加请求,到最后开启下载线程进行文件的下载。为了更好的理解这个下载工具的思想,下面将从源码上对一些重要的函数进行分析。
一开始,调用DownloadManager的enqueue()法进行下载请求的添加,然后就会调用DownloadProvider的insert()方法进行数据库的数据的插入,insert()不单单是把数据插入到数据库,还会启动DownloadService这个服务。1
2
3
4
5
6
7
8
9
10
11
12
13
14
15
16
17
18
19
20
21
22
23
24
25
26
27
28
29
30
31
32
33
34
35
36
37
38
39
40
41
42
43
44
45
46
47
48
49
50
51
52
53
54
55
public Uri insert(final Uri uri, final ContentValues values) {
checkInsertPermissions(values);
SQLiteDatabase db = mOpenHelper.getWritableDatabase();
// note we disallow inserting into ALL_DOWNLOADS
if (pckg != null && (clazz != null || isPublicApi)) {
int uid = Binder.getCallingUid();
try {
if (uid == 0 || mSystemFacade.userOwnsPackage(uid, pckg)) {
filteredValues.put(Downloads.COLUMN_NOTIFICATION_PACKAGE,
pckg);
if (clazz != null) {
filteredValues.put(Downloads.COLUMN_NOTIFICATION_CLASS,
clazz);
}
}
} catch (PackageManager.NameNotFoundException ex) {
/* ignored for now */
}
}
copyString(Downloads.COLUMN_NOTIFICATION_EXTRAS, values, filteredValues);
copyString(Downloads.COLUMN_COOKIE_DATA, values, filteredValues);
copyString(Downloads.COLUMN_USER_AGENT, values, filteredValues);
copyString(Downloads.COLUMN_REFERER, values, filteredValues);
if (getContext().checkCallingPermission(
Downloads.PERMISSION_ACCESS_ADVANCED) == PackageManager.PERMISSION_GRANTED) {
copyInteger(Downloads.COLUMN_OTHER_UID, values, filteredValues);
}
filteredValues.put(Constants.UID, Binder.getCallingUid());
if (Binder.getCallingUid() == 0) {
copyInteger(Constants.UID, values, filteredValues);
}
copyStringWithDefault(Downloads.COLUMN_TITLE, values, filteredValues,
"");
copyStringWithDefault(Downloads.COLUMN_DESCRIPTION, values,
filteredValues, "");
filteredValues.put(Downloads.COLUMN_TOTAL_BYTES, -1);
filteredValues.put(Downloads.COLUMN_CURRENT_BYTES, 0);
Context context = getContext();
context.startService(new Intent(context, DownloadService.class));
long rowID = db.insert(DB_TABLE, null, filteredValues);
if (rowID == -1) {
Log.d(Constants.TAG, "couldn't insert into downloads database");
return null;
}
insertRequestHeaders(db, rowID, values);
context.startService(new Intent(context, DownloadService.class));
notifyContentChanged(uri, match);
return ContentUris.withAppendedId(Downloads.CONTENT_URI, rowID);
}
可以看到上面的代码很长,但是我们只需要关注一些核心的代码。1
long rowID = db.insert(DB_TABLE, null, filteredValues);
这行代码的作用主要是把下载的任务信息保存到数据库中,包括下载的URL、下载的控制状态、下载状态、总的文件大小、已下载的文件大小等默认的数据更新到数据库中。1
context.startService(new Intent(context, DownloadService.class));
这行代码的作用就是启动DownloadService服务。
当我们启动DownloadService之后,DownloadService服务的onCreate()数就会被调用。1
2
3
4
5
6
7
8
9
10
11
12
13
14
15
16
17
18
19public void onCreate() {
super.onCreate();
if (Constants.LOGVV) {
Log.v(Constants.TAG, "Service onCreate");
}
if (mSystemFacade == null) {
mSystemFacade = new RealSystemFacade(this);
}
mObserver = new DownloadManagerContentObserver();
getContentResolver().registerContentObserver(
Downloads.ALL_DOWNLOADS_CONTENT_URI, true, mObserver);
mNotifier = new DownloadNotification(this, mSystemFacade);
mSystemFacade.cancelAllNotifications();
updateFromProvider();
}
可以看到,在onCreate()数中,会注册一个数据库变化监听器DownloadManagerContentObserver,就是说Downloads.ALL_DOWNLOADS_CONTENT_URI这个数据库的数据发生变化的时候,该监听器的监听函数onChange()会被调用。1
2
3
4
5
6
7public void onChange(final boolean selfChange) {
if (Constants.LOGVV) {
Log.v(Constants.TAG,
"Service ContentObserver received notification");
}
updateFromProvider();
}
可以看到onChange()函数会调用updateFromProvider()这个函数,从上面可以看到,onCreate()函数也会调到这个函数。1
2
3
4
5
6
7
8
9private void updateFromProvider() {
synchronized (this) {
mPendingUpdate = true;
if (mUpdateThread == null) {
mUpdateThread = new UpdateThread();
mSystemFacade.startThread(mUpdateThread);
}
}
}
可以看到,updateFormProvider()函数其实就是会启动UpdateThread()这个线程。
下面就进入到UpdateThread这个线程中。1
2
3
4
5
6
7
8
9
10
11
12
13
14
15
16
17
18
19
20
21
22
23
24
25
26
27
28
29
30
31
32
33
34
35
36
37
38
39
40
41
42
43
44
45
46
47
48
49
50
51
52
53
54
55
56
57
58
59
60
61
62
63
64
65
66
67
68
69
70
71
72
73
74
75
76
77
78
79
80
81
82
83
84
85
86
87
88
89
90
91
92
93
94
95
96
97public void run() {
Process.setThreadPriority(Process.THREAD_PRIORITY_BACKGROUND);
trimDatabase();
removeSpuriousFiles();
boolean keepService = false;
// for each update from the database, remember which download is
// supposed to get restarted soonest in the future
long wakeUp = Long.MAX_VALUE;
for (;;) {
synchronized (DownloadService.this) {
if (mUpdateThread != this) {
throw new IllegalStateException(
"multiple UpdateThreads in DownloadService");
}
if (!mPendingUpdate) {
mUpdateThread = null;
if (!keepService) {
stopSelf();
}
if (wakeUp != Long.MAX_VALUE) {
scheduleAlarm(wakeUp);
}
return;
}
mPendingUpdate = false;
}
long now = mSystemFacade.currentTimeMillis();
keepService = false;
wakeUp = Long.MAX_VALUE;
Set<Long> idsNoLongerInDatabase = new HashSet<Long>(
mDownloads.keySet());
Cursor cursor = getContentResolver().query(
Downloads.ALL_DOWNLOADS_CONTENT_URI, null, null, null,
null);
if (cursor == null) {
continue;
}
try {
DownloadInfo.Reader reader = new DownloadInfo.Reader(
getContentResolver(), cursor);
int idColumn = cursor.getColumnIndexOrThrow(Downloads._ID);
for (cursor.moveToFirst(); !cursor.isAfterLast(); cursor
.moveToNext()) {
long id = cursor.getLong(idColumn);
idsNoLongerInDatabase.remove(id);
DownloadInfo info = mDownloads.get(id);
if (info != null) {
updateDownload(reader, info, now);
} else {
info = insertDownload(reader, now);
}
if (info.hasCompletionNotification()) {
keepService = true;
}
long next = info.nextAction(now);
if (next == 0) {
keepService = true;
} else if (next > 0 && next < wakeUp) {
wakeUp = next;
}
}
} finally {
cursor.close();
}
for (Long id : idsNoLongerInDatabase) {
deleteDownload(id);
}
// is there a need to start the DownloadService? yes, if there
// are rows to be deleted.
for (DownloadInfo info : mDownloads.values()) {
if (info.mDeleted) {
keepService = true;
break;
}
}
mNotifier.updateNotification(mDownloads.values());
// look for all rows with deleted flag set and delete the rows
// from the database
// permanently
for (DownloadInfo info : mDownloads.values()) {
if (info.mDeleted) {
Helpers.deleteFile(getContentResolver(), info.mId,
info.mFileName, info.mMimeType);
}
}
}
}
可以看到UpdateThread这个线程也是很长,我们大概分析一下它的作用。
可以看到这里有一个for(;;)的死循环,它的作用是保证数据库中的下载任务都会被加载出来,然后启动所有的下载任务,同时会更新下载任务,包括更新下载任务的状态,删除一些下载任务。
它会从数据库中取出所有的下载任务,然后根据id从mDownloads集合中找到对应的下载任务,如果没找到就会新建一个下载任务DownloadInfo。然后就会调用updateDown()和insertDown(),启动下载任务。1
2
3
4
5
6
7
8
9
10
11
12
13
14
15
16
17
18private void updateDownload(DownloadInfo.Reader reader, DownloadInfo info,
long now) {
int oldVisibility = info.mVisibility;
int oldStatus = info.mStatus;
reader.updateFromDatabase(info);
boolean lostVisibility = oldVisibility == Downloads.VISIBILITY_VISIBLE_NOTIFY_COMPLETED
&& info.mVisibility != Downloads.VISIBILITY_VISIBLE_NOTIFY_COMPLETED
&& Downloads.isStatusCompleted(info.mStatus);
boolean justCompleted = !Downloads.isStatusCompleted(oldStatus)
&& Downloads.isStatusCompleted(info.mStatus);
if (lostVisibility || justCompleted) {
mSystemFacade.cancelNotification(info.mId);
}
info.startIfReady(now);
}
可以看到该函数调用startIfReady()进行下载任务的启动。1
2
3
4
5
6
7
8
9
10
11
12
13
14
15
16
17
18
19
20
21
22void startIfReady(long now) {
if (!isReadyToStart(now)) {
return;
}
if (Constants.LOGV) {
Log.v(Constants.TAG, "Service spawning thread to handle download " + mId);
}
if (mHasActiveThread) {
throw new IllegalStateException("Multiple threads on same download");
}
if (mStatus != Downloads.STATUS_RUNNING) {
mStatus = Downloads.STATUS_RUNNING;
ContentValues values = new ContentValues();
values.put(Downloads.COLUMN_STATUS, mStatus);
mContext.getContentResolver().update(getAllDownloadsUri(), values, null, null);
return;
}
DownloadThread downloader = new DownloadThread(mContext, mSystemFacade, this);
mHasActiveThread = true;
mSystemFacade.startThread(downloader);
}
该函数是一个挺重要的函数,它会根据不同的情况判断下载任务是否需要启动。判断函数是isReadyToStart。这个函数十分关键,在我们要实现暂停下载,继续下载这个功能,都是在这里起作用的。1
2
3
4
5
6
7
8
9
10
11
12
13
14
15
16
17
18
19
20
21
22
23
24
25
26private boolean isReadyToStart(long now) {
if (mHasActiveThread) {
// already running
return false;
}
if (mControl == Downloads.CONTROL_PAUSED) {
// the download is paused, so it's not going to start
return false;
}
switch (mStatus) {
case 0: // status hasn't been initialized yet, this is a new download
case Downloads.STATUS_PENDING: // download is explicit marked as ready to start
case Downloads.STATUS_RUNNING: // download interrupted (process killed etc) while
// running, without a chance to update the database
return true;
case Downloads.STATUS_WAITING_FOR_NETWORK:
case Downloads.STATUS_QUEUED_FOR_WIFI:
return checkCanUseNetwork() == NETWORK_OK;
case Downloads.STATUS_WAITING_TO_RETRY:
// download was waiting for a delayed restart
return restartTime(now) <= now;
}
return false;
}
可以看到,当下载任务正在进行,或者下载任务状态为暂停状态,或者网络状态是否正常,这时会返回false,就是没有准备好,就不会启动下载任务。当返回true的时候,就会把当前下载任务的状态刷新为Downloads.STATUS_RUNNING,同时会启动DownloadThread下载线程。1
2
3
4
5
6
7
8
9
10
11
12
13
14
15
16
17
18
19
20
21
22
23
24
25
26
27
28
29
30
31
32
33
34
35
36
37
38
39
40
41
42
43
44
45
46
47
48
49
50
51
52
53
54
55
56
57
58
59
60
61
62
63
64
65
66
67
68
69
70
71
72
73
74public void run() {
Process.setThreadPriority(Process.THREAD_PRIORITY_BACKGROUND);
State state = new State(mInfo);
PowerManager.WakeLock wakeLock = null;
int finalStatus = Downloads.STATUS_UNKNOWN_ERROR;
try {
PowerManager pm = (PowerManager) mContext
.getSystemService(Context.POWER_SERVICE);
wakeLock = pm.newWakeLock(PowerManager.PARTIAL_WAKE_LOCK,
Constants.TAG);
wakeLock.acquire();
if (Constants.LOGV) {
Log.v(Constants.TAG, "initiating download for " + mInfo.mUri);
}
boolean finished = false;
while (!finished) {
Log.i(Constants.TAG, "Initiating request for download "
+ mInfo.mId);
Request.Builder requestBuilder = new Request.Builder();
InnerState innerState = new InnerState();
setupDestinationFile(state, innerState);
addRequestHeaders(innerState, requestBuilder);
requestBuilder.url(state.mRequestUri);
Request request = requestBuilder.build();
Call call = mOkHttpClient.newCall(request);
try {
executeDownload(innerState, state, call);
finished = true;
} catch (RetryDownload exc) {
// fall through
} finally {
call.cancel();
}
}
if (Constants.LOGV) {
Log.v(Constants.TAG, "download completed for " + mInfo.mUri);
}
finalizeDestinationFile(state);
finalStatus = Downloads.STATUS_SUCCESS;
} catch (StopRequest error) {
// remove the cause before printing, in case it contains PII
Log.w(Constants.TAG, "Aborting request for download " + mInfo.mId
+ ": " + error.getMessage());
finalStatus = error.mFinalStatus;
// fall through to finally block
} catch (Throwable ex) { // sometimes the socket code throws unchecked
// exceptions
Log.w(Constants.TAG, "Exception for id " + mInfo.mId + ": " + ex);
finalStatus = Downloads.STATUS_UNKNOWN_ERROR;
// falls through to the code that reports an error
} finally {
if (wakeLock != null) {
wakeLock.release();
wakeLock = null;
}
if (mOkHttpClient != null) {
mOkHttpClient.cancel(null);
}
cleanupDestination(state, finalStatus);
notifyDownloadCompleted(finalStatus, state.mCountRetry,
state.mRetryAfter, state.mGotData, state.mFilename,
state.mNewUri, state.mMimeType);
mInfo.mHasActiveThread = false;
}
}
其中1
setupDestinationFile(state, innerState);
这个方法是实现断点续传的关键点。1
2
3
4
5
6
7
8
9
10
11
12
13
14
15
16
17
18
19
20
21
22
23
24
25
26
27
28
29
30
31
32
33
34
35
36
37
38
39
40
41
42
43
44
45
46
47
48
49
50private void setupDestinationFile(State state, InnerState innerState)
throws StopRequest {
if (!TextUtils.isEmpty(state.mFilename)) { // only true if we've already
// run a thread for this
// download
if (!Helpers.isFilenameValid(state.mFilename)) {
// this should never happen
throw new StopRequest(Downloads.STATUS_FILE_ERROR,
"found invalid internal destination filename");
}
// We're resuming a download that got interrupted
File f = new File(state.mFilename);
if (f.exists()) {
long fileLength = f.length();
if (fileLength == 0) {
// The download hadn't actually started, we can restart from
// scratch
f.delete();
state.mFilename = null;
} else if (mInfo.mETag == null && !mInfo.mNoIntegrity) {
// This should've been caught upon failure
f.delete();
throw new StopRequest(Downloads.STATUS_CANNOT_RESUME,
"Trying to resume a download that can't be resumed");
} else {
// All right, we'll be able to resume this download
try {
state.mStream = new FileOutputStream(state.mFilename,
true);
} catch (FileNotFoundException exc) {
throw new StopRequest(Downloads.STATUS_FILE_ERROR,
"while opening destination for resuming: "
+ exc.toString(), exc);
}
innerState.mBytesSoFar = (int) fileLength;
if (mInfo.mTotalBytes != -1) {
innerState.mHeaderContentLength = Long
.toString(mInfo.mTotalBytes);
}
innerState.mHeaderETag = mInfo.mETag;
innerState.mContinuingDownload = true;
}
}
}
if (state.mStream != null
&& mInfo.mDestination == Downloads.DESTINATION_EXTERNAL) {
closeDestination(state);
}
}
方法的流程大概是:先根据文件名建立一个文件对象,判断文件对象是否存在,如果存在再判断文件的大小,当文件大小为0的时候,把文件删除。同时,会把当前的文件的输出流保存到state.mStream,把当前文件的长度、要下载文件的总长度、文件继续下载状态保存到innerState中。
再分析addRequestHeader()方法,该方法也是实现断点续传的关键。1
2
3
4
5
6
7
8
9
10
11
12private void addRequestHeaders(InnerState innerState, Request.Builder requestBuilder) {
for (Pair<String, String> header : mInfo.getHeaders()) {
requestBuilder.addHeader(header.first, header.second);
}
if (innerState.mContinuingDownload) {
if (innerState.mHeaderETag != null) {
requestBuilder.addHeader("If-Match", mInfo.mETag);
}
requestBuilder.addHeader("Range", "bytes=" + innerState.mBytesSoFar + "-");
}
}
该方法会把请求头添加到请求中,最重要的是:如果是断点续传的话,会把当前的文件大小也放到请求头中,这样服务器就会知道当前的文件已经下载了多少。
下面来分析最重要的executeDownload方法。1
2
3
4
5
6
7
8
9
10
11
12
13
14
15
16
17
18
19private void executeDownload(InnerState innerState, State state, Call call) throws StopRequest, RetryDownload, IOException {
byte data[] = new byte[Constants.BUFFER_SIZE];
// check just before sending the request to avoid using an invalid
// connection at all
checkConnectivity(state);
Response response = call.execute();
handleExceptionalStatus(state, innerState, response);
if (Constants.LOGV) {
Log.v(Constants.TAG, "received response for " + mInfo.mUri);
}
processResponseHeaders(state, innerState, response);
InputStream entityStream = openResponseEntity(state, response);
transferData(state, innerState, data, entityStream);
}
可以看到这个下载工具用到okhttp这个开源库进行网络的请求。使用okhttp得到了Response对象。
- 先分析processResponseHeaders()这个方法,这个方法中会获取Http请求的header,同时,根据这次下载是否为断点下载,如果是则返回,如果不是,则会把要下载的文件的输入流对象保存到state.mStream变量中。
- 再分析openResponseEntity()这个方法。
1 | private InputStream openResponseEntity(State state, Response response) |
该方法是获取Response对象的输出流变量,最后是transferData()方法。1
2
3
4
5
6
7
8
9
10
11
12
13
14
15
16
17
18
19
20
21
22
23private void transferData(State state, InnerState innerState, byte[] data,
InputStream entityStream) throws StopRequest {
for (; ; ) {
int bytesRead = readFromResponse(state, innerState, data,
entityStream);
if (bytesRead == -1) { // success, end of stream already reached
handleEndOfStream(state, innerState);
return;
}
state.mGotData = true;
writeDataToDestination(state, data, bytesRead);
innerState.mBytesSoFar += bytesRead;
reportProgress(state, innerState);
if (Constants.LOGVV) {
Log.v(Constants.TAG, "downloaded " + innerState.mBytesSoFar
+ " for " + mInfo.mUri);
}
checkPausedOrCanceled(state);
}
}
可以看到,这是一个for(;;)死循环,用于读取下载的文件流。
- 先调用readFromResponse()函数,从文件输出流中读取数据,保存到data字节数组中。
- 然后调用writeDataToDestination()数,把data字节数组中的数据写到本地的文件中。
- 然后调用reportProgress()数,把已下载的文件的大小更新到数据库中。用于更新进度条的显示。
可以看到checkPauseOrCanceled()数。这是实现暂停下载的关键函数。1
2
3
4
5
6
7
8
9
10
11
12private void checkPausedOrCanceled(State state) throws StopRequest {
synchronized (mInfo) {
if (mInfo.mControl == Downloads.CONTROL_PAUSED) {
throw new StopRequest(Downloads.STATUS_PAUSED_BY_APP,
"download paused by owner");
}
}
if (mInfo.mStatus == Downloads.STATUS_CANCELED) {
throw new StopRequest(Downloads.STATUS_CANCELED,
"download canceled");
}
}
可以分析,这里会根据下载任务的当前状态进行判断,如果当前的任务状态被更改为Downloads.CONTROL_PAUSED时,就会抛出StopRequest的异常,当前的文件下载就会被终止,这样就可以实现暂停下载了。
到此为止,DownloadManager下载的整个流程就分析完了。
拓展
通过上面的分析,我们几乎理解了DownloadManager的整个工作流程。在我们下载文件的时候,我们几乎都是需要暂停下载和继续下载还有断点续传的功能。DownloadProvider代码是可以让我们能够实现这个功能了。
实现断点续传的原理其实就是我们每次添加下载任务,都会把任务的信息保存到数据库中,包括下载的URL,已下载的文件大小,总的文件大小。下次我们再进行下载的时候,把已下载的大小传到服务器中,就可以从上一次已下载的文件的基础上继续下载,就可以实现断点下载了。
暂停下载和继续下载的实现,其实只需要更新下载任务的状态就可以实现了。因为从上面的下载可以知道,在下载文件的过程中,都会检验当前的下载任务的状态,若是暂停状态,就会停止下载,跳出死循环。当我们再次改变状态为继续下载时,下载任务会被再次启动。
来源:
http://blog.csdn.net/carrey1989/article/details/8060155
http://blog.csdn.net/garment1991/article/details/54178557
http://www.trinea.cn/android/android-downloadmanager-pro/