概要
在使用 HttpURLConnection前应对一些基础概念有所认识,比如 TCP/IP 协议,HTTP 报文, Socket 等。
- Socket是 TCP 协议层的概念,如果要使用 Socket 直接通信,需要使用远程地址和端口号。其中,端口号根据具体的协议而不同,比如 HTTP 协议默认使用的端口号为 80/tcp。
- HttpURLConnection 是在底层连接上的一个请求,最终也是通过 Socket 连接网络,所谓的 underlaying Socket。使用 HttpURLConnection 不需要指定远程地址和端口号。
- HttpURLConnectionU 只是一个抽象类,只能通过 url.openConection() 方法创建具体的实例。严格来说,openConection() 方法返回的是 URLConnection 的子类。根据 url 对象的不同,如可能不是 http:// 开头的,那么 openConection() 返回的可能就不是 HttpURLConnection。
⚠️ 由于Android是基于java开发,因此关于http请求也是基于HttpURLConnection实现的,但是在android API 23之前的sdk提供过HttpClient网路请求处理类,它们区别如下:
- 标准Java接口(java.NET) —-HttpURLConnection,可以实现简单的基于URL请求、响应功能;
- Apache接口(org.appache.http)—-HttpClient,使用起来更方面更强大,不易扩展;
请求流程
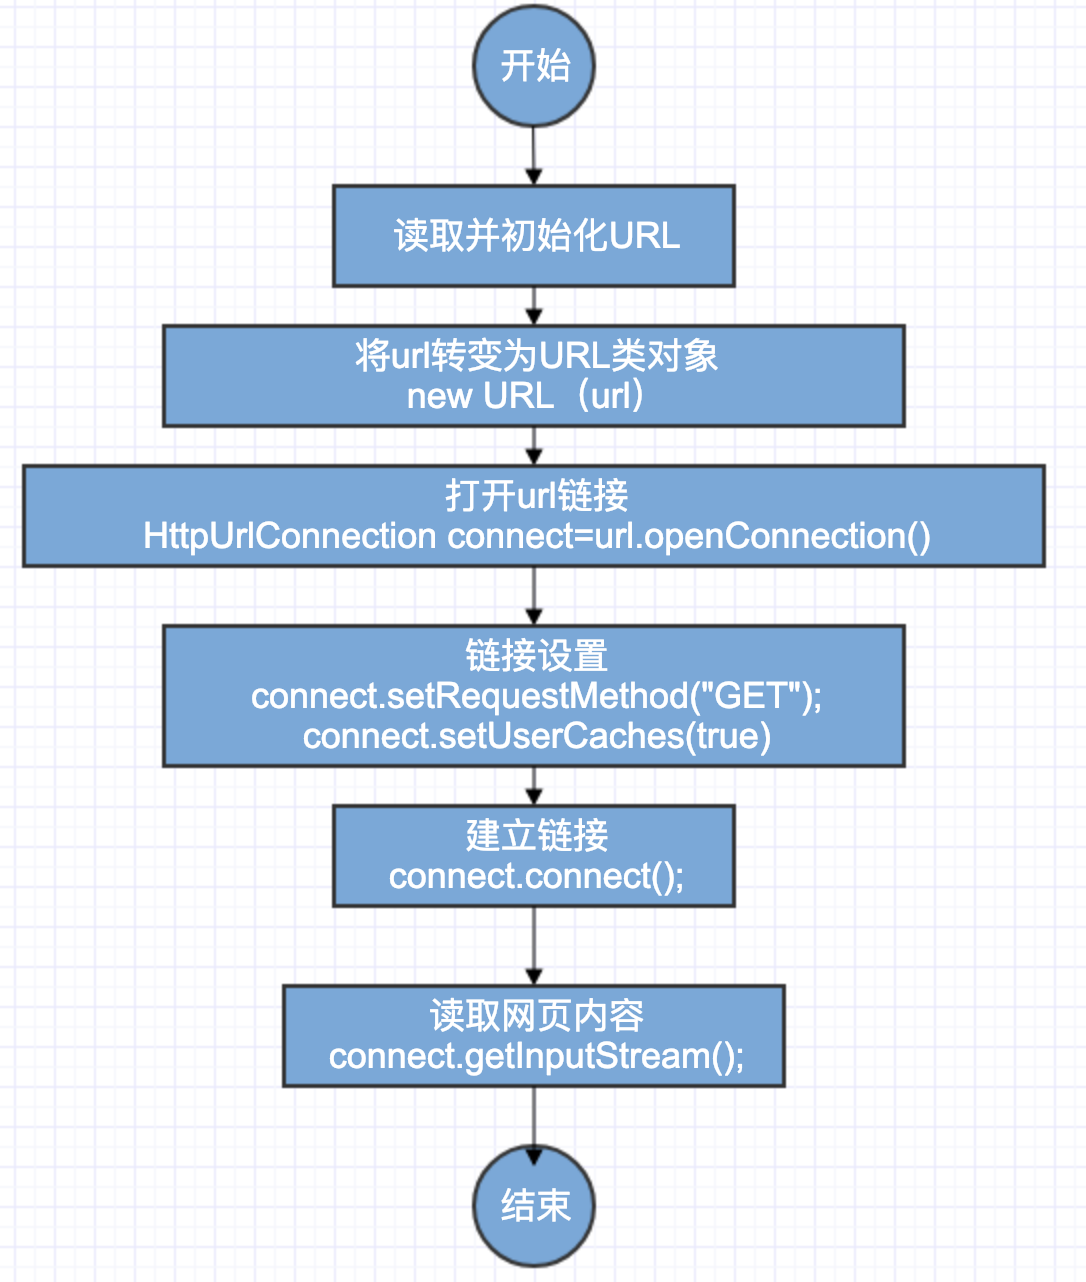
首先看一个简单的GET请求:1
2
3
4
5
6
7
8
9
10
11
12
13
14
15
16
17
18
19
20
21
22
23
24
25
26
27
28
29
30
31
32
33
34
35
36
37
38try {
//构建URL对象
URL url = new URL(requestUrl);
//获取HttpURLConnection实例,httpurlconnection为同步请求
HttpURLConnection connection = (HttpURLConnection) url.openConnection();
//设置请求方法
connection.setRequestMethod("GET");
//设置链接超时时间
connection.setConnectTimeout(10000);
//设置读取超时时间
connection.setReadTimeout(15000);
//添加Header
connection.setRequestProperty("Connection", "keep-Alive");
//建立链接,请求前需设定请求行、请求报头;
connection.connect();
StringBuffer response = new StringBuffer();
BufferedReader reader;
if (connection.getResponseCode() == HttpURLConnection.HTTP_OK) {
//将响应流转换成字符串,响应流只能读取一次
reader = new BufferedReader(new InputStreamReader(connection.getInputStream()));
String line;
while ((line = reader.readLine()) != null) {
response.append(line);
}
System.out.println(response.toString());
} else {
reader = new BufferedReader(new InputStreamReader(connection.getErrorStream()));
String line;
while ((line = reader.readLine()) != null) {
response.append(line);
}
System.out.println(response.toString());
}
} catch (MalformedURLException e) {
e.printStackTrace();
} catch (IOException e) {
e.printStackTrace();
}
⚠️:对于get请求
- url与参数之间用?隔开。
- 键值对中键与值用=连接。
- 两个键值对之间用&连接。
请求属性设置
- setRequestMethod:设定请求的方法,默认是GET
- setDoInput:设置是否从httpUrlConnection读入,默认情况下是true;
- setDoOutput:设置是否向httpUrlConnection输出,为post请求时,参数要放在http正文内,因此需要设为true, 默认情况下是false;
- setUseCaches:设置是否使用缓存,Post请求不能使用缓存
- setConnectTimeOut:单位:毫秒,设置连接超时时间,如果不设置超时(timeout),在网络异常的情况下,可能会导致程序僵死而不继续往下执行。
- setReadTimeOut:单位:毫秒,设置读取超时时间
以上属性需要在调用 connect() 之前完成,调用connect()后就与服务器建立 Socket 连接,而连接以后,连接属性就不可以再修改;但是可以查询服务器返回的头信息了(header information)
请求头或响应头设置
HTTP请求允许一个key带多个用逗号分开的values,但是HttpURLConnection只提供了单个操作的方法:
- setRequestProperty: 设置HTTP HEAD 中的一些参数,如果参数存在则覆盖;
- addRequestProperty: 向HTTP HEAD 中的添加参数,允许一个key存在多个value;
发送URL请求
建立实际连接之后,就是发送请求,把请求参数传到服务器,这就需要使用outputStream把请求参数传给服务器:
- getOutputStream(),此处getOutputStream会隐含的进行connect(即:如同调用上面的connect()方法,所以在开发中不调用上述的connect()也可以)。
获取响应
请求发送成功之后,即可获取响应的状态码,如果成功既可以读取响应中的数据,获取这些数据的方法包括:
- getContent
- getHeaderField
- getInputStream
对于大部分请求来说,getInputStream和getContent用的最多的。
获取响应头标准信息通过以下方式获取:- getContentEncoding
- getContentLength
- getContentType
- getDate
- getExpiration
- getLastModifed
查询头信息信息:- getHeaderFieldKey
- getHeaderField
- getHeaderFields() 返回一个包含消息头所有字段的标准 map 对象
对于get请求一般不需要向http正文内写数据与发送数据,但对于post需要的
1 | //向服务端发送一个json内容请求,(这里的json可以替换成字符串或者文件等) |
小结:
- HttpURLConnection的connect()函数,实际上 只是建立了一个与服务器的tcp连接,并没有实际发送http请求。无论是post还是get,http请求实际上直到HttpURLConnection的getInputStream()这个函数里面才正式发送出去;
- 在用POST方式发送URL请求时,URL请求参数的设定顺序是重中之重, 对connection对象的一切配置(那一堆set函数都必须要在connect()函数执行之前完成。而对outputStream的写操作,又必须要在inputStream的读操作之前。 这些顺序实际上是由http请求的格式决定的。如果inputStream读操作在outputStream的写操作之前,会抛出例外:java.net.ProtocolException: Cannot write output after reading input;
- http请求实际上由两部分组成, 一个是http头,所有关于此次http请求的配置都在http头里面定义,一个是正文content。connect()函数会根据HttpURLConnection对象的配置值生成http头部信息,因此在调用connect函数之前,就必须把所有的配置准备好。
- 在http头后面紧跟着的是http请求的正文,正文的内容是通过outputStream流写入的,实际上outputStream不是一个网络流,充其量是个字符串流,往里面写入的东西不会立即发送到网络,而是存在于内存缓冲区中,待outputStream流关闭时,根据输入的内容生成http正文。至此,http请求的东西已经全部准备就绪。在getInputStream()函数调用的时候,就会把准备好的http请求正式发送到服务器了,然后返回一个输入流,用于读取服务器对于此次http请求的返回信息。由于http 请求在getInputStream的时候已经发送出去了(包括http头和正文),因此在getInputStream()函数 之后对connection对象进行设置(对http头的信息进行修改)或者写入outputStream(对正文进行修改)都是没有意义的了,执行这些操作会导致异常的发生。
⚠️: HTTP 传输的消息要使用 URL UTF-8 编码,英文字母、数字和部分符号保持不变,空格编码成’+’。其他字符编码成 “%XY” 形式的字节序列,特别是中文字符,不能直接传输。可以考虑使用
URLEncoder.encode(string, “UTF-8”) 方法。HttpURLConnection 只能发送一个请求
简单的上传文件
基础的文件上传
在post请求传递参数时知道,可以从连接中得到一个输出流,输出流可以像服务器写数据。同理,可以使用这个输出流将文件写到服务器。代码如下:1
2
3
4
5
6
7
8
9
10
11
12
13
14
15
16
17
18
19
20
21
22
23
24
25
26
27
28
29
30
31
32
33
34
35
36
37
38
39
40try {
URL url = new URL(getUrl);
HttpURLConnection connection = (HttpURLConnection) url.openConnection();
connection.setRequestMethod("POST");
connection.setDoOutput(true);
connection.setDoInput(true);
connection.setUseCaches(false);
connection.setRequestProperty("Content-Type", "file/*");//设置数据类型
connection.connect();
OutputStream outputStream = connection.getOutputStream();
//这里的file即为需要上传的文件
FileInputStream fileInputStream = new FileInputStream("file");//把文件封装成一个流
int length = -1;
byte[] bytes = new byte[1024];
while ((length = fileInputStream.read(bytes)) != -1){
outputStream.write(bytes,0,length);//写的具体操作
}
fileInputStream.close();
outputStream.close();
int responseCode = connection.getResponseCode();
if(responseCode == HttpURLConnection.HTTP_OK){
InputStream inputStream = connection.getErrorStream();
if (null != inputStream) {
reader = new BufferedReader(new InputStreamReader(mConnection.getErrorStream()));
String line;
while ((line = reader.readLine()) != null) {
response.append(line);
}
} else {
response.append(mConnection.getResponseMessage());
}
connection.disconnect();
System.out.println(response.toString());
}
} catch (Exception e) {
e.printStackTrace();
}通过multipart上传文件或者参数
代码如下:1
2
3
4
5
6
7
8
9
10
11
12
13
14
15
16
17
18
19
20
21
22
23
24
25
26
27
28
29
30
31
32
33
34
35
36
37
38
39
40
41
42
43
44
45
46
47
48
49
50
51
52
53
54
55
56
57
58
59
60
61
62
63
64
65
66
67
68
69
70
71
72
73
74
75
76
77
78
79
80
81
82
83
84
85
86
87
88
89
90
91
92
93
94
95
96
97
98
99
100
101
102
103
104
105
106
107
108
109
110
111
112
113
114
115
116
117
118
119
120
121
122
123
124
125
126
127
128
129
130
131
132
133
134
135
136
/**
 * This utility class provides an abstraction layer for sending multipart HTTP
 * POST requests to a web server.
 *
 * @author www.codejava.net
 */
public class MultipartUtility {
    private final String boundary;
    private static final String LINE_FEED = "\r\n";
    private HttpURLConnection httpConn;
    private String charset;
    private OutputStream outputStream;
    private PrintWriter writer;

    /**
     * * This constructor initializes a new HTTP POST request with content type
     * * is set to multipart/form-data
     * * @param requestURL
     * * @param charset
     * * @throws IOException
     */
    public MultipartUtility(String requestURL, String charset)
            throws IOException {
        this.charset = charset;

        // creates a unique boundary based on time stamp
        boundary = "---" + System.currentTimeMillis() + "---";

        URL url = new URL(requestURL);
        httpConn = (HttpURLConnection) url.openConnection();
        httpConn.setUseCaches(false);
        httpConn.setDoOutput(true); // indicates POST method
        httpConn.setDoInput(true);
        httpConn.setRequestProperty("Content-Type",
                "multipart/form-data; boundary=" + boundary);
        outputStream = httpConn.getOutputStream();
        writer = new PrintWriter(new OutputStreamWriter(outputStream, charset),
                true);
    }

    /**
     * * Adds a form field to the request
     * * @param name field name
     * * @param value field value
     */
    public void addFormField(String name, String value) {
        writer.append("--" + boundary).append(LINE_FEED);
        writer.append("Content-Disposition: form-data; name=\"" + name + "\"")
                .append(LINE_FEED);
        writer.append("Content-Type: text/plain; charset=" + charset).append(
                LINE_FEED);
        writer.append(LINE_FEED);
        writer.append(value).append(LINE_FEED);
        writer.flush();
    }

    /**
     * * Adds a upload file section to the request
     * * @param fieldName name attribute in <input type="file" name="..." />
     * * @param uploadFile a File to be uploaded
     * * @throws IOException
     */
    public void addFilePart(String fieldName, File uploadFile)
            throws IOException {
        String fileName = uploadFile.getName();
        writer.append("--" + boundary).append(LINE_FEED);
        //⚠️这里的fileName为表单指定的name值
        writer.append(
                "Content-Disposition: form-data; name=\"" + fieldName
                        + "\"; filename=\"" + fileName + "\"")
                .append(LINE_FEED);
        writer.append(
                "Content-Type: "
                        + URLConnection.guessContentTypeFromName(fileName))
                .append(LINE_FEED);
        writer.append("Content-Transfer-Encoding: binary").append(LINE_FEED);
        writer.append(LINE_FEED);
        writer.flush();

        FileInputStream inputStream = new FileInputStream(uploadFile);
        byte[] buffer = new byte[4096];
        int bytesRead = -1;
        while ((bytesRead = inputStream.read(buffer)) != -1) {
            outputStream.write(buffer, 0, bytesRead);
        }
        outputStream.flush();
        inputStream.close();

        writer.append(LINE_FEED);
        writer.flush();
    }

    /**
     * * Adds a header field to the request.
     * * @param name - name of the header field
     * * @param value - value of the header field
     */
    public void addHeaderField(String name, String value) {
        writer.append(name + ": " + value).append(LINE_FEED);
        writer.flush();
    }


    /**
     * * Completes the request and receives response from the server.
     * * @return a list of Strings as response in case the server returned
     * * status OK, otherwise an exception is thrown.
     * * @throws IOException
     */
    public List<String> finish() throws IOException {
        List<String> response = new ArrayList<>();

        writer.append(LINE_FEED).flush();
        writer.append("--" + boundary + "--").append(LINE_FEED);
        writer.close();

        // checks server's status code first
        int status = httpConn.getResponseCode();
        if (status == HttpURLConnection.HTTP_OK) {
            BufferedReader reader = new BufferedReader(new InputStreamReader(
                    httpConn.getInputStream()));
            String line;
            while ((line = reader.readLine()) != null) {
                response.add(line);
            }
            reader.close();
            //关闭链接
            httpConn.disconnect();
        } else {
            throw new IOException("Server returned non-OK status: " + status);
        }
        return response;
    }
}
测试代码如下:1
2
3
4
5
6
7
8
9
10
11
12
13
14
15
16
17
18
19
20
21
22
23
24
25
26File directory = new File("");//参数为空
String author = directory.getAbsolutePath();
String charset = "UTF-8";
File uploadFile1 = new File(author + "aop.png");
String requestURL = "http://xxxxx/upload";
try {
MultipartUtility multipart = new MultipartUtility(requestURL, charset);
multipart.addFormField("description", "Cool Pictures");
multipart.addFormField("keywords", "Java,upload,Spring");
//
multipart.addFilePart("file", uploadFile1);
List<String> response = multipart.finish();
System.out.println("SERVER REPLIED:");
for (String line : response) {
System.out.println(line);
}
} catch (IOException ex) {
System.err.println(ex);
}
七请求输出如下:1
2
3
4
5
6
7
8
9
10
11
12
13
14
15
16
17
18-----1550237637934---
Content-Disposition: form-data; name="description"
Content-Type: text/plain; charset=UTF-8
Cool Pictures
-----1550237637934---
Content-Disposition: form-data; name="keywords"
Content-Type: text/plain; charset=UTF-8
Java,upload,Spring
-----1550237637934---
Content-Disposition: form-data; name="file"; filename="aop.png"
Content-Type: image/png
Content-Transfer-Encoding: binary
......//二进制数据
-----1550237637934---
其中—–1550237637934—代表一个数据块的开始或结束,这个数据需要在头文件中指定,如上文中的boundary。
⚠️http最早出现时就是为了浏览器与服务器之间的数据传输,所以有固定的协议,协议规范了一定的数据格式,所以在浏览器中传递数据时会自动按照一定的格式封装。在android中不能自动封装,所以这些操作需要手动操作。
- 下载文件
从服务器下载文件是比较简单的操作,只要得到输入流,就可以从流中读出数据。使用示例如下:1
2
3
4
5
6
7
8
9
10
11
12
13
14
15
16
17
18
19
20
21
22
23
24
25
26try {
String urlPath = "https://www.baidu.com/";
URL url = new URL(urlPath);
HttpURLConnection connection = (HttpURLConnection) url.openConnection();
connection.setRequestMethod("GET");
connection.connect();
int responseCode = connection.getResponseCode();
if(responseCode == HttpURLConnection.HTTP_OK){
InputStream inputStream = connection.getInputStream();
File dir = new File("fileDir");
if (!dir.exists()){
dir.mkdirs();
}
File file = new File(dir, "fileName");//根据目录和文件名得到file对象
FileOutputStream fos = new FileOutputStream(file);
byte[] buf = new byte[1024*8];
int len = -1;
while ((len = inputStream.read(buf)) != -1){
fos.write(buf, 0, len);
}
fos.flush();
}
} catch (Exception e) {
e.printStackTrace();
}
注意
- 对于有些请求服务可能会对客户端进行过滤,如是否是浏览器,是否为android手机等客户端:
这个主要看头部信息的user-agent,如设定客户端为浏览器:1
2connection.setRequestProperty("user-agent",
"Mozilla/5.0 (Windows NT 6.3; WOW64) AppleWebKit/537.36 (KHTML, like Gecko) Chrome/51.0.2704.7 Safari/537.36");
参考:
[1] http://www.blogjava.net/supercrsky/articles/247449.html
[2] https://blog.csdn.net/woxueliuyun/article/details/43267365
[3] https://www.codejava.net/java-se/networking/upload-files-by-sending-multipart-request-programmatically
[4] https://www.techcoil.com/blog/how-to-upload-a-file-via-a-http-multipart-request-in-java-without-using-any-external-libraries/